A couple of months ago I bought a copy of Country Woodcraft: Then & Now by Drew Langsner. It’s a beautiful book that dives deep into everything from felling and hewing logs, to building and sharpening tools, to creating everyday items like rakes, stools, buckets and bowls. It even covers handmade farm implements like plows and harrows — super-fun to learn about, but probably not high on my personal list of essentials. The original book was published in the 70s and was updated last year. Highly recommended.
After reading the chapter on spoon carving earlier this month, I happened to be clearing out some winterfall maple branches from the back of our yard in Bellevue, so I cut a few chunks and tucked them away for a rainy day experiment. Yesterday turned out to be that day!
Here’s the thing though — turns out that spoon carving is kind of the macrame of woodworking. YouTube is downright brimming with videos on YouTube talking about finding the spoon in the wood and connecting with the spirit of our ancestors through cutlery. Look, there’s more than a little hippie in me too, but seriously people.
I guess that’s why I’ve enjoyed Country Woodcraft so much. It’s incredibly detailed and richly illustrated and isn’t shy about natural and constructed beauty — it’s just that they emerge primarily from function. Consolidating this particular endeavor down to the essentials:
Get a spoon-sized piece of wood. Grain should be parallel to the length. Avoid the pith.
Whittle it into a spoon shape. Don’t cut yourself.
Sand and finish it.
You now have a spoon.
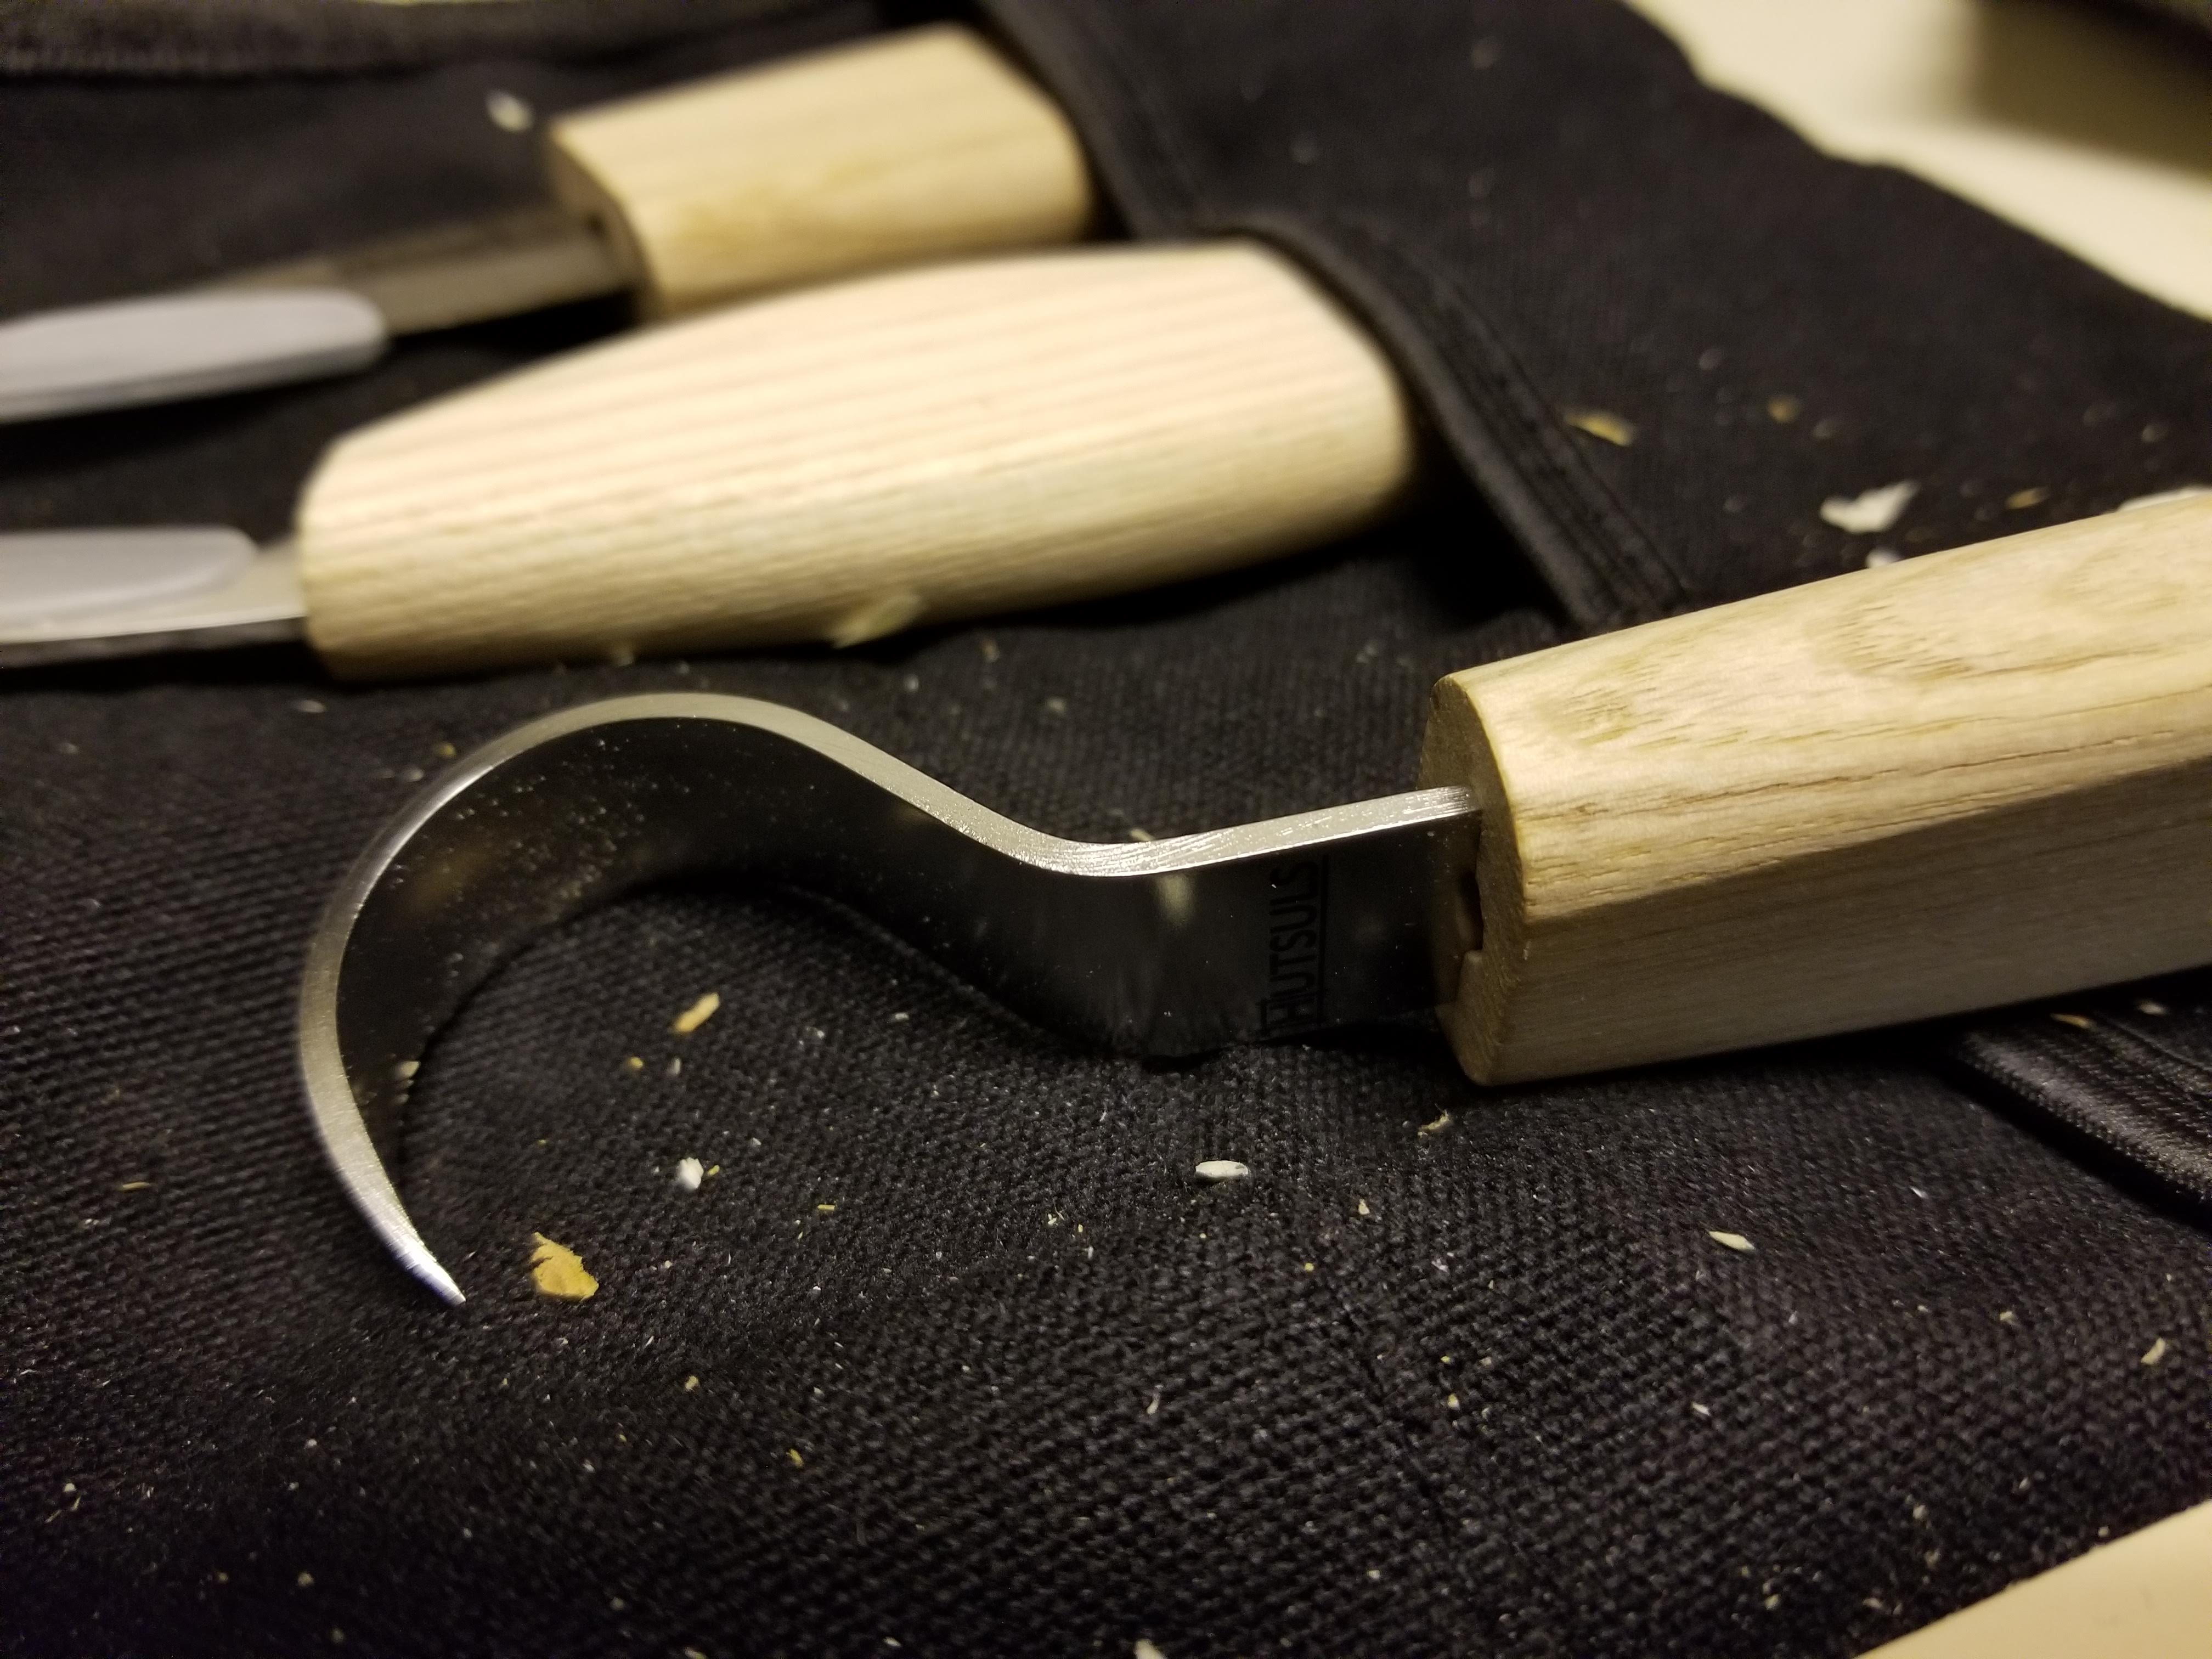
Don’t get me wrong, there is clearly bigtime craft here that takes work and practice. You need sharp knives and hollowing out the bowl requires time, care and patience (I used a hook knife, but a lot of folks use gouge chisels). Deep ladles and such require steam or other bending techniques. My amateur attempt is painfully clumsy compared to real carvers, but it makes me happy nonetheless.
I doubt that fine carving is in my future — years of repetitive workplace stress on the fingers and wrists have taken a toll on my dexterity. Thankful for the big bottle of Advil in the medicine cabinet! But I always value the opportunity to appreciate the work that goes into creating even the simplest objects and tools. Fun stuff!
And next time there is pasta sauce to be stirred at the Nolans — we are golden.
My personal architectural aesthetic was pretty much locked into place by the 1960 Disney movie Swiss Family Robinson. I mean sure, they had materials from the wrecked ship to work with, but running water, a piano and a skylight in the master bedroom of a jungle treehouse? That is living my friend. I will never forgive Disney for retheming their home with some stupid Tarzan noise.
Anyways. There is a little corner of our property here on Whidbey that bumps up against a shared road-end lot. We need a fence there to keep our dog in (and others out), but it’s also the only direct access to the ocean-side yard, so we need a gate that can open. Time for some driftwood construction, Swiss Family Robinson style!
Turns out that getting random driftwood constructs square enough to hang evenly, swing freely and latch securely is a little harder than it looks. But eventually we got there, with beautiful finishing decoration courtesy of my daughter Alex, who at 27 still can rock the deserted island vibe.
The rule was that (excepting hardware) the structure could use only driftwood pulled off of the beach. I cheated in two places — first, I didn’t pour concrete footings, but did bury short treated posts in the ground under each leg, secured with lengths of rebar between. I also cut a circle out of marine-grade plywood for Alex to mount the sunburst pieces on. Good to have those off my conscience.
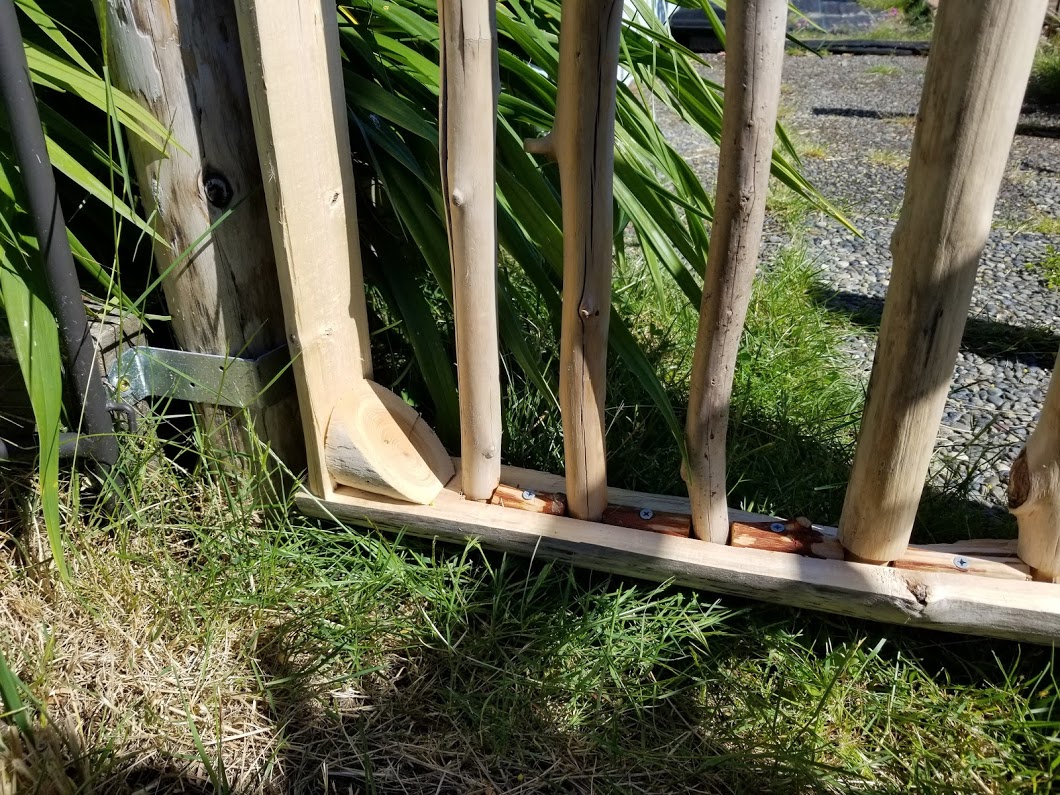
The framing rails of the gate came from branches about 5″ diameter that I cut in half lengthwise using multiple wedges. Branches of this diameter almost always naturally split while they dry, and unfortunately the lines they choose are rarely square (knots don’t help!) so this took a few tries to get right. My super-awesome (and cheap) new electric planer evened out the flat sides pretty well and little 90-degree chucks at the corners kept things stable.
I routed channels on the top and bottom rails, and then went hunting for the vertical pieces to lock into them. My favorite part of this was using the router table to create little round tenons that fit into the slot. Final assembly was a bit of a challenge — bungee cords did a great job of holding it all together while leaving enough flexibility to pop the slats into place.
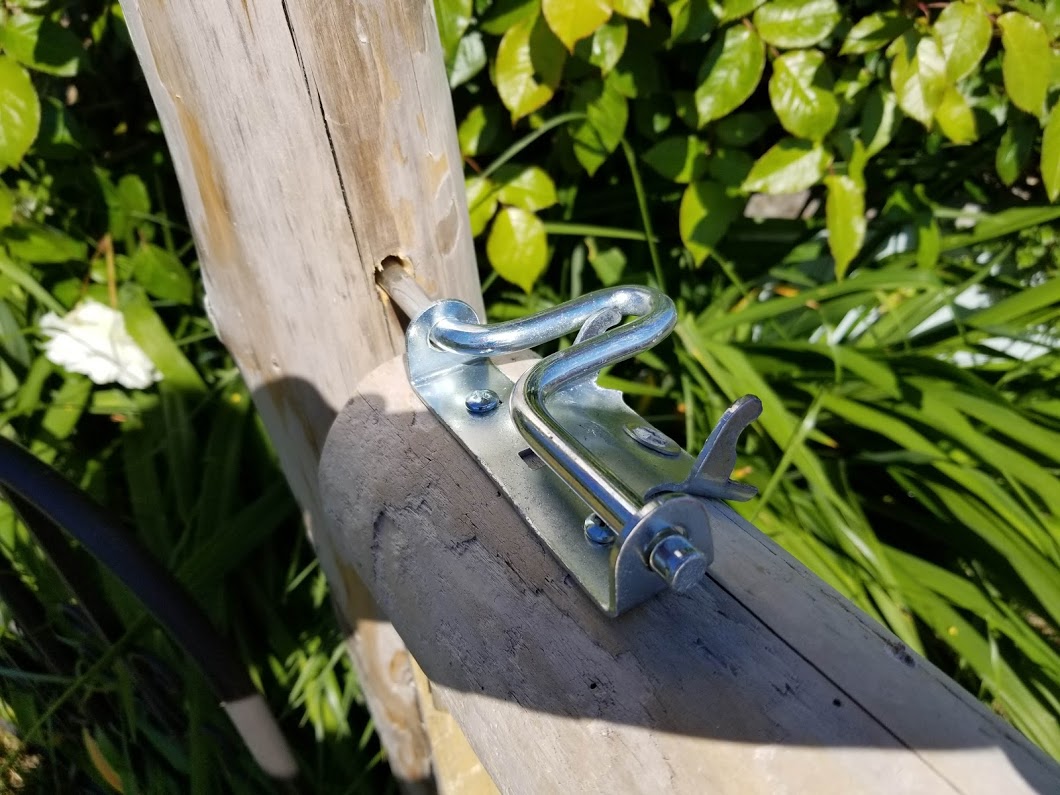
Honestly, the thing that worried me the most was the hanging hardware. This ain’t construction-grade wood here folks, and even a small gate hung on one side creates a bunch of downward torque. But as always, staring vacantly at hardware shelves (thanks Sebo!) for a half hour did the trick — A couple of big screw hooks and galvanized eyebolts were easy to adjust and make it easy to just lift the gate off if needed. Reshaped a standard latching bolt with my beloved angle grinder (and a hammer) and holy crap it actually all came together.
Alex’s contribution really makes the look. She spent a ton of time picking little pieces and getting them arranged into the sunburst — turns out little super-thin drywall screws do the best job at securing fragile wood bits without splitting them.
Next up, a log bench on the waterside with a nice backrest for enjoying summer evenings with a short pour of classy whiskey (Fireball). On it!
A few months ago I made a batch of table salt from Puget Sound seawater (just like my hero Ruth Goodman). It was surprisingly easy; the only finicky part was siphoning off the clear water after letting all the gunk settle to the bottom. From there it was just a slow not-quite-boil until all that was left was the final product. It tastes great and is perfect for cooking or finishing, but the grains were just a little too big for a shaker. Easily fixed with a mortar and pestle, but we didn’t have one in the house. Ah well.
Fast forward to last week. All of my inside projects were on hold drying or missing parts, and it was too rainy to work outside. The perfect time for a “little project” — something self-contained that can go from start to finish in a few hours. Maybe, say, a mortar and pestle?
I’m a big believer in these bite-sized little enterprises. Changing scope from broad to narrow (and back) has always felt like good exercise for my brain. The problems in a little project are more constrained, and the stakes are usually lower because sunk cost can only grow so big in a day or two. This was particularly true at work, where each week I’d try to take at least a half day to close my email and dive deep into some knotty but tractable nugget of code.
The Mortar
I found a chunk of alder in my stash to yield a 5” or so shallow bowl. It seemed smart to turn it with vertical grain, so that grinding pressure would be against the stronger ends. And the bowl itself needed to have a shallow slope to avoid nooks and crannies where stuff could hide from the pestle.
Simple enough, and the coloring that emerged was super-nice. I did find a couple of weird soft spots while shaping the inside, but not bad enough to make a big difference — a little homemade sawdust-and-wood-glue filler did the trick. After sanding, I cut the bottom with my awesome new ryoba saw (happy birthday to me) and….
…Well crap. It turns out that the chunk of wood I picked was leftover from a past project. Those little soft spots on the inside were the ends of two of four screw holes that I totally missed when mounting the block, now gaping out at me from the bottom of this beautiful little bowl. Ugh. I filled them with more of the sawdust putty and it’s “fine” but definitely a bummer. Pay attention, Nolan!
On the upside, the coloration got even better after finishing the piece with (food safe) mineral oil. I’ve made a few pieces out of this alder (it fell on the beach last Fall) and used epoxy, paste wax and a couple of other finishes … this one is definitely my fav.
The Pestle
Using the same theory of end-grain strength I found a smallish branch piece (more leftovers, this time from a set of building blocks for my nephew and niece) that was largely straight and about six inches long. This should be the easy part, right?
Well, the shape of a pestle is interesting. Obviously the business end needs to be rounded into a shape to fit the bowl, maximizing surface area for the grind. I’m somewhat embarrassed to admit that I rough-shaped this with my bench grinder. Kind of like using an ICBM to kill a bug, but sure was quick!
At first I thought I’d just leave the rest of the pestle with it’s natural cylindrical branch shape. This was a very bad idea. Suffice to say that the end result looked more like something sold by “Adam & Eve” than by Williams Sonoma. Researching a little online, I learned that the classic tapered-towards-the-top shape not only looks better, but is more functional as well — it doesn’t slip upwards in your grip as you press down on the mortar. I am definitely not a “the old ways are always the best” kind of guy, but it is striking how often seemingly-arbitrary everyday design elements have evolved that way for good reason. Anyways, I whittled the pestle into shape and then smoothed it down for finishing.
Done!
The final product looks nice in our kitchen and does the job it was made for. A few fun problems, beautiful natural materials and time well spent. Now, back to the more complicated projects! I am probably halfway through a working SMART on FHIR implementation and look forward to writing that one up soon. Always, always fun things to make and learn.
Over the last couple of years I’ve gone from being an amateur woodworker to still an amateur woodworker. Mostly I’ve learned first-hand how much I respect the craftspeople who have invested a lifetime really understanding the materials, tools and techniques involved. I’ve watched my wife develop that mastery in textiles over decades, but nothing hammers it home like trying to create something yourself (please appreciate the hammer joke).
Anyways, along this journey I’ve noticed that there is a striking similarity between woodworkers and software developers — both groups spend at least as much time making tools-to-make-stuff as they do actually making stuff.
Routers are Magic
My latest experience with this in the woodshop started with a burl from a huge first-growth fir stump a little way down the beach. After using it to create some fun pieces on the lathe, I was left with a nice slab that had qualities of both the burl and the healthy tree — perfect for a coffee table centerpiece.
I cut the slab with my chainsaw, so it was pretty uneven — task #1 was to flatten it up. Typically I’d do this with my planer, but read this gem in the manual: “DO NOT PLANE END GRAIN, AS THE WOOD COULD SPLINTER OR POSSIBLY EXPLODE.” Explode? While I’d like to see that, I would prefer not to experience it. Instead, enter the router sled. A sled holds a router at a fixed height over the work table, allowing the user to pass a flat cutting bit in “scan lines” over the piece until it’s even. Of course, I didn’t have such a device.
Time for a tool project! Figuring out how to build a sled that would work in my shop took a little research, but a day later I had a workable setup. A little fine-tuning and a lot of sawdust later — success!
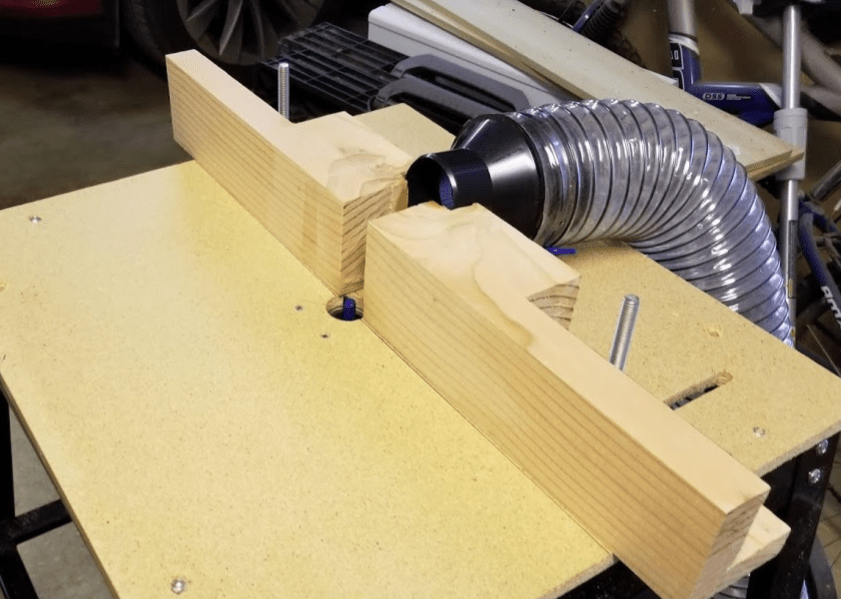
Next up, trimming the edges, which were pretty damaged and brittle from years on the beach. The trick here was to follow the natural contours of the piece — I didn’t want to lose the live edge, just make sure it wasn’t going to be too sharp or break off. A straight-bit router would do the job, but it would be really hard to guide the tool smoothly around the slanted and uneven surface.
Another tool project! This time to create a router table, which allows the bit to project up from underneath. In this configuration, I could slide the piece around the bit rather than the other way around. Took another day to build the table, but it worked great and I even added a little mount for my dust collector, so little less sawdust this time.
More work to do before this one is finished: adding some etching to the top of the slab, pouring the epoxy coating and cutting a cork pad for the bottom. But the centerpiece is well on its way after only two days worth of toolmaking side trips, and of course those tools are ready at hand the next time I need them. Woo hoo!
Back to Software
Back in front of the computer, I thought it’d be useful to write some code demonstrating SMART on FHIR, a pair of technologies that make it easier to add new functionality to the Electronic Medical Record systems in use at most hospitals and healthcare practices these days. I’m actually optimistic about this approach and it’s worthy of a little evangelism.
But even for learning purposes, I don’t like to write code that isn’t at least a little useful, so first I had to figure out what my SMART on FHIR app would actually do. It turns out that clinicaltrials.gov (the US government’s central database of human trials) has a nice search API, so I thought a little plugin that would match a patient’s record with potential trials would be a good place to start.
Sitting down to write the class encapsulating this search, of course I needed a way to make HTTP calls from Java. There are a million libraries for this, but dependencies suck. JDK11 has a nice HttpClient class, but with so many folks still on JDK8 I didn’t want to limit the audience. That leaves us with the old workhorse, HttpUrlConnection. It’s a fine class and I’ve used it in a few articles already, but it requires a bunch of scaffolding and has some quirks that can quickly cause issues in production use.
Tool time! Turns out I won’t be writing about EMRs until next article, because right now we’re going to take a little side trip into the seductive-but-oft-abused world of building software tools and utilities.
First, is it worth it?
Building tools is just fun. There is something incredibly satisfying about creating a tidy and effective interface that does something useful and self-contained. They are usually easy to test well with automation. And you can’t beat that little dopamine hit every time they prove useful.
But bad tools are the worst. The wooorst. They look reusable, but are really tied to whatever unique use case the creator was worried about. Or they work great in a prototype but ignore important production stuff like logging or timeouts. Maybe they have hidden restrictions that aren’t enforced or documented. If you’ve written production code for any length of time, you’ve been there.
So the first questions to ask are — (1) is this tool really something that will be reused; (2) do you really understand those use cases; and (3) are you really committed to make it something usable? Until all of these are obvious yesses, Just Say No. Do some basic modularization within your own feature space and file it away until the next time something similar comes up. In my experience, the third time you see a problem is usually about the right time to go full tool on it.
HTTP Requests
It is a pretty rare system these days that doesn’t make remote calls to some other service using HTTP. The vast majority of the time, consumers of these services basically just want network calls to act like local ones:
They return synchronously.
They time out reasonably.
They are secure, or at least not gratuitously insecure.
They accept and return Java objects, not wire types.
Truth be told, most consumers write their features as if these things are true regardless of what their HTTP library actually does. And because usually remote calls return quickly without errors, those assumptions easily make it through development and basic testing. It’s only in production (where everything happens) that things go south.
This reality is why you need an easy-to-use library built for production. It will dramatically reduce the number of times you have to re-visit features to add timeouts or error handling or other crap that should have been there to begin with. In short — it’s worth it.
Side note — “it’s worth it” even if you’re using a robust third-party HTTP library as your underlying implementation. These libraries are generic by design. You’ll reap all the same benefits by pre-wiring them to your specific configuration and logging services, and by reducing optionality using your own façade.
WebRequests.java
The first version of my tool for web requests is in WebRequests.java. Basic use of the library is simple by design:
Good tool design starts with the first line in this snippet. Default constructors hide settings that a user really ought to think about, but forcing a bunch of explicit/arbitrary choices up front makes the tool hard to adopt. As with so many other things, we try to find balance. Users must be aware that the Config class exists, and the options are crystal clear (see lines 29-36), but they can inherit a set of defaults that were thought through with production environments in mind.
The Async Morass
Network IO really needs to be done asynchronously — the amount of time spent waiting on network activity is huge and can cause havoc in your main threads. But async coding is absolutely crap to get right, and the callback constructs built into modern environments
Create {
	The worst {
		Nesting {
			Disasters {
				Ever {
					No Seriously {
						I’m going to lose it. {
}}}}}}}
Blocks are for variable and condition scoping. I’ve learned to live with them for Exception handling. Using them to keep track of threading, especially beyond a single callback, is nuts. And don’t start yammering about “comprehensions” because you can’t debug those either.
Look, ok — complex things are complex (lines 116-181) and being really careful you can manage it. But in most real world situations, quality code should read for and be organized around logical behavior, not threading implementations.
We deal with this in WebRequests by hiding an ExecutorService inside the class. “get” methods appear synchronous to consumers, but coordinate behind the scenes, and are guaranteed to return control to the calling thread within their timeouts. This isn’t particularly easy to do with HttpUrlConnection (note the syncFutures stuff starting at line 205), and there are some edge cases that will leave worker threads in a temporarily zombie-ish state, but they won’t gum up the primary threads of the application.
For complex use cases, the class offers up the CompletableFuture directly through getAsync … but I doubt that ever sees much use.
The biggest downside to this approach is that the consumer needs to close() the tool at shutdown time, or whenever they want to reclaim resources. This is an annoyance for sure, but on balance I like the tradeoff. If the user doesn’t eventually call close, process shutdown will hang. We could “fix” this by setting our worker threads as daemons. But I like it as-is … the shutdown behavior is obvious and a good reminder to clean things up, making it easy to do the right thing.
Bounded Functionality, not Partial Implementation
WebRequests v1 is a solid and pretty much complete solution for common GET requests. It helps manage query string parameters, deals with IO and error cases, and returns data as a convenient String that can be parsed into JSON or whatever if necessary. What it does, it does well.
On the other hand, there are a few things it doesn’t pretend to support: POST, authentication, cookies, other custom headers (in or out), all kinds of things. “Not pretending” is the key to a good tool, which needs to be both great at and clear about what it does.
As a simple example, because we accept a Map of query string parameters, we escape them correctly and merge them into the base URL if it already includes parameters. Our public interface implies that we’ll do that, so we’d better deliver on the promise. But there is no place to specify a method … so clearly POST isn’t implemented.
The v1 functionality was a nice bite. It supports uses cases beyond our own as-is, but also provides a “home” for new functionality as we need it — inheriting all the goodness we worked hard to get right in the first revision.
ClinicalTrialsSearch and What’s Next
With WebRequests in hand, ClinicalTrialsSearch.java just wraps up the interface to clinicaltrials.gov with a simple object. There are some smarts there to try to make it easy to normalize data into the proper formats, but nothing earth-shattering, just handy. (I do like the way LegacyGender.java and StateProvince.java do this normalization themselves.)
Finally ready to pop up the stack and get back into SMART on FHIR — stay tuned for that. But first a little more time in the woodshop to finish up my centerpiece and a couple of other projects. Until next time!
I just finished this coaster using cherry-clad MDF with red acrylic inlays; both materials from an assortment I got from my valentine (she knows me well!). A few new techniques here that I had a lot of fun with.
The design was inspired by tiles we saw a few years ago at the Alhambra, created in Inkscape by composing a bunch of variations on a sixteen-point star. I am still a rank amateur with this app but am blown away by its power. The second and third rings were each created by overlapping two 16-point stars with different “spoke ratios” (the radius of the outer points divided by the radius of the inner point) and then taking the difference between the two areas. For the third ring I also trimmed out a circle so you got the five-sided end result.
the round-bottom points in the outer ring were created by distributing triangles and circles around the same circular path, breaking all the paths apart, and unioning each touching triangle and circle. That union bit at the end was critical to get a single cut around the edge.
I cut the design from the cherry sheet along the red lines in the screenshot, and engraved the circle in blue. I also cut out a solid circle the same size to act as a base. The trick from there was to cut the acrylic pieces so that they’d inlay perfectly into the wood.
This is way more complicated that you might imagine! First of all, the laser cuts with a tiny but meaningful “kerf” (the width of the cut itself). The kerf is different from material to material, which is why I added that little stub of red cut line outside the circle in the Inkscape screenshot. The width of that test cut measured .014″ using my calipers, which meant that the cutouts were really .007″ bigger than my design. Inkscape came to my rescue again with an “outset” feature that expanded all the shapes for the acrylic cuts.
But wait, there’s more. It turns out that the laser doesn’t make a perfectly vertical cut. It’s actually a cone shape with the point focused on the top edge of the material. This means the bottom of the cut is just a little bit wider that the top, screwing up the inlay fit. BUT (and this is cool), if you flip and reverse your design, you cancel that out and get a perfect match. This was super-simple given my symmetric design; I just flipped over each piece of acrylic before pressing it into place. I have to say it was deeply satisfying having each inlay just click into place so beautifully.
Since this was going to be a coaster, I poured two coats of clear epoxy resin over the whole thing, sanded down the drips and then cut out (thanks again Glowforge) a circle of self-adhesive 2mm cork for the bottom.
I’m quite proud of the end result! A lot of work for a simple coaster, but now that I’ve figured out the quirks, new designs should come together pretty quickly. So many neat concepts packed into that Glowforge.
Love the translucence in the material; maybe next project should be a candle lantern?
Before the epoxy pour, which shows off the fit a little better.