TLDR, drag this link to your bookmarks bar: explain. If you select medical-related text on any page and then click the link, it will open up an “explain” window with an AI-driven translation. Alternatively, you can just visit the site at https://explainmynotes.azurewebsites.net/.
Every day I seem to get just a little bit older. My folks too. Not a bad thing, but it does inevitably mean more time spent trying to navigate the clown show that is American Healthcare. Sometimes things are simple, and sometimes they’re little mystery dramas with House or Doc Martin trying to figure out what’s going on.
By now, most of us have gotten used to using patient portals like MyChart to keep track of our care at various providers. Lab results and clinical notes show up in near real time and — thanks to years of policy pressure — are quite comprehensive. (to wit: when I had appendicitis earlier this year, my wife at home texted me the diagnosis before anybody in the ER came to let me know what was up.)
Access to these primary sources is invaluable. But clinical notes are also full of jargon, shorthand, codes and concepts that very few of us understand. Take for example this short snippet from the surgery notes of my appendicitis visit:
I attempted to bring omentum to sit over the anastomosis, but the omentum was fairly short and there was no easy reach.
I read this shortly after coming out of anesthesia — something she tried to do didn’t work. Is that bad? Should I be concerned? Luckly, Dr. M is pretty awesome; she explained that the omentum is a layer of fat that protects organs in the abdomen, and they like to “drape” it over surgical sites to aid healing by enhancing local blood flow. Somehow despite my notable beer belly I didn’t have enough fat to make this work, but it’s not a big deal. Case closed.
Unfortunately, not every provider is a great communicator like Dr. M. And even when they are, appointments are so short and far-between that there’s rarely a good opportunity for questions like this. That’s why I wrote explain my notes.
Clinical Notes, explained by AI
explain my notes takes advantage of two pretty neat technologies: SMART on FHIR for data access and ChatGPT for helping to interpret the notes. Currently it’s set up to connect to providers using Epic MyChart. In a nutshell, it works like this:
Visit the site, read the terms of use and pick your provider.
Log in at the provider’s patient portal and approve the connection.
Pick an encounter to see a list of associated documents.
Pick a document to view its contents.
Select any text in the document and choose “Explain Selection” to pop up a window that shows the original and “explained” text side by side:
And that’s it! You’ll need to authorize the app each time you use it, because Epic doesn’t permit long-lived tokens for “automatic download” patient applications. Ah well.
Caveat 1: The ChatGPT API isn’t free — if I’m surprised and the app gets a lot of direct use, I may have to figure out how to offset those costs. For now I just hope folks try it and that it’s (a) helpful and (b) inspires others to build on the idea.
I’ve already written a bunch about SMART and why I think it’s so valuable, so I won’t repeat myself here. But this is the first time I’ve written a SMART app for patients, and there were a few interesting nuggets worth a mention:
Standalone Launch
explain my notes uses the “standalone launch” model. With a provider app, a huge part of the benefit comes from living within the context of the EHR — it gets you single sign-on and provider/patient context and feels seamless in an environment where providers are already spending much of their day. It’s not the same for patients; a dedicated site that can explain its function and then “connect to” the portal makes good sense.
Epic Automatic Download
The super-cool thing about patient-facing apps is that you don’t need to “register” them with each individual EHR. Instead, the EHR vendors maintain provider lists and automatically enable connections when authorized by the patient. It’s hard to overestimate just how great this is — back in the day, we had to arrange to connect HealthVault to each and every provider that wanted to work with us.
Careful, though! Automatic download comes with conditions, and they are not immediately obvious (Epic’s conditions are documented behind a free login). “Refresh” tokens aren’t allowed; only certain data types can be accessed; no “write” operations are permitted, etc. My first cut at the app didn’t meet the criteria exactly, and it took me awhile to figure out what was going on.
PDF and CCDA Content
Many notes are stored as HTML or text. Encounter summaries, though, are often stored in “CCDA” format — an old-school XML standard. XML needs to be translated into HTML for display in a browser, and while there is some solid open source code for doing that, the generated HTML doesn’t always display nicely within a larger web page. I was able to tweak it for my purposes; the altered stylesheet is available per the original’s open-source license terms.
PDF content was also a challenge to display so that it both (a) looks correct and (b) makes the selection available for sending to ChatGPT. I ended up doing a server-side translation using pdftohtml, an old standby that still works surprisingly well.
Explaining notes: ChatGPT
I think it’s clear that generative AI is going to be a seriously Big Deal — combustion engine and Internet big. But it’s still very early days, and it’s hard not to be annoyed by the seemingly endless garbage “applications” being churned out by hype-riding VC-funded bros. I get that — but bear with me.
Generative AI (specifically ChatGPT for us) is pretty amazing if you think about it as your well-read, smart, eager-to-please friend without any formal training and a fear of being wrong. People like this are super-useful, because they’ve probably come across information that you haven’t, and can be great “translators” of jargon and other specialty content. You just have to take what they say with a grain of salt — a little fact-checking goes a long way.
The ChatGPT “completions” API is pretty simple — it takes an array of input/questions and returns answers in markdown format. There are a few knobs you can turn, but that’s basically it. “Prompt engineering” is a weird concept, much closer to social engineering than code. The current “setup” prompt for explain my notes is this:
You are a medical professional that explains clinical notes and other medical text using terms and language that an average American adult without medical training will understand. Minimize the use of jargon. Your responses should not be notably longer than the original text. Also please include up to three Google search links targeting the key topics you find.
The “Google search links” part here is the most interesting. I initially asked the system to return “up to five links that would be helpful for further research,” but it turns out that ChatGPT is terrible at this, and is actually known for simply making up gibberish URLs. I’m not sure why this is the case; apologists claim they’re just stale links from old training data, but it’s way more than that. Restricting the links to Google searches seems to work pretty well.
And I guess that’s it for now! Please give the app a try — good test data is hard to come by and so I’d appreciate any and all feedback or bug reports. Until next time…
Over the last few months I’ve been working on a project with the good folks at TCP — the latest stopover on my long, painful, only-debatably-successful journey to use technology to benefit health and healthcare in the world. I’ve written about this project a few times already, and I continue to be excited about the potential for SMART Health Cards and Links to get important information in front of the right people when they need it. In this post I’m going to try to push on that “in front of the right people” bit by going into nerdtastic detail about the SMART Health Viewer application we’ve been building. The code is all MIT-licensed, so I hope you’ll pick out anything useful for your own projects. Suit up, folks!
Disclaimer #1: I 100% do not speak for TCP — I’m just volunteering my time towards this work. Anything in the below that you find objectionable is on me and not them! 🙂
Disclaimer #2: This is all pretty techy and more than a bit dry; it probably won’t be your next favorite beach read. I’ve tried to keep it moving along, but my real objective is to just dump a ton of detail to help out other folks trying to build solid implementations. Next up will be some much more entertaining woodworking stuff, I promise!
A Quick Tour
While there are a few twists and turns under the covers, the app itself is really very simple:
Read a SMART Health Card or Link using a barcode scanner, camera or copy/paste.
View the health information, including (when available) provenance data.
Save the information, using built-in copy/paste buttons or as a single document image.
The application can also run within the context of a SMART-on-FHIR enabled EHR system like Epic or Cerner. Additional features are available in this mode, for example:
The current patient record can be searched for SMART QR codes (e.g., on a scanned insurance card).
Rendered health information can be saved back into the patient record.
Potential patient mismatches are flagged (e.g., if the current patient is Bob Smith but a COVID-19 vaccine record is for Jane Doe).
App Architecture
The viewer is a single page application built using React and Create-React-App (I swear CRA was basically deprecated ten minutes after I learned how to use it). Most of the interface uses Material UI, which is truly a blessing for folks like me that are design-impaired. The source is available on GitHub under an MIT license. The snippets in this post reference the version tag shutdownhook.2 so they’ll stay consistent even as the app evolves. So there you go, logistics out of the way!
An SPA running exclusively in the client browser offers two key benefits: first, it makes the app super-easy to host — any static web server (or even just an AWS bucket) can do the job. More importantly, it means that sensitive health information never leaves the client. This pretty dramatically reduces the exposure to privacy breaches, a Very Good thing.
The React component tree looks something like the below. We’ll examine each in detail, but for now think of this hierarchy as a roadmap to the application:
OptionalFhir (holds the FHIR client if running in an EHR)
The only prerequisites to build the app are node, npm and git (stuff you probably already have anyways). Running in development mode is super-easy and hot-reloads as you edit:
(Note that if you want to actually edit the code for real, add -b new_branch_name to that checkout command to start a branch).
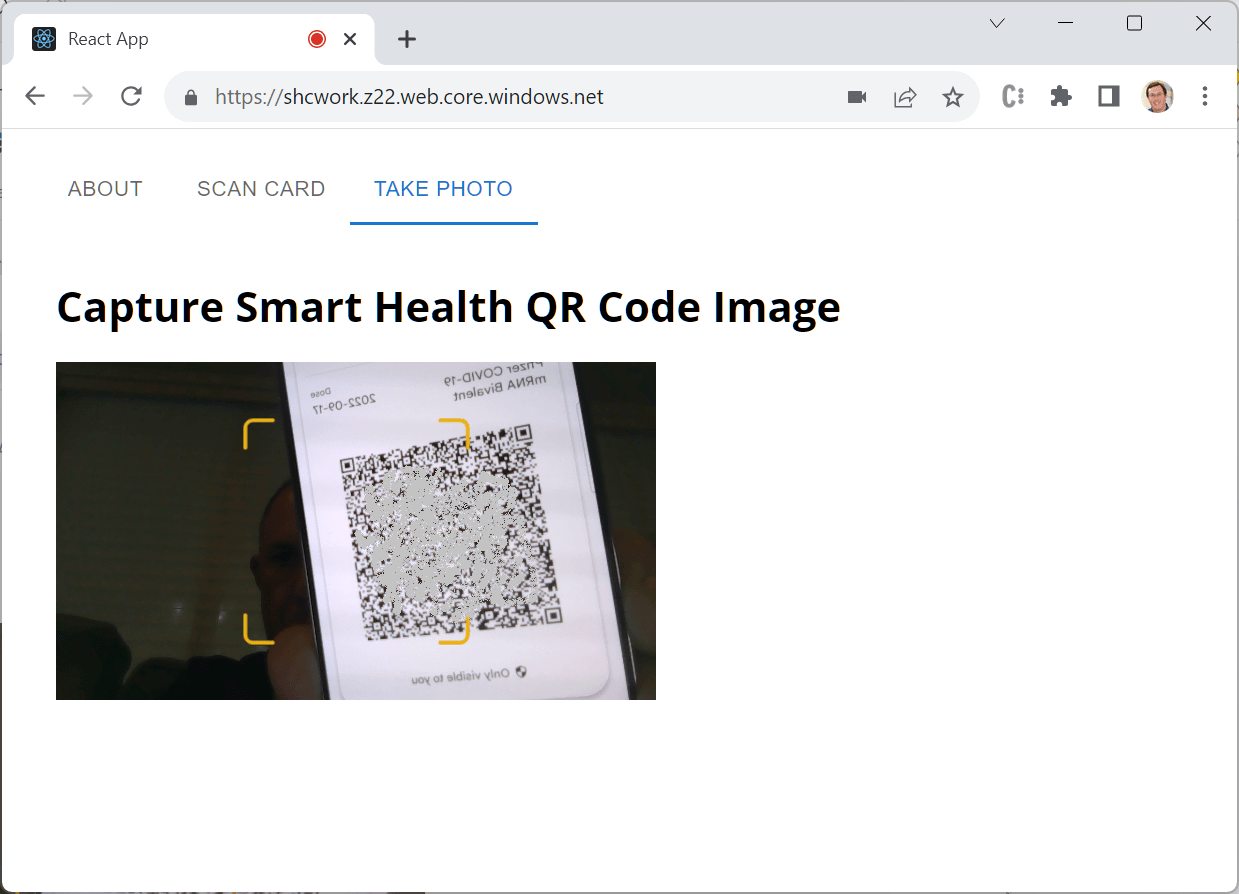
The app will start up with a self-signed certificate (that you’ll have to approve) at https://localhost:3000/. If you have a SMART COVID vaccine card, scan it by clicking the “Take Photo” tab and holding it up to your camera. Or use the “Scan Card” tab and paste in the contents of a demo patient summary or insurance card. Pretty neat!
To deploy a version of the site, just run a build with npm run build, then copy the entirety of the “build” directory to any static web server. I use an Azure blob container for live testing, and keep it up to date using AzCopy like this (remember to azcopy login first!):
A provider using the viewer may run it as a “SMART on FHIR Provider Launch” application. You can read a ton about provider launch apps elsewhere on my blog, but in a nutshell it means that the app runs in an iframe (or similar) within the EHR interface, inheriting its user and patient context. The embedded app is granted authorization to make read and write calls against data in the EHR on behalf of the logged in user. It’s a nice setup, albeit with some pretty inconsistent implementations.
In any case, you can try this out by running the viewer in the SMART Launcher, which simulates an EHR and provides some test data. On the page, make sure “Simulate launch within the EHR UI” is checked, enter https://localhost:3000/launch.html?client=abc into the “App’s Launch URL” box, and click the “Launch” button. You’ll be asked to “sign in” as a provider, select a patient, and then you’ll be right back in our familiar viewer interface — surrounded by EHR goodness and with a few new options available.
With this in place, any component can test for the presence of the FHIR object — meaning that we’re in EHR context — to enable relevant EHR features. For example, you can see this at work in the App component where we decide whether to show the “Search Record” tab. Of course, the same object can be used to actually read and write data, e.g., as we do in the Data component when saving a rendered image into the patient record.
The code starts to look like a typical web app in App.js. A MUI Tabs component handles top-level navigation between the content panels swapped into the next div: an about page, controls for capturing data, and one for displaying it. At the bottom is an optional footer specific to TCP, since we’ll be hosting a version of the app for use in the real world.
If there’s a SHX to display, it’s held in React state as scannedSHX. The Scan, Photo and Search components call back up to the App component using the viewData function to set it, and it’s pushed down to the Data component for rendering.
You’ll also see a bunch of config calls in this code (and throughout the project). Defaults are in (duh) defaults.js — domain-based overrides layer on top of a base set of options. Any config value can also be overridden in the query string (a common use for this last is “initialTab” which can be used to drop the user directly onto one of the scanning modes rather than starting with About).
Once a SHX has been scanned, control passes to the Data tab. Gross parsing errors can show up here, or a request for a passcode if needed. More typically, the data will be parsed and result in one or more FHIR “bundles” — collections of signed or unsigned FHIR resources that work together. If multiple bundles are present, a dropdown allows the user to select between them.
Finally, the selected bundle is rendered by a type-specific component. From here the user can interact with the data or select one of the scanning tabs to read another SHX.
Scanning Stuff: Scanners and Cameras
Scanning with a handheld scanner (like this one I use) isn’t particularly interesting — scanners just send keystrokes, so really you just need a textbox. Just remember to set the focus correctly and auto-submit if the user hits (or the scanner sends) a “return” at the end of the code. A bonus of the textbox is that copy/pasting codes is super-handy during development.
Scanning with a camera is much more interesting. We use qr-scanner, a solid and reliable module for picking barcodes out of camera feeds or static images. In its simplest form, you just instantiate the module, call start, and wait for it to find a QR code. Ah, but of course it’s never quite that easy.
First of all, we may not be able to instantiate a camera at all. Remember that the viewer is built to be embedded with an EHR, which often happens within an iframe that is subject to a number of security restrictions. One of these (unless explicitly permitted with an “allow” policy) is access to connected cameras. If the viewer detects this error case, it replaces the scanner element with a button to pop-up a capture window. This stand-alone window (captureQR.html) can access the camera (still subject to user approval, of course) and passes detected QR codes back to the iframe before closing itself. It’s maybe a little hokey, but gets the job done pretty well.
Picking the right camera can also be a challenge. The viewer is meant to be usable both on mobile and laptop/desktop systems, which can have very different camera setups. The browser allows cameras to be selected by “facing mode” (primarily “user” or “environment”) or by an internal ID that isn’t necessarily correlated with a user-recognizable label. The viewer tries to balance all of these with the following approach mostly in switchCamera.js.
Double-clicking on the “Switch Camera” button rotates through all of the available cameras by ID. This allows selection of, for example, a second externally-connected camera as might be in use at a provider check-in desk.
If there’s only one camera in the system, don’t show any of this at all!
Another twist for this logic is that it needs to be usable in both the React component (Photo.js) and the pop-up simple HTML version (captureQR.html) we discussed earlier. This turns out to be more challenging than I expected, but is accomplished by including switchCamera.js as a script tag way up at the top of the React hierarchy in index.html. The most interesting thing about this code — other than some reusable bits for iterating cameras and such — is the double-click detection, which somehow is still a complicated thing to do in 2023.
Last is the code that pauses the camera after a configurable timeout. In one of our early demos, there seemed to be a steady memory leak that persisted as long as the camera was active. Typically the camera is only visible for a short time and this doesn’t matter, but if for some reason the page is left open, it can eventually crash the browser. The leak doesn’t seem to happen on all browsers or platforms, so more research to do. But to be safe, we just shut the camera off if it doesn’t find a QR code within this timeout.
Scanning Stuff: Searching the EHR
This is really an exploratory feature, but I’m betting something like it will be useful in some workflows. Primarily for SMART Health Insurance Cards, it works when physical cards are scanned into the EHR during check-in. If payers start printing SHX QR Codes on their cards, it could be useful to pull the structured FHIR data out of those QRs based on the scanned images.
When executed in EHR context, the code in Search.js digs around in the patient record looking for scanned files that might have QR codes on them. This happens in two passes:
The code in listDocs.js queries the record for DocumentReference resources that (a) might possibly be coded as payment-related and (b) have an acceptable content type (pdf, jpeg, or png). Newer documents are preferred to older ones. This is actually a pretty nice little bit of code … the biggest bummer is that in many EHR implementations, scanned documents are actually saved in a third-party system and not as FHIR resources anyways. Argh.
Separate from the FHIR-specific stuff, there’s a nice React pattern in here too. Searching and scanning can take some time, so it happens async as part of an Effect. Nothing special about that; the neat part is that we run through the effect multiple times — once for the search and then one for each document searched. On each pass the UX is updated with information about the step — if a QR is found we route directly to the Data tab, and if not we report back and allow the user to search again if appropriate. In a world where it often seems like I’m wedging what I want to do into the React lifecycle, I was pleasantly surprised with how well this matched up.
“Scanning” Stuff: Viewer Prefix
OK this isn’t really scanning at all, but there is one more way that SHX data can make it into the viewer. If you’ve dug into the SMART Health Links spec, you’ll have encountered the viewer URL that can be prepended to the shlink:/ data itself. Our viewer supports that model via shlink.html. No muss, no fuss!
Reading the SHX: resolveSHX
No matter how they’re wrapped and packaged, the endgame for SMART Health Cards and Links is one or more FHIR bundles holding actual health information. The code in SHX.js and resources.js is responsible for sorting all of that out and building up a set of consistent structures that are (more or less) easy to render. This starts with verifySHX, which receives the scanned code — either a shc:/ or shlink:/ string, with the SHL possibly hiding behind a viewer URL hash prefix.
This function returns its work to the caller as a “status” object. The only thing guaranteed to be in the object is a shxStatus code which provides the overall result of the operation. It’s important to keep in mind that “ok” here doesn’t necessarily mean we found usable data — it just means that we were able to resolve the SHX and we were at least able to parse bundles out of it. The status of each bundle is its own thing, as we’ll see later.
The first thing verifySHX does (after setting up some exception handling) is to call resolveSHX. This dude’s job is to normalize the SHX down to two lists: one containing signed FHIR bundles (aka “verifiable credentials”) and one for bundles that are unsigned. For SMART Health Cards, this is easy — the input is a verifiable credential, so we just add it to the list and get out of dodge. (Note we’re taking advantage of the fact that our SHC verification library accepts VC values in a number of formats, including the shc:/ strings read out of QR codes.)
SMART Health Links are a more complicated story; for those we drop down into resolveSHL, which starts with decodeSHL — just a bit of fancy base64-decoding that gets us the payload so that we can throw exceptions if the payload requires a passcode or has expired. Note both of these are just hints to support our user experience — it’s up to the SHL hoster to actually enforce them. So you’ll see similar exceptions thrown later, when we actually request the manifest…
…which happens in fetchSHLManifest. In most cases this just a simple POST with a few parameters. The one exception is for SHLs with the “U” flag, used when the SHL contains only one file and bypasses a formal manifest. When our code detects this, it fakes up a manifest so that the rest of the code can proceed normally.
The rest of resolveSHX loops over each file in the manifest, downloading and decrypting the content and populating the verifiableCredentials and rawBundles arrays as appropriate. The one interesting thing here is resources that aren’t bundles at all — which is fine, we just cons up a bundle-of-one so they’re consistent for the rest of the code.
OK, take a breath. At this point we’ve taken the input SHX and turned it into two arrays — one with verifiable credentials and one with unsigned (“raw”) bundles. The next step is to turn those into a single list of bundles (statusObj.bundles) with consistent format and metadata. Let’s go.
Reading the SHX: Bundles and Organization
First we iterate over each verifiable credential we’ve collected and use smart-health-card-decoder to verify its signature and content. The directories we trust are set by configuration; be careful if you’re going to deploy any of this to production! Note that as of this writing, some of the FHIR validation rules in the decoder are a bit over-harsh; they were built for a first-generation of SMART Health Cards and need to be updated. The newest branch of the viewer actually supports a “permissive” configuration that skips some of these, but I’m going to see about a PR for the decoder soon as well.
Next we iterate over the raw bundles and add them to the list; this is obviously much simpler because there’s not much to verify.
When all is said and done, we have a bundles array that contains the original FHIR object, any bundle-specific errors, a “certStatus” field and signature metadata (if present). The last step here is to call organizeResources on each bundle. Organization has two purposes:
Create structures that make it easy to work with the bundle and resolve references.
Identity the bundle “type” which we’ll use to pick a renderer later on.
For #1, we create a simple array containing every resource, and two maps, one keyed by resource type and one by id (actually double-keyed by fullUrl and the resource ID itself, which provides some resiliency across different implementations). There’s a lot of redundancy here of course, but it prevents renderers re-implementing loops and lookups over and over and over.
#2 is driven by findTypeInfo, a rather grotty set of functions that dig around in the bundles to figure out “what” they are. For example, tryTypeInfoPatientSummary looks for a Composition resource coded with LOINC 60591-5. If you’re looking to add a new type to the viewer, this is where to start.
These routines also supply human-readable labels that can be used in a dropdown, and a list of resources that represent the “subject” of the data. This “subject” list drives the behavior of WrongPatientWarning.js when in EHR context — more on that later.
Another breath — now we have a nice, clean, typed list of bundles in our SHX — time to render them.
Rendering the SHX: Error cases and metadata
Way back in Data.js, the status object with all its goodness is stored in React state. Based on the shxStatus, we do one of four things:
If we need a passcode (or if a provided passcode was rejected), render the passcode input form.
The viewer renders one bundle at a time. If the SHX contains multiple bundles, renderBundleChooser displays a dropdown allowing the user to navigate between them.
If the bundle is verifiable, ValidationInfo.js displays details about the signature in a banner above the data. There’s definitely some usability work to do on this; communicating signature information in a way that humans can actually comprehend is a tricky business.
I’ll call out a few interesting implementation details of these in later sections — but in general rendering FHIR data well is just a slog through the mud. As I’ve said before: Healthcare data sucks, and FHIR is no exception. Everything can be null, everything can be a list … don’t get me started again. The methods in fhirUtil.js and fhirTables.js try to create some reusable sanity around it all, but really it just is what it is. If you want to write production-caliber FHIR display code, it’s going to be ugly and filled with defensive checks. Just learn to love the pain.
HOWTO: Add a New Type Renderer
Giving this its own section just to make it as clear is possible. The code is built so that as more types of data are shared using SMART Health Cards and Links, the viewer can be easily updated to understand and display them. This has already happened once when the good folks at Docket added the Immunization record renderer — I hope there are many more to come!
Add a new BTYPE constant and tryTypeInfoXXX function in resources.js. The tryTypeInfoXXX function should return undefined if the bundle is not a match, otherwise an object with its BTYPE constant, a human-readable label for the bundle, and a list of the resources that identify the subject of the bundle (if any).
Add your new rendering component to the switch statement in Data.js. Your component will receive the organized resource info and a deferred code renderer (“dcr” … see the terminologies section later for details) as input. Feel free to use or ignore fhirUtil and fhirTables — whatever works for your data type!
And that’s it. Eventually we might abstract things out even a bit more, but it’s a good start. If you have any trouble, ping me and I’ll be happy to help.
Terminologies: Deferred Code Rendering
FHIR relies heavily on codes to describe things. These codes may be relatively simple (like Marital Status, which currently includes just eleven values), or they may be mind-numbingly complex (like LOINC, commonly used for lab results and observations, which includes more than 50,000 multi-part codes).
Codes are a key tool in the attempt to make data interoperable — useful not just to the person who created it, but to anyone who receives it. A medical record that indicates “Resfriado Común” may have limited use outside of the Spanish-speaking world, but SNOMED code 82272006 means “a common cold” (or “rhume” or “verkoudheid” or whatever) no matter where it’s received. Codes also help avoid mistakes due to typos, make it easier to do robust research and use computers to work with information, and basically are just kind of great.
But when all you want to do is display a human-readable version of the code, they’re kind of annoying. There are basically an infinite number of coding systems, and as we’ve seen they can get pretty big. Some are used a lot, some very rarely. Some are published online in easily-readable formats, others are not. But everybody has to deal with them.
codes.js attempts to wrangle all of this in a way that works well within the constraints of the React client-side, synchronous rendering model. Basically it works like this:
The dcr is passed as a property to each rendering component (e.g., here).
Whenever a component needs to display human-readable text for a code, it calls dcr.safeCodeDisplay or dcr.safeCodingDisplay. If the text can be rendered synchronously, it does that. Otherwise, it queues up the codeset for asynchronous download and returns a placeholder.
Back in useEffect, if any codesets were queued for download, a re-render is triggered which inserts the final, downloaded values.
If you’re writing a rendering component — just use the dcr methods and ignore the rest.
The list of known systems is at the top of codes.js. Each is keyed with its canonical URL, corresponding to the “system” value in FHIR Coding and CodeablConcept structures. url points to the machine-readable code set (expected to be fetched with a simple GET), and the type (default “fhir”) indicates how that source data is to be parsed into a simple code-to-text dictionary. The current list captures most codes needed for the current use cases, but will surely need to be expanded in the future.
Transformed code sets are also cached in browser-local storage (TTL and other settings are in config) — the end result being that most renderings can be completed fully-synchronously. All this is a lot of work, but the rendering developer experience is super-clean, which I’m kind of proud of.
Saving Rendered Views
The nice thing about the viewer, especially when used with a SHL viewer prefix, is that it “just works” — providers don’t need any fancy software or IT work to receive the data in a SHX. It can easily be copy/pasted (more on this in a bit!) or printed out to be incorporated into a chart. This is really good stuff and not to be underestimated.
However — the long-term endgame for interoperability is to save the data in structured form back into an EHR or other system. Unfortunately while FHIR “read” has become more-or-less expected functionality, “write” is still a little sketchy. And even when that capability is well-implemented, it’s not altogether obvious “where” to save the data. For example, we probably don’t want to fully inter-mingle patient-reported data with a condition list curated by a long-time primary care provider.
There’s a lot to figure out here, but we’ve tried to push things just one small step forward by enabling rendered views to be saved as images, either as a downloaded file or directly in the EHR. We create the image using html2canvas, a really impressive package that does exactly what we need, wrapped up inside of the divToImage function in saveDiv.js. It would probably feel more natural to do this as a PDF rather than a JPEG, but I had a really tough time getting reliable PDF rendering on the client — and since JPEG is well-supported for scanned documents, I just stuck with that.
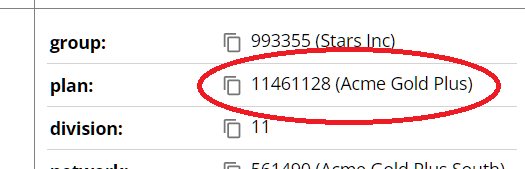
If you scan a SMART Health Insurance Card SHL (e.g., the demo one here) you’ll see a number of “copy” icons placed next to important values. Of course anybody can copy/paste anything, but the idea here is to make it easy to grab the bits and pieces that are useful … for example, if you’re a provider and need to enter insurance member and group numbers into an intake form.
This is implemented in Copyable.js, a standalone React component that accepts two props — the copyable text and, optionally, JSX that represents a more complex rendered view of the data. You can see this at work here (also in the picture), where only the plan number should be copied, but we want to display the name as well.
The hits keep coming, this time in the PatientSummarySection.js component. IPS bundles use a Compositionresource to describe how the other resources (medications, observations, etc.) in the IPS should be grouped and displayed. The document is organized into sections — the content of each section is either a (structured) set of resources, an (unstructured) Narrativeblock of XHTML, or both. (Actually a section can also include a set of sub-sections, but let’s ignore that for today.)
The interplay of structured resources and unstructured narrative here is pretty tricky. IPS generators have great freedom as to how they’re used — for example:
This IPS has a “Plan of Treatment” section with only narrative xhtml.
This one has exclusively structured data in all sections.
This one has both narrative and structured data for all sections.
It even gets a bit weirder, because when both narrative and structured data are present they are “generally” considered to be equivalents. But the Narrative element includes a status, for which acceptable values include “additional” (i.e., the narrative has MORE information than the structured data) or “extensions” (i.e., the narrative includes content from extension elements that a structured rendering might not know how to represent). I swear every one of the meetings must end with a round of “but can we make it just a bit more complicated?”
Anyways, the viewer needs to deal with two problems here: (1) Which data do we display if both are present, and for extra fun (2) How can we safely display XHTML that we receive from an external, possibly malicious source? Awesome!
The second problem is a little hairier, because injecting untrusted XHTML into the browser is just a really, really sketch thing to do. I honestly can’t quite believe that the standard allows this. But it is what it is, and there’s no real option to just ignore what could be critically important clinical information. So OK.
Unfortunately there are still browsers out there that aren’t supported by DOMPurify. My guess is that the intersection of these browsers with those that can use the viewer is basically zero, but you never know. So we have a fallback solution that inserts an IFrameSandbox.js component. The content is loaded into an embedded iframe with the minimal “sandbox” attribute we can use while still reasonably integrating the content into our layout. This solution isn’t great — but it’s better than nothing!
And that’s a Wrap! (for now)
There’s plenty of work left to do on the viewer, and even as I write this the “develop” branch of the code has started to move beyond what I’ve described here. But it should be (maybe more than) enough to understand what’s going on, and hopefully to save other implementers time and angst figuring out how they want their SHX receivers to work. I’m always happy to chat about this kind of thing too, so please just hit me up using the contact form or on LinkedIn or whatever.
Next job, rendering Provenance resources. So much nerd …
This is article three of a series of three. The first two are here and here.
Last time here on the big show, we dug into SMART Health Cards — little bundles of health information that can be provably verified and easily shared using files or QR codes. SHCs are great technology and a building block for some fantastic use cases. But we also called out a few limitations, most urgently a ceiling on QR code size that makes it impractical to share anything but pretty basic stuff. Never fear, there’s a related technology that takes care of that, and adds some great additional features at the same time: SMART Health Links. Let’s check them out.
The Big Picture
Just like SMART Health Cards (SHCs) are represented by encoded strings prefixed with shc:/, SMART Health Links (SHLs) are encoded strings prefixed with shlink:/ — but that’s pretty much where the similarity ends. A SHC is health information; a SHL packages health information in a format that can be securely shared. This can be a bit confusing, because often a SHL holds exactly one SHC, so we get sloppy and talk about them interchangeably, but they are very different things.
The encrypted string behind a shlink:/ (the “payload”) is a base64url-encoded JSON object. We’ll dive in way deeper than this, but the view from 10,000 feet is:
The payload contains (a) an HTTPS link to an unencrypted manifest file and (b) a key that will be used later to decrypt stuff.
The manifest contains a list of files that make up the SHL contents. Each file can be a SHC, a FHIR resource, or an access token that can be used to make live FHIR requests. We’ll talk about this last one later, but for now just think of a manifest as a list of files.
Each file can be decrypted using the key from the original SHL payload.
There’s a lot going on here! And this is just the base case; there are a bunch of different options and obligations. But if you remember the basics (shlink:/, payload, manifest, content) you’ll be able to keep your bearings as we get into the details.
Privacy and Security
In that first diagram, nothing limits who can see the manifest and encrypted content — they’re basically open on the web. But all that is basically meaningless without access to the decryption key from the payload, so don’t panic. It just means that, exactly like a SHC, security in the base case is up to the person that’s holding the SHL itself (in the form of a QR Code or whatever). And often that’s perfectly fine.
Except sometimes it’s not, so SHLs support added protection using an optional passcode that gates access to the manifest:
A user receiving a SHL also is given a passcode. The passcode is not found anywhere in the SHL itself (although a “P” flag is added to the payload as a UX hint).
When presenting the SHL, the user also (separately) provides the passcode.
The receiving system sends the passcode along with the manifest request, which succeeds only if the passcode matches correctly.
Simple but effective. It remains to be seen which use cases will rally around a passcode requirement — but it’s a handy arrow to have in the quiver.
The SHL protocol also defines a bunch of additional requirements to help mitigate the risk of all these (albeit encrypted and/or otherwise protected) files floating around:
Manifest URLs are required to include 256 bits of entropy — that is, they can’t be guessable.
Manifests with passcodes are required to maintain and enforce a lifetime cap on the number of times an invalid passcode is provided before the SHL is disabled.
Content URLs are required to expire (at most) one hour after generation.
(Optionally) SHLs can be set to expire, with a hint to this expiration time available in the payload.
These all make sense … but they do make publishing and hosting SHLs kind of complicated. While content files can be served from “simple” services like AWS buckets or Azure containers, manifests really need to be managed dynamically with a stateful store to keep track of things like passcodes and failed attempts. Don’t think this is going to be a one night project!
SMART Health Links in Action
Let’s look at some real code. First we’ll run a quick end-to-end to get the lay of the land. SHLServer is a standalone, Java-based web server that knows how to create SHLs and serve them up. Build and run it yourself like this (you’ll need a system with mvn and a JDK installed):
git clone https://github.com/seanno/shutdownhook.git
cd shutdownhook/toolbox
mvn clean package install
cd ../shl
mvn clean package
cd demo
./run-demo.sh # or use run-demo.cmd on Windows
This will start your server running on https://localhost:7071 … hope it worked! Next open up a new shell in the same directory and run node create-link.js (you’ll want node v18+). You’ll see an annoying cert warning (sorry, the demo is using a self-signed cert) and then a big fat URL. That’s your SHL, woo hoo! Select the whole thing and then paste it into a browser. If you peek into create-link.js you’ll see the parameters we used to create the SHL, including the passcode “fancy-passcode”. Type that into the box that comes up and …. magic! You should see something very much like the image below. The link we created has both a SHC and a raw FHIR bundle; you can flip between them with the dropdown that says “Health Information”.
So what happened here? When we ran create-link.js, it posted a JSON body to the server’s /createLink endpoint. The JSON set a passcode and an expiration time for the link, and most importantly included our SHC and FHIR files as base64url-encoded strings. SHLServer generated an encryption key, encrypted the files, stored a bunch of metadata in a SQLite database, and generated a SHL “payload” — which looks something like this:
(You can make one of these for yourself by running create.js rather than create-link.js.) Finally, that JSON is encoded with base64url, the shlink:/ protocol tag is added to the front, and then a configured “viewer URL” is added to the front of that.
The viewer URL is optional — apps that know what SHLs are will work correctly with just the shlink:/… part, but by adding that prefix anybody can simply click the link to get a default browser experience. In our case we’ve configured it with https://shcwork.z22.web.core.windows.net/shlink.html, which opens up a generic viewer we’re building at TCP. That URL is just my development server, so handy for demo purposes, but please don’t use it for anything in production!
Anyways, whichever viewer receives the SHL, it decodes the payload back to JSON, issues a POST to fetch the manifest URL it finds inside, pulls the file contents out of that response either directly (.embedded) or indirectly (.location), decrypts it using the key from the payload, and renders the final results. You can see all of this at work in the TCP viewer app. Woot!
A Quick Tour of SHLServer
OK, time for some code. SHLServeris actually a pretty complete implementation of the specification, and could probably even perform pretty reasonably at scale. It’s MIT-licensed code, so feel free to take it and use it as-is or as part of your own solutions however you like, no attribution required. But I really wrote it to help folks understand the nuances of the spec, so let’s take a quick tour.
Because the manifest format doesn’t include a way to identify specific files, the admin methods expect the caller to provide a “manifestUniqueName” for each one. This can be used later to delete or update files — as the name implies, they only need to be unique within each SHL instance, not globally.
The last interesting feature of the class is that it can operate in either “trusted” or “untrusted” mode. That is, the caller can either provide the files as cleartext and ask the server to allocate a key and encrypt them, or it can pre-encrypt them prior to upload. Using the second option means that the server never has access to keys or personal information, which has obvious benefits. But it does mean the caller has to know how to encrypt stuff and “fix up” the payloads it gets back from the server.
The bottom layer of code is SHLStore.java, which just ferries data in semi-ORM style between a Sqlite database and file store. Not much exciting there, although I do have a soft spot for Sqlite and the functional interface I built a year or so ago in SqlStore.java. Enough said.
Anatomy of a Payload
OK, let’s look a little more closely at the payload format that is base64url-encoded to make up the shlink:/ itself. As always it’s just a bit of JSON, with the following fields:
urlidentifies the manifest URL which holds the list of SHL files. Because they’re burned into the payload, manifest URLs are expected to be stable, but include some randomness to prevent them from being guessable. Our server implements a “makeId” function for this that we use in a few different places.
keyis the shared symmetric key used to encrypt and decrypt the content files listed in the manifest. The same key is used for every file in the SHL.
labelis a short string that describes the contents of the SHL at a high level. This is just a UX hint as well.
v is a version number, assumed to be “1” if not present.
flagsis a string of optional upper-case characters that define additional behavior:
“P” indicates that access to the SHL requires a passcode. The passcode itself is kept with the SHL hoster, not the SHL itself. It is communicated to the SHL holder and from the holder to a recipient out of band (e.g., verbally). The flag itself is just another UX hint; the SHL hoster is responsible for enforcement.
“L” indicates that this SHL is intended for long-term use, and the contents of the files inside of it may change over time. For example, a SHL that represents a vaccination history might use this flag and update the contents each time a new vaccine is administered. The flag indicates that it’s acceptable to poll for new data periodically; the spec describes use of the Retry-After header to help in this back-and-forth.
One last flag (“U”) supports the narrow but common use case in which a single file (typically a SHC) is being transferred without a passcode, but the data itself is too large for a usable QR code. In this case the url field is interpreted not as a manifest file but as a single encrypted content file. This option simplifies hosting — the encrypted files can be served by any open, static web server with no dynamic manifest code involved. The TCP viewer supports the U flag, but SHLServer doesn’t generate them.
Note that if you’re paying attention, you’ll see that SHLServer returns another field in the payload: _manifestId. This is not part of the spec, but it’s legal because the spec requires consumers to expect and ignore fields they do not understand. Adding it to the payload simply makes it easier for users of the administration API to refer to the new manifest later (e.g., in a call to upsertFile).
Working with the Manifest
After a viewer decodes the payload, the next step is to issue a POST request for the URL found inside. POST is used so that additional data can be sent without leaking information into server logs:
recipientis a string representing the viewer making the call. For example, this might be something like “Overlake Hospital, Bellevue WA, registration desk.” It is required, but need not be machine-understandable. Just something that can be logged to get a sense of where SHLs are being used.
passcode is (if the P flag is present) the passcode as received out-of-band from the SHL holder.
embeddedLengthMaxis an optional value indicating the maximum size a file can be for direct inclusion in the manifest. More on this in a second.
The SHL hoster uses the incoming manifest request URL to find the appropriate manifest (e.g., in our case https://localhost:7071/manifest/XruV__8k1Zn68NK1lsLH05ZmONtaUC85jmAW4zEHoTA), then puts together a JSON object listing the content files that make up the SHL. The object contains a single “files” array, each element of which contains:
contentType, typically one of application/smart-health-card for a SHC or application/fhir+json for a FHIR resource (I promise we’ll cover application/smart-api-access before we’re done).
Directly, using an embedded field within the manifest JSON.
Indirectly, as referenced by a location field within the manifest JSON.
This is where embeddedLinkMax comes into play. It’s kind of a hassle and I’m not sure it’s worth it, but not my call. Basically, if embeddedLengthMax is not present OR if the size of a file is <= its value, the embedded option may be used. Otherwise, a new, short-lived, unprotected URL representing the content should be allocated and placed into location. Location URLs must expire after no more than one hour, and may be disabled after a single fetch. The intended end result is that the manifest and its files are considered a single unit, even if they’re downloaded independently. All good, but it does make for some non-trivial implementation complexity (SHLServer uses a “urls” table to keep track; cloud-native implementations can use pre-signed URLs with expiration timestamps).
* Note I have run into compatibility issues with encryption/decryption. In particular the specification requires direct encryption using A256GCM, which seems simple enough. But A256GCM requires a 12-byte initialization vector, and there are libraries (like python-jose at the time of this writing) that mistakenly use 16. Which might seem ok because it “works”, but some compliant libraries (like javascript jose) error out when they see the longer IV and won’t proceed. Ah, compatibility.
SMART API Access
OK I’ve put this off long enough — it’s a super-cool feature, but messes with my narrative a bit, so I’ve saved it for its own section.
In addition to static or periodically-updated data files, SHLs support the ability to share “live” authenticated FHIR connections. For example, say I’m travelling to an out-of-state hospital for a procedure, and my primary care provider wants to monitor my recovery. The hospital could issue me a SHL that permits the bearer to make live queries into my record. There are of course other ways to do this, but the convenience of sharing access using a simple link or QR code might be super-handy.
A SHL supports this by including an encrypted file with the content type application/smart-api-access. The file itself is a SMART Access Token Response with an additional aud element that identifies the FHIR endpoint (and possibly some hints about useful / authorized queries). No muss, no fuss.
The spec talks about some other types of “dynamic” exchange using SHLs as well. They’re all credible and potentially useful, but frankly a bit speculative. IMNSHO, let’s lock down the more simple file-sharing scenarios before we get too far out over our skis here.
And that’s it!
OK, that’s a wrap on our little journey through the emerging world of SMART Health Cards and Links. I hope it’s been useful — please take the code, make it your own, and let me know if (when) you find bugs or have ideas to make it better. Maybe this time we’ll actually make a dent in the health information exchange clown show!
Contains some health information (e.g., information about vaccines administered to an individual);
Is provably vouched for by some known issuer (e.g., WA DOH confirms that the individual actually received the vaccines);
Can be shared in many ways (e.g., through a printed QR Code or in a mobile wallet); and
May be invalidated/retracted if the issuer no longer believes the claim.
The best way to think about security and privacy for a SHC is to imagine it as a physical piece of paper containing the same information (which, sometimes, it is!):
An issuer gives a SHC to humans they believe should have it. (E.g., WAVerify will give you a COVID vaccine SHC if you prove you have access to the email address or mobile phone that was recorded when you physically received the vaccine.)
It’s up to the holder to “protect” a SHC by not losing it or allowing it to be stolen. (E.g., by keeping a printed version safely in your wallet or behind a PIN on your mobile phone). SHCs are not encrypted!
The holder can share the SHC with whomever they like. (E.g., by allowing the bouncer at your favorite dive to scan the printout).
A really important implication of this approach is that a SHC is not a proof of identity. If I show you a SHC with Sean’s vaccine information, it doesn’t mean that I am Sean — it just means that I have access to this information about Sean (maybe legitimately, maybe not). Additional work is required to prove that the person with the SHC is the same person that is in the SHC. Typically this is done by looking at an actual ID (e.g., a drivers license) and verifying that the name/birthdate/etc. match what’s in the SHC.
OK, that’s basically what we’re working with here. Now let’s see how they’re put actually together and used.
Health Information
A SHC can contain any health information that can be represented in JSON using FHIR resources, which in practice means anything. For example, here’s one of my vaccine records as a FHIR “Immunization” resource:
Most of this is pretty self-explanatory (which is one of the advantages of FHIR over other formats). Code “208” in the CVX system represents the original Pfizer-BioNTech vaccine, and I’ve redacted out the actual lot number because, well, I don’t really know why I care about you seeing that but whatever.
The patient “reference” element is interesting — what does “resource:0” mean? Because information in a SHC is usually composed of not just one but a few related resources, my actual COVID SHC also includes a “Patient” resource that contains my demographic information. Referencing that resource links the two together to form a complete record. Related resources are packaged together into a collection called a “Bundle” (another FHIR type). Here’s a complete COVID bundle (cut to include just my first vaccination):
The “entry” array in the bundle is just an array of resources, each one keyed with a “fullUrl” value that can be used as a reference. Typically fullUrl values are actual unique identifiers (often REST-style URLs), but the SHC specification prescribes the use of “resource:#” values instead. Primarily this is to help minimize resource size, but it’s also a nice reminder that the resources in a SHC should stand alone without dependencies outside of its bundle.
Actually, to be really precise, the specification only requires “resource:#” identifiers when the SHC is destined to be shared using a QR code. We’ll talk a lot more about this later, but QR codes are quite limited in the amount of data they can reasonably contain. One way the specification tries to keep the size down is with a set of minimization steps which result in still-valid but terse resources.
Obviously there’s a lot more to FHIR and we could keep going for a long time — but I think that’s enough for our purposes. The important takeaway is just that the actual goodies in the magic inner core of a SHC are just FHIR resources that can represent any useful health-related information.
Signatures and Verifiable Credentials
One problem with a paper vaccine card is that it’s trivial to forge — and the same goes for a random digital bundle of FHIR resources. Now this may not always be the end of the world (smart folks like Bruce Schneier have argued that it can actually be a “feature”), often it’s a real problem. One of the coolest things about SHCs is that they require a very small incremental investment vs. paper to be made strongly “verifiable” in a way that doesn’t require sensitive centralized databases or other privacy-threatening technology.
Like so many other things in our digital world, SHCs accomplish this using public key cryptography.
First, an issuer (e.g., WANotify) creates a pair of related “keys.” One is a “private” key that the organization keeps to itself as an internal secret. The other is a “public” key that is published openly for anyone to see at a well-known URL (e.g., for Washington it’s at https://waverify.doh.wa.gov/creds/.well-known/jwks.json). Keys must include some specific properties and be formatted as a JSON Web Key Set; here’s one way to get the job done (full sourceon github):
Next, the FHIR bundle needs to be wrapped up in a structure that’s almost but not quite a W3C Verifiable Credential (a fully “legit” VC can be directly derived from the SHC format; where they differ it’s basically another attempt to reduce data size for the QR representation). In practice that means using JSON like this:
ISS_URL tells readers where to find the public key that will ultimately verify that the issuer signed the bundle. Note this is a prefix of the JWKS URL we saw above (e.g., for Washington the ISS value is https://waverify.doh.wa.gov/creds). “.well-known/jwks.json” is part of the specification to be appended by the reader. Also, the ISS value cannot have a trailing slash — it is regularly used in exact string comparisons, so the protocol can’t afford to be as sloppy as we usually are about that.
NOT_BEFORE_EPOCH_SECONDS is a timestamp that defines when the VC should be considered valid, in epoch seconds. Most typically this is just the time when it was created (e.g., in Javascript, new Date() / 1000). The rest is pretty much boilerplate — of course the fhirVersion value must match the version to which your fhirBundle conforms.
Finally, we can sign this bad boy using a JSON Web Signature. JWS (or if you’re picky, JWS using compact serialization) is one of the two flavors of JSON Web Token — a format that makes it easy to move signed and/or encrypted data around the web. The issuer first compresses the data with DEFLATE (that size issue again!), then uses its private key to sign it, using code something like this:
*** Don’t miss the deflateRawSync call above! “raw” means that the result won’t include a zip header. This can trip up implementations that expect a header by default. One such example is the Java Inflater class; passing true to it’s constructor will do the trick.
And here’s our resulting JWS (in SHC conversations often referred to as the VC):
That big garbled mess is actually hiding three different base64url-encoded sections, each separated by dots (feel free to skip the Where’s Waldo game on this): a header, the payload and the signature itself. Decoding the header is a useful exercise:
First is the “zip” field that we added ourselves — this is actually a non-standard header for JWS, but totally allowed and a useful hint/reminder that our payload is compressed. More important are the algorithm and key identifier used to sign the payload. So to verify a SHC, the receiver:
Decodes the three sections with base64url.
Uses the ISS value in the payload to get the list of valid keys for the issuer.
Uses the “kid” field in the header to pick the right one from that list.
Computes the signature and compares it to the one in the JWS.
And then magic happens. We’re really close now — just need to cover a couple of side issues and then look at sharing (including using QR codes). Hang in there!
Trusted Issuers and Directories
Protocols are all well and good, but at some point the rubber has to meet the road. Sure you can trust any issuer that puts a JWKS file up on the web, but should you? Probably not — but how to decide? Typically folks delegate the work to some centralized organization (a trust network or trust registry) that serves as the gatekeeper for inclusion. The trust network publishes a directory of vetted participants at a secure, well-known location that everyone can start from.
Unfortunately, this practical necessity is often the last thing that gets implemented in trust-dependent projects, because it’s so easy to fake up in demos and tests (including mine). And while I wasn’t on the ground in 2021 when folks were putting it together, it sure seems like the COVID-initiated SHC network was no exception. This is the situation as it appears to be today, at least in the USA and other jurisdictions without a strong central network of their own:
The Verifiable Clinical Information Coalition (née the Vaccine Credential Initiative, both conveniently abbreviated as VCI) sets the rules for inclusion in the network.
The Commons Project is responsible for actually vetting issuers against these rules and maintaining technical infrastructure for the network.
Machine-readable lists of issuers, their ISS values and cached public keys are available in the VCI Directory on GitHub.
One of the nicest things that VCI does is to take a daily “snapshot” of all the JWKS files in the network and aggregate them into a single file here. This means that any application that wants to verify SHCs can just download this one file and use it to find keys, rather than having to download each JWKS on-demand. Since network calls are always slow and unreliable, the fewer the better. Good stuff!
Despite its near-impenetrable web of trademarks, VCI/CommonTrust has so far used a pretty common-sense approach to inclusion. Issuers are required to be one of the following (from their site):
Clinical health system or hospital providing patient care
National or regional pharmacy chain
National or regional laboratory diagnostics provider
National or regional health insurance payor
Government or governmental agency
It’s pretty easy to verify whether an applicant does or does not fit into one of these categories; there doesn’t seem to be much controversy about that. What is up for grabs, however, is whether this same trust network should be used for all SHCs. For example, would it be better to have a separate trust network for insurance cards? There are good arguments pro and con; the nerds among us who just want to know what URL to use will just have to wait and see how it plays out!
Revocation
If you were really paying attention back when we talked about the SHC privacy and security model, you might have realized that since people hold SHCs themselves, without any “live” link back to the issuer, the issuer might have trouble retracting the credential if it needs to, for example if a bug caused them to put the wrong plan identifier on an insurance card. “Revocation” is not a common part of the SHC lifecycle (e.g., your insurance card from last year doesn’t need to be revoked — it’s still a valid insurance card, the data just shows that the plan is expired) — but it can happen.
In the case of a major sh*tshow — say somebody hacks into an issuer’s internal systems — public keys can simply be removed from the trust network and all SHCs signed by that issuer will immediately become invalid. But that’s a pretty big hammer, sure to cause a lot of chaos and annoyance throughout the system. More typically, a SHC issuer creates and publishes a cardrevocation list (CRL) that contains opaque identifiers for individual cards that should not be trusted.
The issuer adds an “rid” field to the signed SHC VC. Because it may be posted publicly, the rid must be a random, opaque value.
The issuer maintains a CRL containing revoked rids for each of its public keys at “ISS_URL/.well-known/KID.json”, where KID is a key identifier from its JWKS file (that .well-known URL construct is really quite handy).
Verifiers download the CRL regularly and use it to reject individual cards that show up on the list. “Regularly” isn’t very well-defined, but daily seems to be a generally-accepted frequency.
There are some more details that enable time-based revocation, but I’m calling it good there. TLDR, there’s a pretty good way for issuers to retract a card that was issued in error.
Sharing by File
OK, we’ve got a SHC in JWS/VC format, and we want to move it around — how to do that? We’ll cover the less-commonly-used method first, which is just sticking a SHC into a file. The specification defines an extension “.smart-health-card” and MIME type “application/smart-health-card” for these files.
It’s pretty simple, except for one thing. The file format actually can contain multiple cards — it’s a JSON object with a “verifiableCredential” array, each entry of which is a JWS/VC string. I can see where they were going with this concept … it might be nice to have a file that wraps up multiple cards from different issuers. But with the appearance of SMART Health Links I’m thinking this capability may be very, very lightly used. Ah well, there’s always a little leftover detritus when you’re figuring out something new.
Presumably as SHCs become more and more popular, sharing them around this way may increase in popularity. For example, it’d be really nice to just tap a link with the right MIME type and have the SHC drop directly into your Google or Apple wallet. Likely will happen, but it we’re just early, so the process using files is a bit clunky.
One nice thing about storing a SHC in a file — unlike with QR codes, there’s no practical size restriction. It turns out that this is a pretty big deal as the use cases expand, and is a key reason that SMART Health Links are playing an increasingly important role. We’ll talk about those next time.
Sharing by QR Code
Finally! The first experience everyone has with SMART Health Cards is the QR Code — but it’s taken more than 2,500 words to get there. With that background, at least it’s pretty easy to understand what’s going on inside. A SHC QR Code simply contains the JWS/VC string we created and signed earlier. It’s not a link to that data, it’s the actual data itself.
Space really is at a premium with QR Codes. It depends on things like the image size and error correction level, but in practice SHC data in JWS/VC form has to be 1,191 bytes or smaller. The original specification had a vehicle for “chunking” larger data into multiple codes (imagine a page with four individual QRs on it, scanned one after another) but for obvious reasons that was quickly deprecated by the community.
So everything about encoding QRs is about squeezing things down. There are a few different “modes” that can be used for QR data; the SMART folks figured out that numeric was the best option for SHC data. The spec goes into gory detail here, so I’m just going to cheat and just pop in a little code using the qrcode npm package:
The code generates this PNG (go ahead and scan it; just remember that nobody will trust our made-up issuer). Below the image is a peek at the data inside the code.
… and we made it. Woo hoo! There are actually a few other ways to move SHC data around using FHIR APIs, but I’m going to call it here.
I hope all of this noise proves useful, both to help understand what’s going on under the covers and give you a bit of a head start on actually working with SHCs in code. Next time we’ll dive into SMART Health Links, which address some of the challenges with SHCs and add some neat stuff of their own. I’d love to hear your thoughts or corrections, just hit me up on Twitter or LinkedIn or whatever.
This is article one of a series of three. Two is here; three is here!
A few weeks ago I helped out with a demo at UCSD that showed patients checking into the doctor using a QR code. It was pretty cool and worked well, excepting some glare issues on the kiosk camera. But why, you might ask, did this retired old guy choose to spend time writing code to support, of all things, workflow automation between providers and insurance companies? Well since you clearly did ask, I will be happy to explain!
I spent a lot of my career trying to make it easier for individuals to get the informed care they need to be healthy and safe. And while I’ll always be proud of those efforts, the reality is that we just weren’t able to change things very much. Especially here in the US, where the system is driven far more by dollars than by need. But I’m still a believer — longitudinal care that travels with the individual is the only way to fix all of this — and despite my exit from the daily commute, I’m always on the lookout for ideas that will push that ball forward.
COVID and the birth of SMART Health Cards
Flash back to COVID year two (bear with me here). We had vaccines and they worked really well, and folks were chomping at the bit to DO STUFF again. One way we tried to open the world back up was by requiring proof of vaccination for entry to movies and bars and such. And because healthcare still thinks it’s 1950, this “proof” was typically a piece of paper. Seriously. Anyways, a few folks who live in the current millenium came up with a better idea they called SMART Health Cards — a fancy way of using QR codes and phones to share information (like vaccine status) that can be digitally verified. It was a lot better than paper — The Commons Project even made a free mobile app that venues could use to quickly and easily scan cards. More than thirty states adopted the standard within months — a track record that will make any health tech wonk stand up and take notice.
Of course the problem with any new technology is that adoption takes time — most folks still just showed up at the bar with a piece of paper. But with SMART Health Cards, that’s fine! Paper records could easily include a SHC QR code and the system still worked great. I found this bridge between the paper and digital worlds super-compelling … it just smelled like maybe there was something going on here that was really different. Hmm.
As it turns out, the pandemic began to largely burn itself out just as all of this was building up steam. That’s a good thing of course, but it kind of put the brakes on SHC adoption for a bit.
Enter SMART Health Insurance Cards
One reason the states were so quick to adopt SHCs is because it was fundamentally simple:
Host a certificate (ok, a “signing key”).
Sign and Print a QR code on your existing paper records.
That’s the whole thing. Everything that worked before keeps working. All you need to do to get the digital benefits is to put a QR code on whatever document or card or app you already have. This is pretty neat. Of course, other pieces of the ecosystem like the verifier and “trust network” of issuers took a bit more work, but for the folks in the business of issuing proof, it’s really easy.
It’s pretty clear that this technology could be used in other ways as well. Extending vaccine cards to include more history for camps and schools is an obvious one. Folks are working on an “International Patient Summary” to help people move more seamlessly between health systems. And, finally getting back to the point of this post, it seems like there is a real opportunity to improve the experience of patient check-in for care — we all have insurance cards in our wallet, why not make them digital and use QR codes to simplify the process?
This idea gets me excited because, if you play it out, there appears to be a chance to move that “individual health record” ball forward. First, there is real business momentum behind the idea of improving check-in. 22% of claim denials are due to typos and other errors entering registration information. We’ve learned it takes six weeks to train front desk staff to interpret the thousands of different insurance card formats — and it’s a high-turnover job, so folks are running that training again and again. And even when the data makes it to the right place in the end, it’s only after a super-annoying process of form-filling and xeroxing that nobody feels positive about.
All of this together means there are a lot of people who are honestly psyched about the potential financial / experience benefits of digital check-in. Especially when the lift is simply “put a QR code on your existing cards.” It’s kind of a no-brainer and I think that’s why more than 70 different organizations were represented at the UCSD demonstration. It was pretty neat.
More than insurance
Cool, so there’s motivation to actually deploy these things and begin to transition check-in to the modern world. (I should acknowledge that this is not the first or only initiative in this space; for example Phreesia has been working the problem for years and does a fantastic job. SMART Health Cards are additive to these workflow solutions and will just make them all get traction quicker.)
But the other thing that gets me excited here is that the “payload” in a SMART Health Card can carry way more than just insurance data. That same card — especially since it’s coming from an insurance company that knows a lot about your health — could include information on your allergies, medications, recent procedures, and much more. All of the stuff that you have to fill out on forms every time you show up anyways, and that can make or break the quality of care you receive. You can even imagine using this connection to set up authorization for the provider to update your personal record after the visit.
Woo hoo! At the end of the day, I see this initiative as one that has the potential to improve coordination of care through individuals in a way that will actually be deployed and sustained, because it has immediate and obvious business benefit too. And with the ability of SHCs to bridge paper to digital, we may be looking at a real winner. Still a ton of work to do on the provider integration side, but that just makes it interesting.
Oops one problem (and a solution)
It turns out that there is one big technical issue with SHC QR codes that make a lot of what I’ve been gushing about kind of, well, impossible. The numbers bounce around depending on the physical size of the QR image, but basically you can only cram about 1,200 bytes of data into the QR itself. That’s enough for a really terse list of vaccines, but it just doesn’t work for larger payloads. Insurance data alone using the proposed CARIN FHIR format seems to average about 15k. Hmm.
No problem — Josh and his merry band of collaborators come to the rescue again with the concept of SMART Health Links. A SHL creates an indirection between the QR Code and a package of data of basically unlimited size that can contain multiple SMART Health Cards, other collections of health data, and even those authorization links I mentioned earlier. The data in the QR code is just a pointer to that package, encrypted at a URL somewhere. The standard defines how that encryption works, defines ways to add additional security, and so on. It’s great stuff.
The workflow we demonstrated at UCSD uses payor-issued SMART Health Cards wrapped up inside SMART Health Links. If a person has multiple insurance cards (or even potentially drivers licenses and other good stuff) they could combine them all into a “Super-Link” while still maintaining intact the ability to verify each back to the company or state or whatever that issued it. Ka-ching!
And if you’re a nerd like me, over the next week or so I’m going to write two techy posts about the details — one for SMART Health Cards and one for SMART Health Links. Hopefully they will serve to get folks more comfortable with what it will take for issuers and consumers to get moving with real, production deployments quickly. If you’d like to get notified when those go up, just follow me on LinkedIn or Twitter or whatever.
It’s a good fight and hopefully this one will get us closer to great care. Just Keep Swimming!
“USCDI vs. USCDI+ vs. EHI vs. HL7 FHIR US Core vs. IPA. Definitions, similarities, and differences as you understand them. Go!” —Anonymous, Twitter
I spent about a decade working in “Health Information Technology” — an industry that builds solutions for managing the flow of healthcare information. It’s a big tent that boasts one of the largest trade shows in the world and dozens of specialized venture funds. And it’s quite diverse, including electronic health records, consumer products, billing and cost management, image management, AI and analytics of every flavor you can imagine, and more. The money is huge, and the energy is huger.
Real world progress, on the other hand, is tough to come by. I’m not talking about health care generally. The tools of actual care keep rocketing forward; the rate limiter on tests and treatments seems only our ability to assess efficacy and safety fast enough. But in the HIT world, it’s mostly a lot of noise. The “best” exits are mostly acquisitions by huge insurance companies willing to try anything to squeak out a bit more margin.
That’s not to say there’s zero success. Pockets of awesome actually happen quite often, they just rarely make the jump from “promising pilot” to actual daily use at scale. There are many reasons for this, but primarily it comes down to workflow and economics. In our system today, nobody is incented to keep you well or to increase true efficiency. Providers get paid when they treat you, and insurance companies don’t know you long enough to really care about your long-term health. Crappy information management in healthcare simply isn’t a technology problem. But it’s an easy and fun hammer to keep pounding the table with. So we do.
But I’m certainly not the first genius to recognize this, and the world doesn’t need another cynical naysayer, so what am I doing here? After watching another stream of HIT technobabble clog up my Twitter feed this morning, I thought it might be helpful to call out four technologies that have actually made a real difference over the last few years. Perhaps we’ll see something in there that will help others find their way to a positive outcome. Or maybe not. Let’s give it a try.
A. Patient Portals
Everyone loves to hate on patient portals. I sure did during the time I spent trying to make HealthVault go. After all, most of us interact with at least a half dozen different providers and we’re supposed to just create accounts at all of them? And figure out which one to use when? And deal with their circa 1995 interfaces? Really?
Well, yeah. That’s pretty much how business works on the web. Businesses host websites where I can view my transaction history, pay bills, and contact customer support. A few folks might use aggregation services to create a single view of their finances or whatever, but most of us just muddle through, more-or-less happily, using a gaggle of different websites that don’t much talk to each other.
There were three big problems with patient portals a few years ago:
They didn’t exist. Most providers had some third-party billing site where you could pay because, money. But that was it.
When they did exist, they were hard to log into. You usually had to request an “activation code” at the front desk in person, and they rarely knew what you were talking about.
When they did exist and you could log in, the staff didn’t use them. So secure messaging, for example, was pretty much a black hole.
Regulation fixed #1; time fixed #2; the pandemic fixed #3. And it turns out that patient portals today are pretty handy tools for interacting with your providers. Sure, they don’t provide a universal comprehensive view of our health. And sure, the interfaces seem to belong to a long ago era. But they’re there, they work, and they have made it demonstrably easier for us to manage care.
Takeaway: Sometimes, healthcare is more like other businesses than we care to admit.
B. Epic Community Connect & Care Everywhere
Epic is a boogeyman in the industry — an EHR juggernaut. Despite a multitude of options, fully a third of hospitals use Epic, and that percentage is much larger if you look at the biggest health systems in the country. It’s kind of insane.
It can easily cost hundreds of millions of dollars to install Epic. Institutions often have Epic consultants on site full time. And nobody loves the interface. So what is going on here? Well, mostly Epic is just really good at making life bearable for CIOs and their IT departments. They take care of everything, as long as you just keep sending them checks. They are extremely paternalistic about how their software can be used, and as upside-down as that seems, healthcare loves it. Great for Epic. Less so for providers and patients, except for two things:
“Community Connect” is an Epic program that allows customers to “sublet” seats in their Epic installation to smaller providers. Since docs are basically required to have an EHR now (thanks regulation), this ends up being a no-brainer value proposition for folks that don’t have the IT savvy (or interest) to buy and deploy something themselves. Plus it helps the original customer offset their own cost a bit.
Because providers are using the same system here, data sharing becomes the default versus the exception. It’s harder not to share! And even non-affiliated Epic users can connect by enabling “Care Everywhere,” a global network run by Epic just for Epic customers. Thanks to these two things, if you’re served by the 33%+ of the industry that uses Epic, sharing images and labs and history is just happening like magic. Today.
Takeaway: Data sharing works great in a monopoly.
C. Open Notes
OpenNotes is one of those things that gives you a bit of optimism at a time when optimism can be tough to come by. Way back in 2010, three institutions (Beth Israel in MA, Geisinger in PA, and Harberview in WA) started a long-running experiment that gave patients completely unfettered access to their medical records. All the doctor’s notes, verbatim, with virtually no exception. This was considered incredibly radical at the time: patients wouldn’t understand the notes; they’d get scared and create more work for the providers; providers fearing lawsuits would self-censor important information; you name it.
But at the end of the study, none of that bad stuff happened. Instead, patients felt more informed and greatly preferred the primary data over generic “patient education” and dumbed-down summaries. Providers reported no extra work or legal challenges. It took a long time, but this wisdom finally made it into federal regulation last year. Patients now must be granted full access to their providers’ notes in electronic form at no charge.
In the last twelve months my wife had a significant knee surgery and my mom had a major operation on her lungs. In both cases, the provider’s notes were extraordinarily useful as we worked through recovery and assessed future risk. We are so much better educated than we would otherwise have been. An order of magnitude better than ever before.
Takeaway: Information already being generated by providers can power better care.
D. Telemedicine
It’s hard to admit anything good could have come out of a global pandemic, but I’m going to try. The adoption of telemedicine as part of standard care has been simply transformational. Urgent care options like Teladoc and Doctor on Demand (I’ve used both) make simple care for infections and viruses easy and non-disruptive. For years insurance providers refused “equal pay” for this type of encounter; it seems that they’ve finally decided that it can help their own bottom line.
Just as impactful, most “regular” docs and specialists have continued to provide virtual visits as an option alongside traditional face-to-face sessions. Consistent communication between patients and providers can make all the difference, especially in chronic care management. I’ve had more and better access to my GI specialists in the last few years than ever before.
It’s only quite recently that audio and video quality have gotten good enough to make telemedicine feel like “real” medicine. Thanks for making us push the envelope, COVID.
Takeaway: Better care and efficiency don’t have to be mutually exclusive.
So there we go. There are ways to make things better with technology, but you have to work within the context of reality, and they ain’t always that sexy. We don’t need more JSON or more standards or more jargon; we need more information and thoughtful integration. Just keep swimming!
Welcome to the finale! While the full codebase has been available from the beginning, parts 1, 2, and 3 of the series have focused mostly on the logistics of getting a SMART app registered, authorized and running within the various EHR environments. After all that noise, you’d think you could just write your app in peace, but no. Why? Because healthcare data freaking sucks.
There are a few reasons for this, some legit and others not so much. It’s useful to understand the whys, so we’ll talk about them first. But if you’re going to write real apps, not just connectathon demos, you need a strategy for muddling through it, so we’ll do that too. With real code.
Health records are stories first
Consider your own health history for a moment. Even for the healthiest among us, there are childhood and adult vaccinations, a few broken bones, allergies that wax and wane, that weird skin thing you were embarrassed to ask the doc about, colonoscopies or mammograms… it’s a long list. If you’re part of the 60% of the population that manages a chronic condition, the list gets a lot longer. And it’s all important. The care you need today is a direct result of the care you’ve received in the past.
Now let’s make it concrete: tell me when you had your last tetanus shot. Maybe you have a patient portal somewhere with that data, if you remember which one and if you remember your username and if you had an hour to look for it. But in the ER today with a rusty nail stuck in your foot? Pick one: “When I was a kid;” “Not sure if I ever have had one;” “Two years ago when I was on vacation.”
At least currently, a booster is recommended if your last shot was more than five years ago (or ten if it’s a clean wound). So even with those vague answers, a doc can judge whether or not you need a shot — probably yes for the first two, and no for the last. Plus they can enter that into your record so that there is better information available for your next ER visit.
The point is that even “simple” medicine is hard, and any information is better than none when trying to make care decisions. Getting an extra tetanus booster is no big deal — but for other complex, difficult-to-diagnose conditions docs face every day, the stakes are much higher.
This is why medical dramas are always popular on TV. Every case is a detective story, piecing together life history and lab results and images and Medline searches until a consistent picture finally emerges. So while “got a rash from the flu vaccine” or “travelled to the rainforest as a teen” may not seem important in isolation, as clues to something larger they can be pivotal.
As I used to say a lot in my HealthVault days, comprehensive messy data trumps spotty clean data any day. This is uncomfortable for folks that create data models and apps. We like clean data. “As a kid” may be super-helpful to a doc wondering when you got the measles, but it’s (nearly) useless for a model trying to predict the optimal age to get a shingles vaccine.
We make it worse
It’s tough to build data models (and APIs) that support the narrative, messy data needed to deliver comprehensive care and serve as the basis for compute-based solutions, that’s for sure — and I certainly don’t have a silver bullet to offer. But again and again, the formats we create just make things worse by punting the issue. Everything can be null, everything can be a list, controlled vocabularies are just recommendations, you get the idea. Ironically given this series, I was and remain pretty blasé about FHIR itself because it is exactly the same. Sure it’s easier to parse and the documentation is excellent, but at the end of the day, pretty much the entire burden of interpreting the data gets dumped on the app developer.
To wit: pretty much every app in the world needs to display the patient’s name. These apps aren’t name experts. They just want the freaking name to show on a web page. But in the FHIR patient record:
There is a list of names (and it’s nullable).
Each HumanName entry in the list has a nullable NameUse constant, but the standard doesn’t have explicit priority rules for picking the best.
Each entry has a nullable Period, which if present might indicate that the name is no longer in use, after some more parsing work and simple but finicky computation.
The structure has a “text” element intended for display … but it’s nullable.
The family name used to be nullable array, but in later versions is a nullable singleton.
You might say that it’s the job of a client library to wrap up this complexity and make it usable. And to be sure, that’s exactly what I’ve tried to do with SmartEhr (more on this in a minute!). But that’s just a band aid over a lazy API. And because typically APIs support multiple client libraries across languages, you’re pretty much guaranteed that decisions about how to interpret the data are going to diverge between them. What a mess. Left to a developer looking to get through to the “real work” of their application, it can get ugly fast:
String name = patient.name.get(0).text;
This is real code I’ve seen out there. It might look good at the connectathon with fake data, but that silly little line has two potential NullPointerExceptions and one IndexOutOfBounds expression, and as a kicker may have picked the wrong entry. Sweet.
At this point in the program I’d like to remind you that we’re just talking about getting thepatient’s name.
Anyways, I can complain all I want — but the API ain’t changing, so our only option is to build in some of this developer-friendly functionality at a higher level. Doing this well is quite tricky, because by definition the code is, to use the popular jargon, opinionated. Patient.bestName makes choices:
We interpret a null period to mean the name is active.
We “prefer” names in the order they appear in the HumanNameUse enum. (Even looking at this just now I’m wondering if I should have moved “anonymous” to the top of the HumanNameUse enum, since it’s intended to be privacy-protecting.)
SmartTypes
Making these helpers as clean and maintainable as possible is the job of SmartTypes.java — a collection of structures that parse raw FHIR resources from JSON and then selectively add helpers to improve the developer experience. This breaks down into three main bits:
Defining the structures based on the specification.
Adding FHIR-specific parsing logic in the form of JsonDeserializers.
Designing and writing opinionated helpers.
Unlike comprehensive FHIR mappings like HAPI, SmartEhr is parsimonious about which resources it codifies and which fields within those resources are parsed out. This hurts a little, because I’d like to be helpful to everyone. But it takes careful thought in the context of a use case to do a good job, so I decided it was better to leave expansion to the future. If you add a resource or helper, please send me a pull request, and/or let me know if I can help think it through.
Defining the structures is relatively simple. Using the excellent FHIR reference material, just create a Java object with public fields that you care about associated with the types you want those fields to be. Sometimes the right type is obvious and sometimes it’s a little more complicated — the key is to pick something that is going to be the most useful to a developer. This is a hierarchical exercise, as you may have to define new “primitive” structures along the way.
The FHIR standard has evolved over the years. But because the changes from DSTU2 to R4 have been pretty subtle, I’ve been able to mostly abstract them away for developers. This provides nice flexibility if an EHR hasn’t stayed current, but may end up being too much of a hassle to be worth it long-term — we’ll see.
When it comes to parsing the json into these objects, I can’t say enough good things about the Gson engine — SmartEhr uses it extensively throughout. Each top-level structure is given a static “fromJson” method that basically asks Gson to do the work (e.g., Patient.fromJson). We add two bits of goodness to this process ourselves.
First, we do a bit of post-processing on the parsed object to make it easier to use. Primarily we use this to sort lists in order of descending priority (where “priority” is something I’ve just done my best to assess where the standard isn’t forthcoming). You could imagine taking this post-processing further, for example adding dummy elements to empty lists to avoid the need for annoying null checks, but I haven’t gone there.
We also add parsing logic to patch some FHIR quirks and novel types. This logic is implemented as a set of JsonDeserializer classes attached to our Gson parser:
The “date” and “dateTime” FHIR types are parsed into LocalDate and ZonedDateTime respectively. This is a classic optionality situation; each FHIR subject allows for increased precision (e.g., YYYY, YYYY-MM or YYYY-MM-DD for dates) based on what is known. Since developers most often want to compare dates, this is hard to work with — these deserializers default missing values to get to something reasonable. Be careful here though! “1990” isn’t really the same as “1990-01-01” … use case matters.
In a few places, string arrays have been changed to strings between versions. The LaxStringDeserializer makes that go away by space-concatenating arrays if needed.
These steps get us pretty far — the objects are clean and validated and in many cases can be used as-is. But as we discussed earlier, there’s still a ton of room for interpretation. The helpers we’ve added to the structures wrap this up, and so far fall into a few buckets:
Picking of the “best” from a nullable list of items, such as in Patient.bestAddress or bestName. This is generally a combination of ordering the “use” constants and checking for valid periods (Period.current).
Condition.bestGuessOnset is a particularly interesting one, and my least favorite helper implementation. Onset may be recorded as a dateTime, but the standard also allows it to be given as an Age, Period, Range or free-text String. I really should be at least trying to use those alternate types, but as yet have not.
Weeding through obsolete or erroneous entries, as in Condition.validAndActive. Of particular note here is the validation status — if something is “entered_in_error” it is typically not removed from the record, just marked as such. These can easily lead a naïve developer astray if not handled.
Sometimes it’s just nice to have an easy way to display items onscreen; helpers like Address.display and HumanName.displayName take care of this.
SmartTypes is definitely just the seed of a complete developer-friendly data model for this stuff. But I hope that the general pattern will make it easy for myself and others to grow it as needed.
Enough Said
Well, I think that about does it. These posts have been dense and wonky, but I’ve tried to include enough color that readers come away with two uber-points:
SMART on FHIR (not just FHIR) is a transformative technology for clinical care. There is no better way to get your software innovation into clinical practice.
SmartEhr and SmartServer are simple, production-class, almost dependency-free, license-free libraries that can help you build your SMART on FHIR app quickly and with a minimum of hassle.
Please let me know how I can help. Send me bugs (they are surely there) and pull requests. I would be super-excited to see apps based on these libraries make it into the EHR app stores. Go do that!
*** A last note and request (this will show up at the bottom of each article in the series). I’ve spent a lot of time in this industry, and the systemic impediments to progress and innovation can make even good folks feel hopeless sometimes. I really, truly believe that SMART is one of those rare technologies that has matured at exactly the right time to change the game. But there’s no guarantee — not enough folks know about it, and it’s too hard to use. If you swim in this pool, please help me fix that:
Share these articles with folks that use and implement EHRs. Tell them to look at the “app store” for their system and add an app to their test system. Tell them to ask vendors if they have a SMART interface to their solution.
Share these articles with folks that build care delivery solutions. Explain how they can use SMART to add functionality for customers without a custom login and without having to do an integration project with custom IT teams.
Contact me if I can help. There’s a form here on the website, and I’m @seanno on Twitter, or use LinkedIn, or whatever. I’m happy to answer questions, make some connections, and heck I might even write some code for you if it makes a difference.
There are a lot of moving parts in the SMART-on-FHIR game, but the launch sequence is where the magic really happens. The launch sequence provides your SMART app with automated login as well as user, patient and encounter context — everything necessary to create a friction-free and natural user experience. In this installment of the SMART on FHIR saga, we’ll walk through the process in detail.
Of course, the whole reason I wrote SmartEhr/SmartServer was to handle stuff like this for you. If I’ve been successful, then this article may not be that relevant. Still, it’s always useful to know what’s going on under the covers, and hopefully Google will leave a trail here for folks struggling to build their own implementations.
The Big Picture
SMART launch is actually covered quite well in the official documentation. It’s a bit broad for our purposes though (we only care about “EHR Launch”) and leaves out a bunch of implementation-dependent quirks that can easily trip things up. In short, EHR Launch proceeds like this:
Within the EHR user interface, the user navigates to a SMART app using a link or button set up by the EHR administrator. This opens up a web browser, typically within an iframe. The browser is directed to a pre-configured “launch” URL hosted by the SMART app with some magic parameters appended to the query string.
Upon receiving this request, the SMART app confirms the source EHR that initiated the sequence, then redirects the browser back to the EHR with query string parameters that confirm the identity of the SMART app and request access to the specific data types required.
Next the EHR performs final verification. In some launch scenarios the EHR also asks the user (through UX shown in the iframe) to login and/or select a target patient — but this does not happen with our embedded “EHR Launch” scenario, because that context is already set up (kind of the point of all this). The EHR redirects the browser one more time to the SMART app, adding a short-lived authorization code to the query string.
The SMART app makes a back-end request (independent of the browser) to the EHR, exchanging the authorization code for an “access token” and user/patient context.
Finally, the SMART app renders its user experience in the iframe created so very long ago. The app retrieves EHR data using the access token and FHIR resource URLs, and does what it does. Excepting refresh token management, that’s where the story ends, with happy users and hopefully some innovative care workflows!
For those that need a little more jargon in their lives, all this is basically an OAuth2 exchange. We’re going to dive into each step in much more detail below … buckle up!
Setup: URLs
The security of a SMART app connection depends on each system knowing where the other one lives. In step #3 above, the EHR will only send the authorization code to a “return URL” that is preconfigured for the app. Each EHR system has its own interface for managing this configuration; we walked through the Epic and Cerner flavors in the previous article in the series. Once you’ve seen one, the others will feel very familiar.
Similarly, the SMART app needs to know which EHRs are trusted and where they live. Each app can do this however they like; for SmartEhr we use a JSON configuration file that contains one entry for each trusted EHR. For example:
The “IssUrl” is the FHIR base URL for the relevant EHR instance; it must match the “iss” parameter that comes in on the “launch URL” we’ll talk about later. These two intertwined settings provide the basis for secure exchange of information. Hopefully it goes without saying that these need to be trusted HTTPS URLs for it to work as intended, but hey I’ll say it anyways.
The “ClientId” is assigned to the SMART app by the EHR, and also must be present in order for the exchange to work properly — you’ll find it in the same portal you use to set your return URL and such.
A couple of things to note about site configuration in SmartEhr. First, it is conceivable that you might have two EHRs using the same IssUrl setting — for example in a cloud-hosted multitenant situation. In that case, the EHR “launch” URL must be configured to also pass a “siteid” parameter that matches an entry in the SmartEhr configuration (SiteId values are arbitrary but should be unique). This does not change the requirement that the IssUrl value must match what we see on the launch URL; it simply allows us to differentiate between multiple tenants.
Second, the IssUrl does double-duty. It is the FHIR base URL for the EHR — that is, the root of the URL that we will use to query for data about the patient. But it also hosts an endpoint that contains “metadata” information about the EHR’s capabilities. Most importantly, this metadata contains two additional URLs: The “authorization” URL is the basis of the redirect in Step #2 above, and the “token” URL is used to fetch (and refresh if allowed) access tokens in Step #3.
SmartEhr pre-loads these URLs on a per-IssUrl basis at startup. By default we use the “/metadata/” well-known endpoint for this purpose. An alternative mechanism using the endpoint “.well-known/smart-configuration.json” can be selected by including the value “UseWellKnownMetadata” = true in a site configuration; there isn’t really any advantage to one or the other. If for some reason an EHR doesn’t support either of these endpoints, the URL values can be hardcoded in the site configuration with the values “AuthUrl” and “TokenUrl”.
Setup: Scope
As with the overall launch sequence, there’s pretty good documentation for launch scopes on the HL7 site. It’s just that there is a LOT there and it can be hard to navigate, so we’ll add a bit of color commentary.
Scopes are an OAuth2 concept that enable granular access to a user’s data; each scope is an application-defined string that represents some logical subset. In the FHIR case, an example is “user/Condition.Read” which is the scope required to look at (but not modify) a condition record for any patient that the EHR user has access to.
In many typical OAuth2 scenarios, the logged-in user is presented with a list of the scopes needed by an application at runtime, and explicitly grants or denies access to them. (They can even choose to grant some of the requested scopes but not all — a seemingly nice bit of flexibility that in reality just causes most apps to fall on their face.)
Our EHR launch scenario is a little different, in that the scopes needed by the SMART app are pre-configured up front on the EHR’s developer site. Theoretically an EHR could still show these values to the user for approval, but in my experience that doesn’t happen. This is actually much nicer (in this specific scenario) for the actual EHR user, but does create some redundant noise in the protocol that’s a little annoying.
March 2024 Update: Many of the scopes below have been updated in the latest version to use a system of abbreviations that are more granular and easier to combine (see here). The “v1” scopes below should continue to work, just make sure that whatever you use is supported by your target EHRs. Thanks Gail!
These are the key scopes that you’ll likely run into:
Scope
Notes
launch
Required for the EHR launch scenario, this scope gives you access to the “context” of the EHR — who is the patient and what is their current encounter.
openid fhirUser user/Practitioner.read
Provides the identity (in the form of a FHIR resource) of the logged-in user (openid fhirUser) and the rights to retrieve that resource (user/Practitioner.read). This is important if, for example, you need to know the user’s email address or NPI number.
patient/Patient.read
Demographic details for the in-context patient. Replace “Patient” after the slash with other resource names as needed (e.g., Condition, MedicationRequest).
user/Patient.read
As above (including the use of other resource names), but granting access to all resources of that type available to the user (i.e., across many patients).
[patient/user]/[Resource].write
Each of the “.read” scopes has a corresponding “.write” version. I haven’t focused on these in SmartEhr so far, but it’s a simple extension and perhaps a good blog post someday.
[patient/user]/[Resource].search
Using the same pattern as for read, the “.search” suffix allows parameterized queries for resources. I find this one annoying, because the official documentation says it should just be read and write to encompass both actions, but we live in the world as it is.
The patient/… and user/… scopes technically support wildcard syntax (e.g., patient/*.* to read and write everything about the in-context patient). A useful concept, but somewhat frowned upon even in the official documentation — and Cerner doesn’t even implement it. So despite the mess that comes with lengthy scope strings, better to avoid the wildcards.
Frankly getting these scopes right, and in sync with the EHR’s developer portals, can be tedious and a bit frustrating. For example, it took me longer than it should have to figure out that to get a list of conditions for a patient, Cerner wants “Condition.read” while Epic wants “Condition.search”. Combine this with the fact that there is often a time lag (of indeterminate length) between editing your configuration and having it apply in the sandbox and, well, ugh.
Another example: in the R4 API version Epic has broken down Conditions into different types (Problems, Health Concern, Genomics, etc.), and will fail searches that don’t include parameters to filter to what the app has access to. Why? I can understand adding granularity to the permissions model, but then just return the records the app can see. Healthcare standards, man.
SmartEhr always sends “launch openid fhirUser” in the scope string. Additional scopes are added based on the value of the “Scope” parameter in the json configuration file.
Refresh Tokens
Less common, but important scopes if you will have long-running sessions, are “online_access” and “offline_access”. These both ask to enable “refresh tokens” for long-lived access to EHR data. In my experience, EHR vendors are (understandably) not super-hot on this concept, but it can be useful and it is implemented in SmartEhr. Refresh behavior basically works like this:
App configuration at the EHR developer site must indicate a need for refresh tokens. This will also require the app to have a “Client Secret” which is kept private (in the case of SmartEhr, in the site configuration json).
The “online_access” or “offline_access” scope is provided during launch, indicating to the EHR (ahem, again) that you need a refresh token. The difference is that “online_access” provides a refresh token that is valid only as long as the currently logged-in EHR user stays logged in. “offline_access” persists indefinitely (more or less).
The app will receive a refresh token in addition to the access token in Step #4 of the “Big Picture” described at the top of this article.
If the access token expires, a new one can be fetched by sending the refresh token and the client secret to the EHR’s “TokenUrl” endpoint. Successful return will also include another refresh token so the app can rinse and repeat as needed.
“online_access” seems like a great idea for an app that stays interactive with the user, because otherwise there’s no way to ensure synchronization with the EHR’s login timeout. But in my experience, implementation is really spotty and I’ve literally been told by one vendor to “just not worry about it.” It’s true that the access token you’re granted generally will outlast a typical session, so that’s not crazy, I guess. Feels messy.
“offline_access” is perfect for surveillance apps that will periodically look for new data, or for writing data back to the EHR that may come later — for example, the user may ask for some long-running computation and have the results written back as a PDF document.
Once things are set up in the EHR developer portal, you can enable refresh tokens in SmartEhr by adding the appropriate values to the json configuration. For example at lines 3 and 9 below:
I can’t believe we’re this far into this and haven’t even actually started the launch. But we’re here at last. All the code for this part is in SmartEhr.launch; it might be helpful to have that open to refer to along the way.
Looking back at the “Big Picture,” Step #1 starts with the EHR sending a browser to the app’s launch URL as configured in the EHR developer portal — this is what we’ve simulated in the last two articles using the various EHR sandbox links. The EHR adds two query string parameters to this URL:
iss: the FHIR base URL for the EHR, corresponding to the “IssUrl” values in the json config.
launch: an opaque (to the app) string that identifies the EHR session and context.
The first thing we do is to allocate a new Session that we’ll maintain throughout the app’s lifecycle. It starts out pretty empty, but great things are in store for it.
Next, we need to find the correct SiteConfig for this EHR. Back in the Setup section we talked about the optional “siteid” query string parameter. We’ll use that value to look up the SiteConfig if it’s present, or if not will use the “iss” parameter. Either way, we succeed only if we can identify exactly one matching config and the provided “iss” query string parameter matches our configured value for the site.
Finally, we need to build up a URL where the EHR will confirm all is well before giving us the keys to get an access token. We pile a ton of query string parameters onto this URL:
response_type: always the string “code”.
aud: always (for our scenario) the “IssUrl” value in the SiteConfig.
client_id: the “ClientId” value in the SiteConfig.
redirect_uri: The URL that we would like the EHR to send the browser back to after confirming things are OK. This must match the value pre-configured in the EHR developer portal.
launch: the same value we received on the query string from the EHR. Round-tripping this value lets the EHR associate our request with the initial launch.
state: our growing “Session” object, dehydrated into a string. Just as “launch” helps the EHR keep track of context through this negotiation, “state” lets us do the same and we’ll see it again later. It’s important to keep tabs on how big this value is — as I found out the hard way, beyond 4k some browsers (and EHRs) will puke.
scope: as described in the “scopes” section, a space-separated string containing all of the scopes the app requires to run. I find this frustrating — the EHR already knows what scopes we need because we configured it back at their developer portal. It makes sense for other launch types, but for us it just means keeping two lists in sync for no real benefit. Ah well.
The launch method returns this complete URL to the caller to execute the redirect. Note that throughout all of this, “SmartEhr” is the headless engine that can be used within any web framework. If you’d like to see how that engine is used in an actual web context, take a look at SmartServer, in particular for this stuff SmartServer.registerLaunchHandler.
Successful Authorization
After the EHR decides that everything we just sent is OK, they send the browser back to the app’s return URL (the “redirect_uri” as configured in the EHR developer portal and sent in the redirect_uri query string parameter above). The EHR adds two parameters to this URL:
code: a short-lived token that we’ll trade for our real goal, an access token.
state: The same value we sent to the EHR in the last redirect.
The code for this phase is in SmartEhr.successfulAuth. We first “rehydrate” the Session using the state parameter, which provides the link back to the correct site configuration. Next up is a backend call (i.e., not using browser redirects) to the EHR to swap “code” for an access token. This call is a POST to the “TokenUrl” value in the SiteConfig, including the following form elements (in normal application/x-www-form-encoded format):
grant_type: always “authorization_code”
code: the code parameter we received on the query string
redirect_uri: the same redirect_uri we sent in the last phase. Don’t really get this one, but hey.
If we’re going to request refresh tokens, we send this request with a Basic Authorization header where the “user” is the configured ClientId and then “password” is the ClientSecret. If not, we just append ClientId to the query string as client_id.
This is the first time we’ve made a direct request from our app to the EHR, rather than going through the browser. For all of these, be sure to set the “Accept” header of your requests to “application/json”. Without it, Epic will return results in XML and Cerner won’t return anything at all. To be fair, this is buried in the spec, but come on now.
There is a ton of great stuff in the payload returned by this call; SmartEhr sifts it out in SmartEhr.parseTokens. For starters it includes the basic authorization stuff: the access token, an expiration timestamp for the token, and if appropriate a refresh token. We also get an identifier for the in-context patient, and a Boolean value “need_patient_banner” that you shouldn’t ignore. If this value is true, it means the app’s web page is not embedded in the EHR with visible patient context, so the app should prominently display the patient’s name and possibly other demographics such as birthdate. Users engaged in clinical care move quickly; accidentally working with the wrong chart can have disastrous results so this is a real safety issue — make sure your app is a good citizen!
The last piece of data we extract from this payload is the FHIR Resource identifier (a relative URL under the IssUrl) for the logged-in user. This value is buried in the “id_token”, which is a JSON Web Token string. There are a few steps to decoding this value, but ultimately we pull the value out of the “fhirUser” value in the token json. I’ve found EHRs to be inconsistent in returning relative or absolute URLs in this value; SmartEhr normalizes it so developers can count on a consistent format.
All of this goodness gets stored in the Session object that is then returned from the successfulAuth method. It’s important that this object be available in each request made by the logged-in user’s browser, so it needs to be stored in some kind of session manager. SmartServer accomplishes this in the registerReturnHandler method by storing the dehydrated Session in a session cookie, but whatever your web environment uses for session management is fine.
With an in-memory session manager, you can just store the object itself and be done with it. However, in production it’s more likely that you’ll use some sort of session that works across machines (the cookie that SmartServer uses is one example of this). In that case, you’ll need to be aware that the Session contents may change during a request — for example, if the access token expires and is refreshed. Each request that uses the Session should be wrapped with something like this:
String sessionData = getSessionDataFromMySessionManager();
SmartEhr.Session session = mySmartEhrInstance.rehydrate(sessionData);

// code does stuff with session

sessionData = mySmartEhrInstance.dehydrateIfUpdated(session);
if (sessionData != null) storeSessionDataInMySessionManager(sessionData);
You can see an example of this happening in the implementation of SmartServer.SessionHandler. SmartServer apps just inherit their handlers from SessionHandler and things are managed behind the scenes. Whatever web framework you use almost certainly has a similar mechanism to add pre- and post-actions to your handlers.
This seems a good time to reinforce that the SmartEhr object itself wants to be a long-lived process singleton, rather than something created on each request. This comes down to all of the metadata requests that happen on creation of the object. The singleton nature isn’t enforced, but maybe it should be. I’ll think about that.
Apps doing App Things
Anyways — at last, the app can just be an app. Each request has access to an authorized Session object, and can use it together with the global/singleton SmartEhr object to request FHIR data in whatever way and pattern makes sense.
I’ll be honest, I can’t imagine that anyone actually has read this far. That’s fine — the point here was to be super-comprehensive and call out all the little quirks that make developing from the spec a challenge. Google, please serve it up to those in need.
And I suppose maybe walking through all the grotty details will encourage you to just use SmartEhr, and maybe even SmartServer too. If you do, and especially when you find bugs, let me know!
Next up (and maybe the last, not sure) in the series, we’ll talk about working with FHIR resources and dealing with the challenges of extreme optionality in healthcare standards. Follow me on Twitter or LinkedIn or whatever to get a ping when that one comes out.
*** A last note and request (this will show up at the bottom of each article in the series). I’ve spent a lot of time in this industry, and the systemic impediments to progress and innovation can make even good folks feel hopeless sometimes. I really, truly believe that SMART is one of those rare technologies that has matured at exactly the right time to change the game. But there’s no guarantee — not enough folks know about it, and it’s too hard to use. If you swim in this pool, please help me fix that:
Share these articles with folks that use and implement EHRs. Tell them to look at the “app store” for their system and add an app to their test system. Tell them to ask vendors if they have a SMART interface to their solution.
Share these articles with folks that build care delivery solutions. Explain how they can use SMART to add functionality for customers without a custom login and without having to do an integration project with custom IT teams.
Contact me if I can help. There’s a form here on the website, and I’m @seanno on Twitter, or use LinkedIn, or whatever. I’m happy to answer questions, make some connections, and heck I might even write some code for you if it makes a difference.
In the first article of this series, I argued that anyone building or using healthcare technology should be excited about and embracing SMART on FHIR, right now. By integrating tools and workflows directly into the EHR user experience, SMART sidesteps many of the problems that have historically stymied innovation in care delivery. It’s super cool.
However, building a truly production-ready SMART app from scratch is a big lift. Much of this comes down to excessive optionality in the standards; trying to serve every scenario makes it painful to do simple and common things. That’s where this project comes in: SmartEhr and SmartServer are real, concrete, license-free Java classes that you can use to dramatically accelerate SMART development.
Time for the rubber to meet the road. First, we’re going to build a real, production-class SMART app using this framework using one class and just under 100 lines of Java. Future articles will go deeper; for now we’re just going to get some code running and get comfortable with sandbox environments.
XrayServer
Xray was built specifically for this walkthrough, but it’s actually generally useful for investigating resources and seeing FHIR data on the wire. After going through the launch sequence, the landing page makes it easy to call FHIR resources and view the JSON output. Think about it as a baby version of Postman for SMART.
1. Get the code
Your development machine will need reasonably recent copies of the JDK (I’m using OpenJDK v11, but it should work with any JDK >= v8); Maven and Git. You probably have them already, but if not come back when you’re good. I’ll wait here.
All the code you need is in the shutdownhook repository on github. Use the green “Code” button on that page to get the code — either by cloning it or just downloading a zip and unpacking it. There are a few projects in the repository but you only care about these two:
shutdownhook/toolbox contains utility code, most importantly the underlying HTTPS server and request classes used by SmartEhr and SmartServer.
Use the commands below to first build the toolbox code and install it into your local Maven repository, then build the smart-trials project. The end result is a “fat” jar in the target directory that has no external dependencies and includes main() entrypoints for XrayServer and the ClinicalTrialsServer we’ll cover later in the series.
cd YOUR-SRC-DIR/shutdownhook/toolbox
mvn clean package install
cd ../smart-trials
mvn clean package
ls -l target/smart-trials-1.0-SNAPSHOT-jar-with-dependencies.jar
If you have any problems building, let me know. I work pretty exclusively in Linux (as nature intended) so sometimes miss Mac or Windows weirdnesses. Happy to fix that up if it happened here; better yet send a pull request!
3. Run it!
The jar is bundled with a “get started” Xray configuration as well as a self-signed “localhost” certificate that allows the HTTPS server to manage browser exchanges. This makes it easy to get started with development, but obviously neither of them are production-ready. That’s ok for our purposes today.
Run the server with these commands:
cd YOUR-SRC-DIR/shutdownhook/smart-trials
java -cp \
    target/smart-trials-1.0-SNAPSHOT-jar-with-dependencies.jar \
    com.shutdownhook.xray.XrayServer
The server will start listening for requests on port 7071. Point your browser at https://localhost:7071/ and go through the motions of accepting the scary untrusted certificate — you need to do this now so that the redirect and iframe negotiations work later on. Also, if you’re running a firewall on your server, make sure to open up port 7071. On CentOS 7, I use something like:
Now point your browser at the SMART App Launcher (https://launch.smarthealthit.org/). There’s a ton of options on this page, but just leave them alone and scroll down to the bottom. Enter https://localhost:7071/launch into the “App Launch URL” box and click “Launch App!”
MAGIC TIME. If all goes well, you’ll be prompted to select a practitioner and a patient, then land on a screen that looks like the screenshot to the right. All that noise on the page doesn’t really matter, but feel free to click around and get a feel for what FHIR resources look like. Sweet!
What Just Happened?
The App Launcher acts as a fake EHR system. By providing the /launch URL, you’re telling that EHR to open up Xray in an iframe, adding some identification parameters to the query string. Xray verifies that these look good, then redirects the browser back, saying “please give me the ok to get an access token.” The EHR ensures a patient and provider context is set up, and once again sends the browser back to Xray for some final housekeeping and the landing page.
Beyond the logistics, the most important part of this dance is agreement on the types of data that Xray requires to do its job. In the real world, this information is pre-registered with the EHR (this is skipped in the SMART App Launcher) and confirmed during the negotiation. As a testing/inspection tool, Xray makes a pretty broad request for data types, but restricts itself to “read-only” operations.
The launch negotiation is encapsulated in the launch and successfulAuth methods of SmartEhr, and specified quite well in the SMART documentation for the masochists in the audience. We just need to make sure the configuration is set up correctly.
Epic Time
The SMART App Launcher lets us skip a lot of that configuration, which is super-convenient for getting started, but leaves a bunch of gaps for apps intended for the real world. Each vendor has their own developer program which interprets the specification just a little differently. Our first target is Epic because it is by far the dominant EHR system in the United States.
Epic on FHIR is the homepage for the Epic development program. Sign up (for free), click “Build Apps” and then “Create” to set up Xray as an application in your account, using the following guide to fill out the form:
Application Name can be anything you like. For a production app, this information will be published in the Epic directory, but we’re never going to launch this app, so anything works.
Application Audience should be “Clinicians or Administrative Users.” SMART apps can work in many scenarios, but we’re focused on tools for providers, embedded in the EHR.
Incoming APIs is where we set our required access to data.
All access types are tagged with a FHIR API version: DSTU2, STU3 or R4. SmartEhr supports all of these, but we’ll just use the “R4” versions for Xray.
Every SmartEhr app needs at least Patient.Read access.
If you need information about the logged-in provider (such as their email address), you’ll need Practitioner.Read.
The static links on the Xray landing page include shortcuts to the patient’s problem list and medications, so also include Condition.Search (Problems) and MedicationRequest.Search (Orders).
Add any other data types you’re interested in as well; you can make these requests from Xray using the “Custom” input box.
Redirect URI should be https://localhost:7071/return (note the https:// prefix is included in the dropdown already).
Xray does not Require Refresh Tokens so leave this checkbox blank.
Click the “Save” button, then scroll to the bottom of the page where some new options will appear:
SMART on FHIR Version should be set to “R4” as discussed above.
Summary, like application name, is important for published apps but can be anything for Xray.
Leave the rest of the fields as they are and click “Save & Ready for Sandbox”. This will send you back to the application list; if you click on your new app, you’ll see “Client ID” and “Non-Production Client ID” fields at the top of the page. Your app is ready to go!
Before we move on, two side notes. First, there often is a delay between editing settings for your application and seeing them live in production. I have wasted a ton of time thinking my changes had no effect, only to have them light up ten or fifteen minutes later. Be patient!
It’s also worth touching on the publication process for FHIR applications so that they can be used at real Epic sites. The simplest way to get this done is do simply mark your app as ready with the “Save & Ready for Production” button. You can then share your “production” and “non-production” (for test systems) Client IDs with interested Epic customers — details are in the Epic documentation.
If you want to show up in Epic’s “App Orchard” directory of applications, life is a little more complicated (and expensive). You’ll have to join the Epic App Orchard program and go through a process whereby your application is approved for publication. You may also need to be in this program if your app needs to access data not part of the current FHIR standard — for example, at least as of this writing, billing and insurance information is only available through custom Epic APIs beyond FHIR.
We’re almost there. Epic knows about Xray, but Xray doesn’t know about Epic. Back on your development machine, fire up an editor and open the file YOUR-SRC-DIR/shutdownhook/smart-trials/src/main/resources/xray.json. In the “Sites” array, you’ll see an entry for “Epic” — replace the “ClientId” value with your “Non-Production Client ID.” Rebuild the jar and re-launch Xray to pick up the new configuration.
OK — let’s run this thing! Back on the Epic on FHIR site, use the “Documentation” dropdown and choose “Launching your App from Epic.” Click the “Try It” button, select a test patient, choose your app in the list, set the launch URL to https://localhost:7071/launch (just like with the SMART App Launcher), and click “Launch.”
MORE MAGIC TIME. The Epic sandbox doesn’t embed your app in a simulated EHR like we saw with the SMART App Launcher, but the Xray page should look very similar. This is pretty cool — the exact same code that works with the SMART App Launcher is working with Epic as well!
I’ll see your Epic and raise you a Cerner
The other behemoth in the EHR world is Cerner — most notable recently for winning a $16B contract to be the EHR for the Veteran’s Administration. Cerner also happens to be home to one of my all-time favorite developers, so woot for that.
Cerner’s SMART developer program is similar to Epic’s in a lot of ways; you can sign up for free and use their “Code Console” to set up and test applications. Once you’re logged into to the console, choose “My Apps” and then “New App” to get started. Not surprisingly, the information you provide is nearly identical to Epic — the only extra question is about OAuth2, to which you should say YES.
The interface for selecting access looks familiar too, but here we see a distinction between “User Scopes” and “Patient Scopes.” The difference is explained in the SMART specification, but in short “user” means any data the logged in user has access to (possibly including many patients), while “patient” is limited to data for the one patient that was selected in the EHR for use in your app. Usually we’re going to want the “patient” versions; an exception is user/Practitioner.read which is required to get information about the logged-in user.
Cerner has also chosen to disallow “wildcard” scopes for their FHIR applications (the SMART reference linked above talks about these), so if you choose additional data types for use in Xray, you’ll have to update the “Scopes” string in your xray.json config file to match.
After creating your application, clicking it from the “My Apps” list will show a summary page that includes your Client Id. Copy this value and add it to the xray.json config file under Sites/Cerner. Also review the “FHIR Spec” link on that page; you may (or may not) need to update the “IssUrl” config setting with that value. Remember to re-build and re-launch Xray to pick up the new configuration.
EVEN MORE MAGIC TIME. Click on the “Begin Testing” button and use the provided demo credentials to log into the Cerner Sandbox EHR. After the same now-familiar negotiation, Xray will show up connected to Cerner data. Three for three, woo hoo!
Enough Said (for today)
As a SMART app developer, we’ve done a whole lot here with very little code. I thought “under 100 lines” was a catchy way to say that, but the meat of the app is really less than fifty — three functions that each receive authenticated SmartEhr and Session instances, ready to make FHIR requests. No muss and no fuss. In the next article, we’ll look in more detail at the launch sequence. Things are getting increasingly nerdy folks. Just the way I like it.
*** A last note and request (this will show up at the bottom of each article in the series). I’ve spent a lot of time in this industry, and the systemic impediments to progress and innovation can make even good folks feel hopeless sometimes. I really, truly believe that SMART is one of those rare technologies that has matured at exactly the right time to change the game. But there’s no guarantee — not enough folks know about it, and it’s too hard to use. If you swim in this pool, please help me fix that:
Share these articles with folks that use and implement EHRs. Tell them to look at the “app store” for their system and add an app to their test system. Tell them to ask vendors if they have a SMART interface to their solution.
Share these articles with folks that build care delivery solutions. Explain how they can use SMART to add functionality for customers without a custom login and without having to do an integration project with custom IT teams.
Contact me if I can help. There’s a form here on the website, and I’m @seanno on Twitter, or use LinkedIn, or whatever. I’m happy to answer questions, make some connections, and heck I might even write some code for you if it makes a difference.
There’s no shortage of innovation in Healthcare… sort of. Better to say that there’s no shortage of innovation in diagnosis and treatment. The drugs and tests and equipment coming to market these days are stunning. But “Health IT” — the software and systems that coordinate and manage the delivery of care — not so much.
Which isn’t to say that there aren’t good ideas — it’s just super-hard to actually get them implemented and into use. Enormously complex “Electronic Health Records” from companies like Epic and Cerner rule the roost, and don’t generally make it easy to share the sandbox. I have some sympathy for the challenges they face. Healthcare is a weird confluence of science and art and building software to support it efficiently and accurately is just a hard job. Love them or hate them, EHRs are where healthcare workflow happens, period, full stop. When you spend up to $1B to install software (usually less, but looking at you, Mayo) … you’re gonna use it.
All of this makes it really tough to introduce new software into a healthcare environment. IT departments visibly pale at the suggestion. Users are rightfully resistant to logging into yet another app with yet another interface. Even getting over all that, data integrations are insanely expensive and difficult, so double-entry of information (and the mistakes that come with it) are rampant.
The Big Idea
So how do you impact care with software? Don’t fight city hall — instead, find a way to wedge intothe EHR, where folks live and breathe. Of course, that’s historically been much easier said than done, thanks to a lack of integration standards and enthusiasm for the concept amongst EHR vendors. (This “lack of enthusiasm” has been so problematic that language in the federal Cures Act actually calls it out!)
Viva the Revolution! Back in 2009, Zak Kohane and Ken Mandl wrote a landmark article in the NEJM titled “No small change for the health information economy.” The full text is behind the journalwall, but in short they said, “We need an iPhone App Store for Health IT and we’re going to figure out how to make it happen.” This kicked off a series of events that ultimately have come together as SMART on FHIR.
SMART on FHIR
At its core, SMART on FHIR (I’m just going to call it SMART from now on) provides a way to embed your own application into the context of an EHR experience. It’s a combination of technologies that let you:
Share the EHR’s login context, avoiding extra passwords and double-login.
Exchange data (read and write) with the EHR, avoiding duplicative data entry or storage.
Appear within the EHR user interface, providing a comfortable look-and-feel for users.
(Not strictly part of FHIR but key) Publish your applications in EHR “app stores” so users can find and, more importantly, install them without a heavy IT lift.
Sounds awesome. And it is, but fair warning: over the course of these articles I’m going to complain a lot about how SMART works. I mean, A LOT. So let me reinforce that I truly believe that it can and should be “the” transformative technology that breaks the juggernaut on Health IT innovation. I love it. I love the people who thought of it. I love the developers I know who have worked on it. I love that ONC has embraced it. It is awesome. OK.
That’s a good setup for the first big challenge. SMART is SUPER-broad — provider and patient apps, online and offline access, real-time and batch data, all served up with a big helping of optionality and vendor-specific noise that can make it hard to see what I believe is the much more targeted but revolutionary opportunity: Get third-party, real-time workflow innovation for caregivers into the EHR.
Seriously, every single company trying to impact care delivery needs to start thinking about SMART as their primary user interface. Sure, you’ll probably need to have a “lowest common denominator” version that stands alone — but treat that as a backup, not your lead. I promise that if you demo your solution embedded with shared login and no separate UX, you’ll get farther faster every time.
How Can I Help?
Lack of awareness is not the only thing hampering SMART adoption. The excessive optionality that dogs pretty much every healthcare standard is an anchor around SMART’s neck as well, making it unreasonably hard to do simple things like access a moderately clean list of a patient’s current health conditions, or even their preferred name (!!!).
My goal is to eliminate as much of that complexity as I can, so that building a SMART app is trivial. “ShutdownTrials” is a complete, standalone, 99% dependency-free (it does use Gson) project that tries to do this in three acts:
SmartEhr: a headless Java-based library for implementing SMART in any JVM-based application environment with minimal effort.
SmartServer: building on SmartEhr, an extensible, secure web server that handles all of the HTTPS interactions required to launch and authenticate an application.
ClinicalTrialsServer: building on SmartServer, a working, turnkey demo application that embeds contextual search for clinical trials into an EHR.
These can be used independently, so you don’t have to buy into my web server to use the backend. All have been tested with the Epic and Cerner sandboxes, and the Clinical Trials search application could be installed into production EHRs today (drop me a note if you’re interested, I’d be happy to help get it running at your site as a SMART proof-of-concept).
The code is all available, license-free, on Github. Over the course of this series I’ll dive into the implementation: first the basics and auth sequence, then a deep look into the data model and how I’ve tried to make the information there easier to consume. I’ve tried to optimize for time-to-production in my specific scenario, so the code looks a little different than other libraries. There’s a lot of it; we’ll take a few rounds to cover it all!
You should see something that looks like the screenshot to the right — a “Simulated EHR” that shows potential clinical trials for imaginary patient Phillip Jones. If you want to fine-tune the search, edit the demographics or use the checkboxes, then click “refresh list”. For example, the EHR doesn’t provide an address for Phillip, so you can fill in the country “US” to see only trials in the United States.
These results come from http://clinicaltrials.gov, a public repository of clinical trials maintained by the NIH. Beware that choosing multiple conditions will often lead to empty results; just aren’t a lot of combo trials for sinusitis, ED and rosacea!
Next, try going back to the launch page and clicking on “DSTU2 with patient/doc picker”. This time, before you see results, you’ll have the option to “log in” to the EHR and select a test patient. This will land on a search experience where the demographics and conditions are appropriate for that patient. Nice!
Here’s what is going on behind the scenes:
Your browser starts at the SMART App Launcher, a development sandbox maintained by the good folks at smarthealthit.org. While vendors like Epic and Cerner have quite serviceable development environments, SMART is nice because it’s completely open and has a solid selection of test patients to work with out of the box.
Once the provider is logged in and the patient is selected, a negotiation sends your browser back and forth between the EHR and ShutdownTrials a couple of times. The end result is that we prove to each other that we’re legitimate, and the application receives a token that can be used to read and write EHR data.
The application requests demographics and condition data for the patient, converts them into an API request at clinicaltrials.gov, and displays the results in the embedded iframe.
Tada! If it all seems very simple in practice, then at least I’ve gotten something right — because it’s anything but simple in execution. Buckle up friends, because the deep dive is going to be a great ride.
*** A last note and request (this will show up at the bottom of each article in the series). I’ve spent a lot of time in this industry, and the systemic impediments to progress and innovation can make even good folks feel hopeless sometimes. I really, truly believe that SMART is one of those rare technologies that has matured at exactly the right time to change the game. But there’s no guarantee — not enough folks know about it, and it’s too hard to use. If you swim in this pool, please help me fix that:
Share these articles with folks that use and implement EHRs. Tell them to look at the “app store” for their system and add an app to their test system. Tell them to ask vendors if they have a SMART interface for their solution.
Share these articles with folks that build care delivery solutions. Explain how they can use SMART to add functionality for customers without a custom login and without having to do an integration project with custom IT teams.
Contact me if I can help. There’s a form here on the website, and I’m @seanno on Twitter, or use LinkedIn, or whatever. I’m happy to answer questions, make some connections, and heck I might even write some code for you if it makes a difference.