AI is changing the world. Yes we are in a bubble and current claims are overblown and countless stupid companies are being started and a ton of investment capital is being thrown away. But don’t let anyone tell you (even if it feels good) that it’s all smoke, mimicry and plagiarism. They are incorrect.
There’s no substitute for direct experience — sit down and try it for yourself. You’ll quickly begin to develop an intuition for what it can and can’t do well. You’ll find amazing insights and unsettling failures, and learn how to direct it towards positive outcomes. The people that understand this will thrive on the other side.
To get you rolling, here are two quick, real-world anecdotes from earlier this week — and a few thoughts about why they went down the way they did.
1. Let’s Go Narrowboating!
For years I’ve been fascinated with the UK’s extensive canal network and the narrowboats that travel them. Lara and I are planning to meet some friends in the Cotswolds next year, and I’m trying to convince them that we need to rent a boat and spend a few days on the water.
Of course, the sum total of my experience with narrowboating comes from watching Pru and Timothy on TV, so where to start? These days it’s AI, of course. I started with this very exploratory opening salvo (including the heartbreaking typo literally on word #1!):
I’m need help planning a trip. My wife and I are 56 and would like to spend about three days exploring the Kennet & Avon Canal in a rented narrowboat. We’ve never been on a narrowboat or the canals before so we are beginners! We’d like a peaceful, quiet trip with a few locks but not too many. We’d like to have the option of staying in hotels at night, or at least mooring in villages with nice restaurants and pubs. Can you help me get started?
Here’s a record of the full conversation. Along the way the model made two errors of consistency, each of which could have been disastrous: (1) it would have stranded the boat at the end of the trip because it didn’t consider having to return it; (2) it both warned me not to travel the Caen Hill locks and then recommended a mooring point that would have required doing so.
But the final result, created soup to nuts in just over twenty minutes, is a remarkably useful and comprehensive itinerary:4-Day Narrowboat Holiday Guide for Beginners. Good enough to rival the most helpful travel agent.
2. Let’s Build a Web App!
Life on Whidbey Island is dominated by weather, tides and ferries. I’ve got a bunch of apps and sites I use to monitor this stuff, and for a long time I’ve wanted to put together a little mobile-friendly web site to unify them all.
This isn’t particularly complicated. My personal weather station and the NOAA tide stations have APIs, and I’ve previously hacked up the WSDOT ferries site so I can pull images. There’s even a REST API that can monitor water levels in our community tank. The only hangup is the user experience — I despise, and am not particularly good at, building usable, nice-to-look at HTML/CSS interfaces.
The file src/Tides.jsx is set up to fetch a json url representing a high and low tides for today and the following four days; right now it just displays that json text in the component div. I would like to render this information in a way that fits into the “card” display of the site.
Please write javascript that will create an HTML representation of the information that contains a simple graph of high and low tides over the period, with a vertical line marking the current time. The graph should show a smooth curve between highs and lows using the rule of twelfths (please indicate if you do not know what this is).
Below the graph should be a table of each high and low from earliest to latest.
An example of the javascript is in /tmp/tides.json.
The display should fit into the card that contains the content without expanding its width. It should render well on desktop and mobile browsers.
Please give it a try. Please only edit the file src/Tides.jsx so it’s easy to keep track of your work.
Here’s the complete set of interactions I used to create and fine-tune the tides HTML. There was a small bug rendering the horizontal axis to my specification, but most of the back-and-forth is me changing my mind about how to render the chart and table. It even figured out that “src/Tides.jsx” was the wrong relative path, and edited the correct file without saying anything. Really, really impressive.
The best travel agents have always been those who really, deeply understand:
The client. Who are they, what are their preferences, how much do they want to do in a day? Do they have any specific physical limitations? Do they want things scheduled to the minute or are they free spirits? How do they react when language is a barrier? What do they want to learn? Is it OK if their tour guide is a hugger?
The locale. Which museums are worth it, and how much time do you really need? What restaurants are an easy walk even at night? Which guides love to talk about wars, or sex, or food, or sport? When do you really want AC and when is it an option? Which side of the hotel is quieter and which has the best views?
This is stuff that’s really hard to pull out of even the best guidebooks, especially in combination with human idiosyncrasies — everyone is a different in some weird way. The best agents put all of this together into a coherent whole that just works.
Front-end web code is the same way — you need to understand not just the data you’re trying to render and how the user wants to see it, but also the incredibly arcane details of rendering HTML and CSS across different browsers and different devices.
This is where AI shines. It knows an incredible amount of “stuff” — more by far than any human that’s ever lived. It has extracted little nuggets out of reviews and support sites and other nooks and crannies that are extremely niche and hidden. It can hold a ton of these variables together, all and once, and mix and match and sort and connect them with a specification or request.
Any time you’d seek out an expert that knows “the secrets” and is willing to listen to what you really want — AI is going to be your best friend.
Trust but Verify
The popular press loves to point out “catastrophic” AI failings, a great example being the mistake of both telling me to stay away from Caen Hill and sending me through it. But it’s actually pretty easy to avoid things like this if you use careful phrasing (which I did not). For example, “Please double-check that your recommendations are consistent, that stops and landmarks line up with the route you’ve selected.”
Also, note my instruction to Claude that it should tell me if it doesn’t know the “rule of twelfths;” AI wants to please and needs reminders to stay in line. I use phrasing like this a lot when doing research: for example, “Please only provide data based on concrete information for which you can provide citations. Do you best to avoid bias or incomplete data sets and do not make up anything you don’t actually know to be correct.”
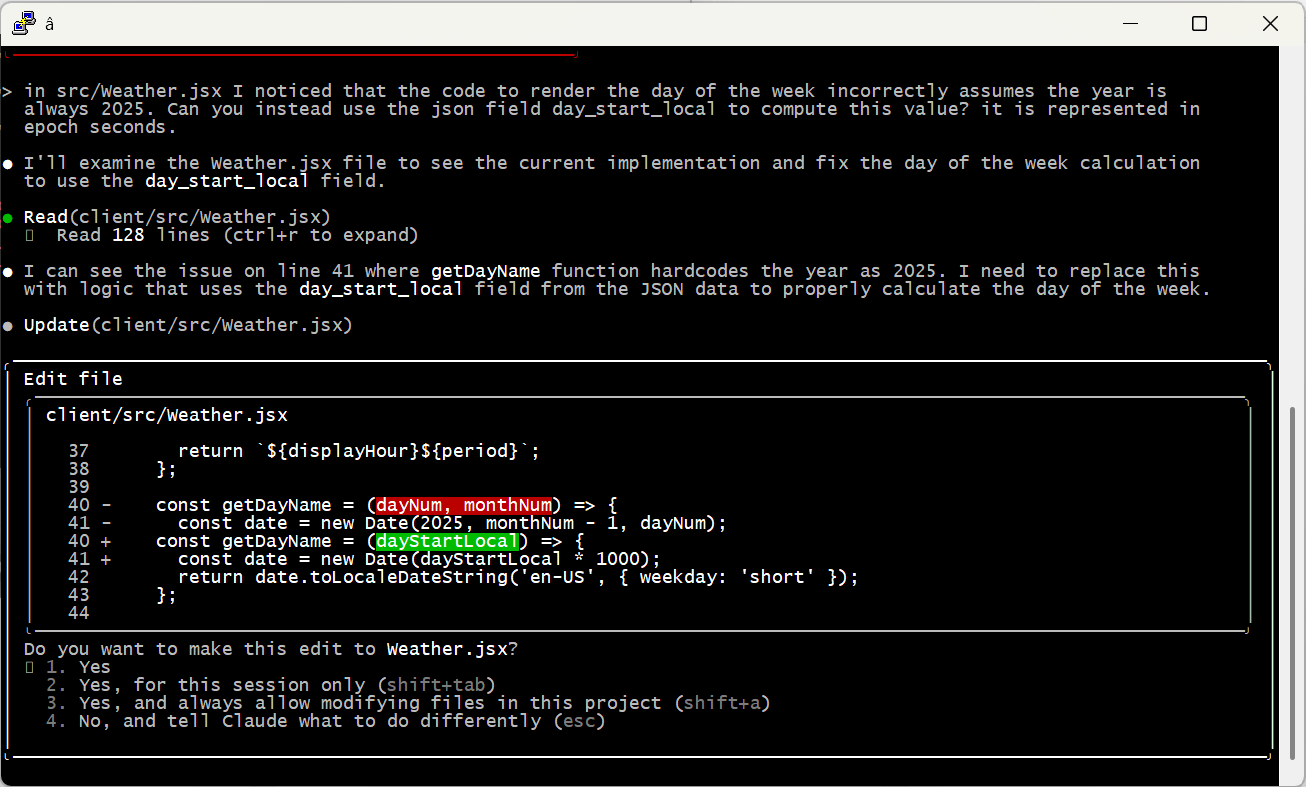
And of course, check the work yourself! Even the most senior human developers get a review before sending code to production; it’s no different with AI. When I asked Claude to code up the weather display, it created a bug by assuming it would always be 2025 — an issue that would have been invisible (for a few months at least) without manual review.
Embrace the Conversation
I find it most effective to simply talk to AI like I’d speak to a human. Set up tasks with details, examples and boundaries — just enough precision to minimize ambiguity while allowing space for learning, initiative and creativity.
I also simply cannot help but add “please” and “thank you” and “great job” and “my bad” into the conversation. That may seem a bit weird, but the agent is doing work for me, and I appreciate it, so why not acknowledge it? I actually think it leads to better outcomes, too. Maybe that’s all in my head, or maybe I just give better instructions in that mode. Either way I’m sticking with it.
Modularize and Limit Complexity
Looking back at the Caen Hill problem, it’s pretty clear what went wrong. Claude found that Denzies was a good stopping point based on distance and had great moorage, hotels and restaurants. On another thread it remembered that we were narrowboat beginners and should avoid tougher sections like Caen Hill. The failure was in missing the connection between these two factors — we couldn’t both avoid the locks and stop in Denzies.
Reminding the model to pay attention to these conflicts helps a ton. But there are still practical limits on how much they can handle at one time. A few weeks ago I tried playing with this by describing a relatively complex app. I purposely tried to do it all in one shot, something that is not recommended by anyone. 😉 The spec is here if you’d like to take a look.
As predicted, it was an abject failure. The model tried to break the problem up into pieces, but it was fundamentally unable to satisfy all the constraints at once. It would ignore requirements and lie about it, then break other stuff when it was caught out … just a mess.
At the end of the day, models can become overwhelmed — just like people. I’m sure the state of the art will keep evolving (“agentic” AI may be one step on that path), but for now the onus is still on humans to organize problems into tasks the machines can do.
A Miraculous World
I think that’s enough for one post. I just can’t encourage folks enough to spend time with these models and get a real, hands-on, hype-free sense of how they work, their strengths and their weaknesses. Don’t get sucked into the simplistic narratives of the popular press; on both “sides” of the AI issue they’re more about fitting the technology to their ideology than real understanding.
The reality is amazing and beautiful. And scary. And it’s here.
Lara and I shuttle regularly between Bellevue and Whidbey Island in Washington, so the Mukilteo-Clinton ferry is a big part of our life. WA actually runs the largest ferry system in the USA, with 28 boats tooting around the Puget Sound area. Super fun day trips all over the place, and the ships are pretty cool — there’s even a contracting process open right now to start converting the fleet to hybrid electric. Woot! But it can get pretty crowded — at peak summer times you can easily wait three hours to get on a boat. Recent staffing challenges have been a double-whammy and can make planning a bit tough. On the upside, a friend-of-a-friend apparently does a brisk business selling WTF (“Where’s the Ferry?”) merchandise.
Anyways, picking the right time to make the crossing is a bit of an art and requires some flexibility. We often will just plan to go “sometime after lunch,” pack up the car, and keep one eye on the live camera feeds watching for a break in the line. It occurred to me that having these cameras up on our TV would be more convenient than having to keep pulling my phone out of my pocket. Thus was born the “Washington Ferry Cameras” Roku channel, which I’ve published in the channel store and is free for anyone to use. Just search the store for “ferry” and it’ll pop up.
The rest of this article is just nerdstuff — the code is up on github and I’ll walk through the process of building and publishing for Roku. Enjoy!
The Roku Developer SDK
There are two ways to build a Roku channel: Direct Publisher and the Developer SDK. Direct Publisher is a no-code platform intended for channels that show live or on-demand videos from a structured catalog. You basically just provide a JSON feed describing the video content and all of the user experience is provided by Roku. It’s a pretty sweet system actually, making it easy for publishers and ensuring that users have a consistent streaming experience across channels.
The Developer SDK is meant for channels that do something other than just streaming video. There are tons of these “custom channels” out there — games and tools and whatnot. My ferry app clearly falls into this category, because there isn’t any video to be found and the UX is optimized for quickly scanning camera images. So that’s what I’ll be talking about here.
SDK channels are built using SceneGraph, an XML dialect for describing user interface screens, and BrightScript, a BASIC-like language for scripting behaviors and logic. It’s pretty classic stuff — SceneGraph elements each represent a user interface widget (or a background processing unit as we’ll see in a bit), arranged in a visual hierarchy that allows encapsulation of reusable “components” and event handling. We’ll get into the details, but if you’ve ever developed apps in Visual Basic it’s all going to seem pretty familiar.
Everything is interpreted on the Roku, so “building” an app just means packaging all the files into a ZIP with the right internal structure:
A source folder containing Brightscript files, most importantly Main.brs which contains the channel entrypoint.
A components folder containing SceneGraph XML files. Honestly most of the Brightscript ends up being in here too.
There is also an images folder that contains assets including the splashscreen shown at startup and images that appear in the channel list; you’ll see these referenced in the manifest file with the format pkg:/images/IMAGENAME. “pkg” here is a file system prefix that refers to your zip file; more details are in the documentation. You’ll also see that there are duplicate images here, one for each Roku resolution (SD, HD, and FHD or “Full HD”). The Roku will auto-scale images and screens that you design to fit whatever resolution is running, but this can result in less-than pleasing results so providing custom versions for these key assets makes a lot of sense.
You can also provide alternative SceneGraph XML for different resolutions. If you think SD screens may be a big part of your user base that might be worthwhile, because the pixel “shape” is different on an SD screen vs HD and FHD. For me, it seemed totally reasonable to just work with a single FHD XML file (1920 x 1080) resolution and let the Roku manage scaling automagically.
Building and Deploying
Manually deploying an app is pretty straightforward. You can give it a try using Roku’s “Hello World” application. Download the pre-built ZIP from github, save it locally, open a browser to http://YOUR_ROKU_ADDRESS, use the “Upload” button to push the code to the Roku, and finally click “Install with zip” to make the magic happen. You should see a “Roku Developers” splash screen show up on the tv, followed by a static screen saying “Hello World.” Woot!
You can follow the same process for your own apps; just create a ZIP from the channel folder and upload it using a browser. But it’s much (much) more convenient to automate it with a makefile. This can actually be really simple (here’s the one I use for the ferry channel) if you include the app.mk helper that Roku distributes with its sample code and ensure you have versions of make, curl and zip available on your development machine. You’ll need two environment variables:
ROKU_DEV_TARGET should be set to the IP address of your Roku.
DEVPASSWORD should be set to the password you selected when enabling developer mode on the device. Note this is not the same as the password you created when enrolling in the developer program online — this is the one you set on the device itself.
With all of this in place, you can simply run “make” and “make install” to push things up. For the ferry channel, assuming you have git installed (and your Roku is on), try:
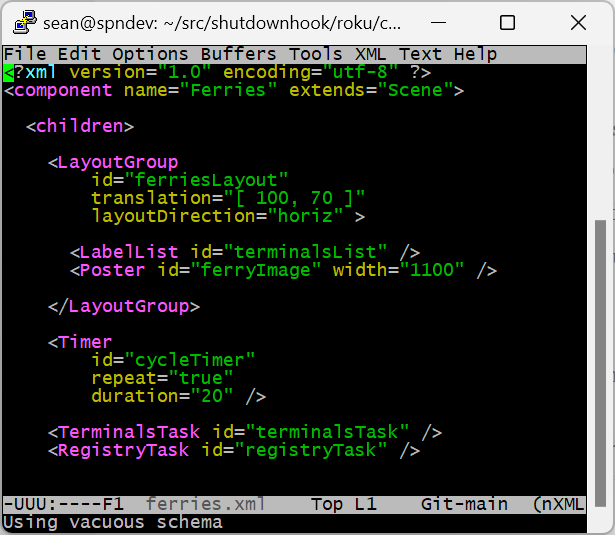
As a SceneGraph application, most of the action in the channel is in the components directory. Execution starts in “sub Main” in source/Main.brs, but all it really does is bootstrap some root objects and display the main “Scene” component defined in components/ferries.xml. You can use this Main pretty much as-is in any SceneGraph app by replacing the name of the scene.
Take a quick look at the scaffolding I’ve added for handling “deep links” (here and here). This is the mechanism that Roku uses to launch a channel directly targeting a specific video, usually from the global Roku search interface (you can read more about deep linking in my latest post about Share To Roku). It’s not directly applicable for the ferries app, but might be useful in a future channel.
The scene layout and components are all at the top of ferries.xml. Roku supports a ton of UX components, but for my purposes the important ones are LabelListfor showing/selecting terminal names and Posterfor showing camera images. Because my manifest defines the app as fhd, I have a 1920 x 1080 canvas on which to place elements, with (0,0) at the top-left of the screen. The LayoutGroupcomponent positions the list on the left and the image on the right. Fun fact: Roku recommends leaving a 5% margin around the edges to account for overscan, which apparently still exists even with non-CRT televisions, which is the purpose of the “translation” attribute that offsets the group to (100,70).
Below the visible UX elements are three invisible components (Tasks) that help manage program flow and threading:
A Timercomponent is used to cycle through camera images every twenty seconds.
A custom TerminalsTaskthat loads the terminal names and camera URLs from the WSDOT site.
A custom RegistryTaskthat saves the currently-selected terminal so the channel remembers your last selection.
Each XML file in the components directory (visible or not) actually defines an SceneGraph object with methods defined in the BrightScript CDATA section below the XML itself. When a scene is instantiated, it and all the children defined in its xml are created and their “init” functions are called. The SceneGraph thread then dispatches events to components in the scene until it’s destroyed, either because the user closed the channel with the back or home buttons, or because the channel itself navigates to a new scene.
Channel Threading
It’s actually pretty important to understand how threads work within a channel:
The SceneGraph render thread is where UX events happen. It’s super-important that this thread doesn’t block, for example by waiting on a network request.
Task threads are created by Task components (in our case the Timer, TerminalsTask and RegistryTask) to perform background work.
The most typical (but not only) pattern for using background tasks looks like this:
The Task defines public fields in its <interface> tag. These fields may be used for input and/or output values.
The task caller (often a handler in the render thread) starts the task thread by:
Setting input fields on the task, if any.
Calling “observeField” on the output task fields (if any), specifying a method to be called when the value is updated.
Setting the “control” field on the task to “RUN.”
The task does its work and (if applicable) sets the value of its output fields.
This triggers the original caller’s “observeField” method to be executed on the caller’s thread, where it can act on the results of the task.
Data Scoping and “m”
Throughout the component code you’ll see references to the magic SceneGraph “m” object. The details are described in the SDK documentation, but it’s really just an associative array that is set up for use by components like this:
m.WHATEVER references data in component scope — basically object fields in typical OO parlance.
m.global references data in global scope.
m.top is a magic pre-set that references the top of the component hierarchy for whatever component it’s called from (pretty much “this“). I really only use m.top when looking up components by id, kind of the same way I’d use document.getElementById in classic Javascript.
If you dig too much into the documentation on this it can get a bit confusing, because “m” as described above is provided by SceneGraph, which sits on top of BrightScript, which actually has its own concept of “m” which is basically just #1. This is one of those cases where it seems better to just wave our hands and not ask a lot of questions.
OK, enough of that — let’s dig into each of the components in more detail.
This component is the UX workhorse; we already saw the XML that defines the elements in the scene at the top of the file. The Brightscript section is mostly concerned with handling UX and background events.
On initthe component wires up handlers to be called when the focus (using the up/down arrow buttons) or selection (using the OK button) changes in the terminal list. It then starts the terminalsTask and hooks up the onContentReady handler to be called when that task completes.
When that happens, onContentReadypopulates the LabelList with the list of terminal names and queries the registryTask (synchronously) to determine if the user has selected a terminal in a previous run of the channel. If so, focus is set to that terminal, otherwise it just defaults to the first one in the list (it pays to be “Anacortes”). cycleImage is called to kickstart image display, and the cycleTimer is started to rotate images (the “Timer” we use is just a specialized Task node — it takes care of the thread stuff and just runs our callback on the UX thread at the specified interval).
The next few methods deal with the events that change the terminal or image. onKeyEventreceives (duh) events sent by the remote control, cycling the images left or right. onItemFocusedsets the current terminal name, resets the image index to start with the first camera, and kicks of a registryTask thread to remember the new terminal for the future. onItemSelectedand onTimerjust flip to the next camera image.
The timer behavior is a bit wonky — the image is cycled every 20 seconds regardless of when the last UX event happened. So you might choose a new terminal and have the first image shown for just a second before the timer rotates away from it. In practice this doesn’t seem to impact the experience much, so I just didn’t worry about it.
The last bit of code in this component is cycleImage, which does the hard work of figuring out and showing the right “next” image. The array handling is kind of nitpicky because each terminal can have a different number of associated cameras; there’s probably a cleaner way of dealing with it but I opted for being very explicit. The code also scales the image to fit correctly into our 1100 pixel width without getting distorted, and then sets the URL with a random query string parameter that ensures the Roku doesn’t just return a previously-cached image. Tada!
This component has one job — load up the terminal and camera data from the WSDOT site and hand it back to the ferries component. Instead of a <children> XML node at the top, we have an <interface> node that defines how the task interacts with the outside world. In this case it’s just one field (“ferries”) which receives the processed data.
The value m.top.functionName tells the task what function to run when it’s control is set to RUN. We set the value in our init function so callers don’t need to care. Interestingly though, you can have a task with multiple entrypoints and let the caller choose by setting this value before setting the control. None of that fancy-pants “encapsulation” in Brightscript!
The Roku SDK provides some nice helpers for fetching data from URLs (remember to set the cert bundle!) and parsing JSON, so most of this component is pretty simple. The only bummer is that the WSDOT JSON is just a little bit wonky, so we have to “fix it up” before we can use it in our channel.
It seems so long ago now, but the original JSON was really just JavaScript literal expressions. You can say something like this in JavaScript to define an object with custom fields: var foo = { strField: “hi”, intField: 20 }. People decided this was cool and set up their API methods to just return the part in curly braces, replacing the client-side JavaScript with something like: var foo = eval(stringWeFetched). “eval” is the uber-useful and uber-dangerous JavaScript method that just compiles and executes code, so this worked great.
A side effect of this approach was that you could actually use any legal JavaScript in your “JSON” — for example, { intField: 1 + 3 } (i.e., “4”). But of course we all started using JSON everywhere, and in all of those non-JavaScript environments “eval” doesn’t exist. And even in JavaScript it ends up being a huge security vulnerability. So these little hacks were disallowed, first class parsers (like my beloved gson) were created, and the JSON we know and love today came into its own.
You may have deduced from this digression that the WSDOT JSON actually contains live JavaScript — and you’re right. Just a few Date constructors, but it’s enough to confuse the Roku JSON parser. The code in fixupDateJavascriptis just good old grotty string manipulation that hacks it back to something parsable. This was actually a really nice time to have Hulu’s command-line brs tool available because I didn’t have to keep pushing code up to the Roku to get it right.
Most people have a “home” ferry terminal. In fact, we have two — Mukilteo when we’re in Bellevue and Clinton on the island. It’d be super-annoying to have to use the remote to select that terminal every time the channel starts, so we save the “last viewed” terminal in the Roku registry as a preference.
The registry is meant for per-device preference data, so it’s pretty limited in size at 16kb (still way more than we need). The only trick is that flushing the registry to storage can block the UX thread — probably not enough to matter, but to be a good citizen I put the logic into a background task. Each time a new terminal is selected, the UX thread makes a fire-and-forget call that writes and flushes the value. Looking at this code now I probably should have just created one roRegistrySection object on init and stored it in m … ah well.
The flip side of storing the terminal value is getting it back when the channel starts up. I wanted to keep all the registry logic in one place, so I did this by adding a public synchronous method to the registryTask interface. Calling this method is a bit ugly but hey, you can’t have everything. Once you start to get used to how the language works you can actually keep things pretty tidy.
Packaging and Publishing
Once the channel is working in “dev” mode, the next step is to get it published to the channel store for others to use. For wider testing purposes, it can be launched immediately as a “beta” channel that users install using a web link. There used to be a brisk business in “private” (cough cough, porn) Roku channels using this mechanism, but Roku shut that down last year by limiting beta channels to twenty users and auto-expiring them after 120 days. Still a great vehicle for testing, but not so much for channel publishing. For that you now have to go official, which involves pretty standard “app” type stuff like setting up privacy policies and passing certification tests.
Either way, the first step is to “package” your channel. Annoyingly this has to happen on your Roku device:
Set up your Roku with a signing key. Instructions are here; remember to save the generated password! (Aside: I love it when instructions say “if it doesn’t work, try the same thing again.”)
Make sure the “ready-for-prime-time” version of your channel is uploaded to your Roku device.
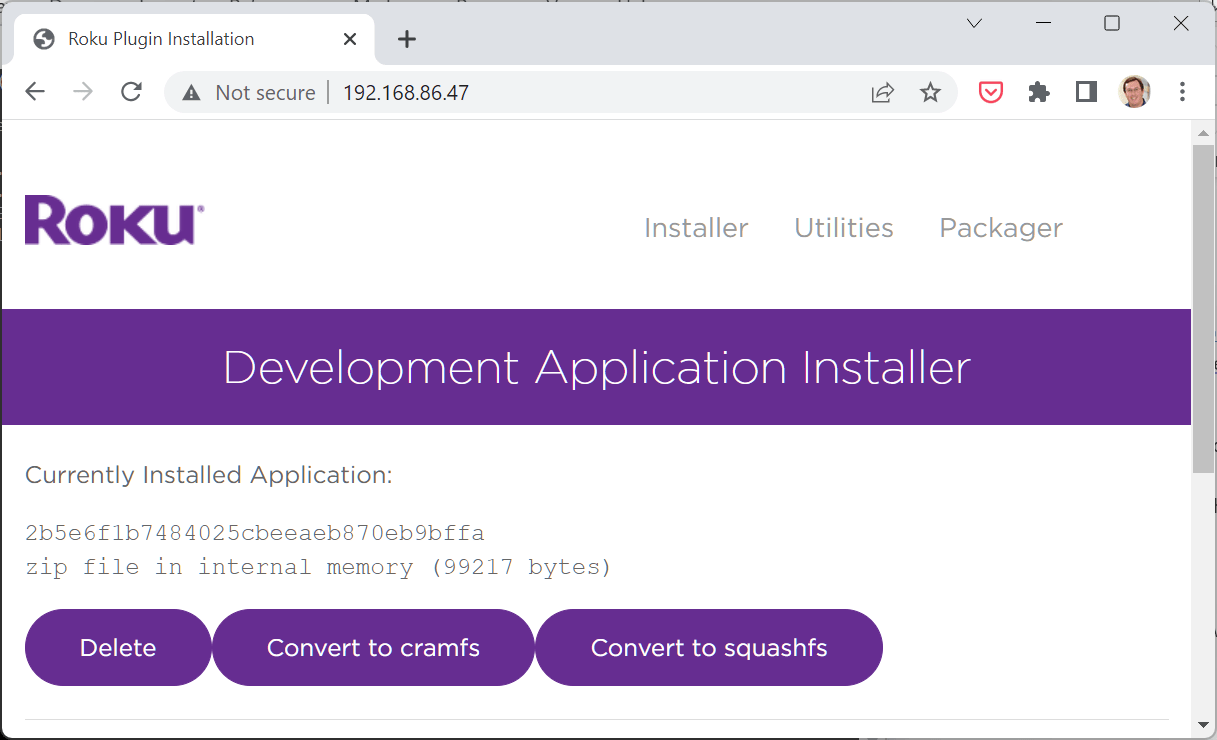
Use a web browser to visit http://YOUR_ROKU_ADDRESS; you’ll land on the “Development Application Installer” page showing some data on the sideloaded app.
Click the “Convert to Cramfs” button. You actually don’t need to compress your app, but why wouldn’t you? Apparently “Squashfs” is a bit more efficient but it creates a Roku version dependency; not worth dealing with that unless your channel already relies on newer versions.
Click the “Packager” link, provide an app name and the password from genkey, and click “Package.”
Woo hoo! You’ll now have a link from which you can download your channel package file. Do that.
Almost there! The last step is to add your channel using the Roku developer dashboard. This ends up being a big checklist of administrative stuff — for Beta channels you can ignore most of it, but I’ll make some notes on each section because eventually you’ll need to slog through them all:
Properties are pretty self-explanatory. You’ll need to host a privacy and terms of use page somewhere and make some declarations about whether the channel is targeted at kids, etc.. For me the most important part of this ended up being the “Classification” dropdown. A lot of the “channel behavior” requirements later on just didn’t apply to my channel — not surprisingly Roku is pretty focused on channels that show videos. By choosing “App/Utility” as my classification I was able to skip over some of those (thanks support forum).
Channel Store Info is all about marketing stuff that shows up in the (of course) channel store.
Monetization didn’t apply for me so an easy skip.
Screenshots are weird. They’re optional, so I just bailed for now. The Roku “Utilities” page at http://YOUR_ROKU_ADDRESS claims to be able to take screenshots from the device itself, but either the tool fails or it leaves out the ferry image. I need to just cons one up but it’s a hassle — will get there!
Support Information is obvious. Be careful about what email address you use!
Package Upload is where you provide the package file we created earlier.
Static Analysis runs some offline code quality tools — you need to pass without errors to publish.
Channel Behavior Analysis only appears if it’s applicable for your channel (i.e., if it shows video). The primary metrics are time for the channel to show the home page, and time for video to start rendering. You’ll need to handle deep linking (remember when we saw that in Main.brs) and fire a few “beacons” that help the Roku measure performance.
Preview and Publish just shows a summary of channel information and a checklist that shows your progress on all of the bullets above. When you’re ready, you can schedule a time for the channel to go live and you’re off to the races. Whew.
That’s it! The last bit was a bit of a whirlwind — I wanted to call out the key gotchas to help keep you from getting stuck, but it’s by far the least interesting part of building a channel. Once I got my head around the basic BrightScript/SceneGraph concepts I really quite enjoyed the development process. I’ve been thinking about a few other channels that might be fun — my son suggested a flight tracker, and I’ve always been interested in ecommerce on the TV. Not sure when any of that will happen, though … so many cool things to try!
Please let me know if you have any issues with the code or with the channel, always happy to help! Until next time.