Last week I flew into Colorado and met my brother and cousin for an overnight trip to the Sangree Froelicher “hut” outside of Leadville. It was my second winter backcountry trip, about 3.5 miles into the San Isabel National Forest on an amazing rented pair of dps skis. Truth be told I was not in particularly great shape for this trip, but I managed to weekend-warrior my way through it with no damage beyond an impressively large blister on my little toe.
Sangree’s hut is part of the 10th Mountain Division Hut Association network, more than three dozen chalets tucked into the backcountry around Colorado. It’s hard to describe just how magical the “huts” are — multi-story, multi-room log masterpieces with wood stoves and ovens, bedrooms with mattresses, sinks and cisterns and permanent outhouses, propane burners and solar lights. Arriving at one after a day skinning into the silent, snow-covered forests and hills is like stumbling into some crazy Narnia/Wardrobe situation (minus the White Witch).
The association is named in honor of the 10th Mountain Division of the US Army, famous for operations in the Italian Alps during WW2, and which dominates the history of skiing in the United States — at least sixty-two modern resorts were founded by folks connected to the 10th, including Aspen, Vail, Sugarbush — even my hometown favorite Crystal Mountain. Sangree Froelicher, for whom our hut this year was named, was killed in action during the Italian campaign. Evenings in the huts lend themselves to a bit of reflection, and to the conflicting emotions of being thankful for the sacrifice of brave people, but also frustrated at the stupidity of those that created the need for it.
Anyway — while the place was amazing, of course there’s no “staff” or anything — so there are plenty of chores to do. The four of us shared our hut with another group of eight up for their own annual trip, and I couldn’t help but notice that the dynamics shared a lot in common with the workplaces I inhabited for so many years. People are people, and it’s always interesting to see what happens when we’re thrown together.
1. Tortoises and Hares
I tend to skin quickly and take frequent breaks. My cousin and her husband are slower but steady. My brother is fast AND steady. The differences caused us to spread out along the trail, but as we all came back together at the hut, it was clear that everybody had had their best day. Being alone in the backcountry is about remembering just how big the world is — and that despite being pretty insignificant at the end of the day, we’re a part of it, and we belong. Sounds corny, but the utter, complete, snow-covered silence is really special.
Travelling at your own pace is also a great exercise in self-motivation. Three and a half miles doesn’t seem like much, but for an old guy shuffling uphill on skis with a pack — it’s plenty. And there’s something to be said for doing it on your own. Most of our accomplishments in the modern world are parts of a larger whole, which is a-ok. But it’s nice to be able to take end-to-end credit for once! 😉
Most of all, we all made it, in our own way. And in plenty of time for a beer before dinner.
2. Leaders, Followers and Slackers
The huts are amazing — but there’s also a lot to do. Wood needs to be split and carried inside. The stoves need to be tended, and snow brought in to melt and boil for drinking water. Since COVID there are enhanced (and appreciated) cleaning protocols, especially for sleeping and kitchen areas. Snow needs to be shoveled, food prepared, dishes washed and bleached.
But unlike most day-to-day situations, there’s no official hierarchy or assignments, within or between groups. Inevitably, a few folks self-identify (not necessarily explicitly) as “leaders” and start organizing things. Usually this leads to a too-many-cooks situation, as differences in style show themselves or people simply bump into each other trying to do the same job. But as long as nobody is a total a**hole, it usually works out just fine.
Having spent the bulk of my career as a “leader” (oh how I hate that word) — these days I revel in being a follower. I put in my share of work and then some, but much prefer to be labor and let somebody else call the shots. I’m the guy carrying in the wood and rinsing the dishes; somebody else can figure out how to adjust the flue on the wood stove and take the rap when it’s too cold overnight!
Of course, there are always one or two folks who are happy to just skate by without helping at all. And over the course of only one or two nights, it’s pretty easy to “hide” and take advantage — I only tend to notice thanks to years trying to optimize my software teams. But I have learned to delay judgment a bit — there are many legitimate reasons people hold back (lack of confidence, shyness, physical issues, etc.). The ones that are just lazy confuse me; do they really not feel bad? It’s weird.
3. Sharing and Mansplaining
There’s a bunch of technology in the huts — the woodstoves have a million ways to fine-tune them; there’s a big pot for snowmelt; a rooftop cistern and hand-pump at the sink; solar lights with a battery bank; wood-fired ovens and propane burners; you get the idea. There are also plenty of traditions and social expectations about sharing bedrooms and kitchens and drying racks and such. It can actually be a bit intimidating, especially for a first-timer trying to pitch in.
Most folks who come on these trips love to share what they know, and do so generously. But sharing “styles” vary dramatically, I’m sure often with people completely unaware of their effect on others. The women in my life have a lot to say about “mansplaining” — and in this situation there couldn’t be a better word. My personal approach is to just let it ride — if I learn a bit and never see these folks again, I’ll take the net win. But you can really see it eat at folks too, and that’s just a shame.
I love to share things I’ve learned too … it’s why I write this stuff down! And I’m sure that when I get on a roll, I can sometimes forget that other people know things too. Watching the dynamics in the hut is a great reminder: read the room, folks!
4. Us and Them
Segmenting people into groups seems to be wired into our brains. It’s surely a remnant of evolution — always assessing our environment to predict what is helpful, safe, dangerous and unknown. My brother and I were playing a game listening to the radio: how many songs are based on some vague “them” that said “we’d never make it” or whatever? There’s always a bad guy. I mean, this is how right-wing media (and to a much lesser extent all media) keeps our attention: be scared, be afraid, they’re after what is yours!
This even plays out — in a far gentler way — in the hut. There’s a standard set of ice-breaking questions between groups: Your first time here? Where are you from? How’d you like the hike in? Cold enough for you? Sometimes there’s an extrovert that tries to create connections (my friend Jim is a grandmaster at this), but more often we keep largely to ourselves except for shared chores and a few low-stakes exchanges. And people are different, of course. Perhaps one group is overtly religious and the other is not. Or one likes to stay up late with a drink and the other turns in early. And of course there’s politics, although thankfully it seems like the backcountry is understood to be a no-fly zone for that insanity.
In any case, a cozy, warm mountain hut is an excellent place to try to think differently — so I gave it a shot and offered my Chips Ahoy across the aisle. A major accomplishment for introvert Sean!
I really, really don’t miss people management at work. But I do miss the people. Sitting quietly in a corner of Sangree’s hut, watching folks figure out how to live and work together in a shared, special place — it made me a bit nostalgic for the great startup teams my friends and I created out of nothing. Everyone should experience just how awesome that can be. Even with a wicked blister and some dude on the other side of the room mansplaining how to properly store your skins overnight.
I’m a big fan of projects that capture change over time — siblings that take a picture every year for decades; seeds becoming plants; stars moving across the sky. Time expansion is pretty cool too; I can waste a lot of time (ha) watching the Slo Mo Guys. This year I decided on a New Year whim to try a similar project myself — not a particularly original one, but fun nevertheless. Each day in 2024 I’m trying to take a single picture or short video, typically but not always a closeup/macro view, that loosely represents something notable about the day. No long descriptions, just a word or two to go along with the shot. Follow my progress on Instagram if you’re so inclined!
“Loosely represents something notable” is the trick — I’m trying for shots that: (1) can stand on their own; (2) aren’t obviously events or people; but (3) have a little hook to help me remember where and why I took them. Hopefully scrolling through the set next January first will be a fun way to remember the sweep of the year.
Just over a twelfth of the way through the process, I thought I’d share a sneak peek. Click through the image to see an interactive version!
Of course I had to find a way to write some code here too. I really wanted to embed the thumbnails in a traditional calendar — I’m sure there must be a pre-built story for this somewhere, but I was unsuccessful in my quest. The superpower of the modern age comes through again — a bit of time with the Instagram API and I was good to go. 95% of the code is just reuse from other projects, which is how I know I’m still doing it right! I won’t spend time on it here, but if you want to steal anything please feel free — it’s all open-licensed and on GitHub. Let me know if I can help.
Update: SQL Hammer has been updated somewhat extensively since this post was written. It’s still a great introduction and contains good detail, but if you just want to use and understand the latest version of the app, start here: https://github.com/seanno/shutdownhook/tree/main/dss#readme.
Everyone loves to talk about code, but it’s really databases that run the world. And not nerd-chic graph databases, or vector databases, or object stores, or whatever hyped-up new hoohah that Meta created this month. I’m talking about old school, relational, SQL databases. Every (every) (every!) company uses them. And for good reason — tables and columns and relationships do an excellent job of modeling things and processes in the real world.
To be fair, there are solid specialized use cases for the hoohas too. But SQL is and will remain ubiquitous because it does its job. I’m actually of the opinion that everyone should learn SQL, not just because it’s a work superpower (I’m looking at you, Tracy) but because normalization is a useful strategy for thinking about all kinds of problems. Actually, that’s another article I should write — but not right now.
The “Direct SQL” Problem
Today, I want to share a little tool that fills a technology gap I’ve found at every company I’ve ever been at — an access-controlled, auditable way to directly execute ad hoc SQL queries for data analysis, troubleshooting, workflow support and data repair.
See, in the “normal” course of business SQL is an infrastructure component — not something folks interact with directly. Enterprise applications provide higher-level end-user and system interfaces that use SQL “under the covers” as a way to store and model data. These applications add important controls on top of the raw data store: making sure that access restrictions are enforced, applying business rules to keep things consistent, generating logs to support auditing requirements, and so on. All good stuff.
But inevitably, something happens that requires people to venture under those covers. Maybe the application just has a bug. Or more commonly, something needs to happen in the real world that the application wasn’t designed to handle — updating the shipping address for an order after it was placed, reprocessing a job after a network interruption, that kind of thing. Perhaps somebody needs metrics for a presentation and the data warehouse doesn’t have the right data. There’s always something.
Easy enough for somebody who knows SQL. Open up a database client or your SQL-aware IDE and you’re good to go. But there’s a problem! Every one of the guardrails provided by application logic are gone. No access control, no auditing, no double-checking that your query doesn’t (oops) accidentally delete a bunch of records. Not only that, but direct database connections typically require access to a machine running directly in a production network — another opportunity for things to go wrong.
It’s easy to say that this “shouldn’t” happen, but that’s just naïve, wishful thinking. Best to just acknowledge reality and at least put some controls in place that minimize risk and maximize capability. That’s exactly what SQL Hammer does.
Try it live!
Before we install anything, let’s take a look at SQL Hammer running on my trusty server at https://shutdownapps.duckdns.org:7083/. I’m assuming you know the basics of SQL syntax. If not, this app probably ain’t much use to you anyways. Log in with any GitHub account and you’ll see two entries in the “Connection” dropdown: “EV Counts in Washington State” and “Scratch DB for Demos etc.” First choose the EV connection, which contains information about EV sales in Washington State (sourced from data.wa.gov) in a single table “evs.”
Running Queries
Your account is granted read-only access to this connection, so you can’t run or save arbitrary SQL statements — you can only run queries that others have created and marked as “shared.” This feature makes direct SQL data safely available to less technical folks in your organization. Click on “EV counts by model year,” then the Run button. Magic!
The “Open as URL” button creates a link that can be bookmarked or shared to provide direct (but still authenticated) access to this query. “Save as CSV” downloads the data for further processing in a spreadsheet app like Microsoft Excel.
Queries can also be more dynamic, requiring user-provided input at runtime. Select and run “EV counts by make in year;” you’ll see that the target model year is listed as a parameter in the results area and applied to the query results. The default is 2023, but you can change this and “Refresh” to look at another year. Parameters are super-powerful, especially for shared queries.
Creating Queries
Now choose the “Scratch DB” connection from the dropdown at the top. In this account you’ve been granted full SQL access, which is a little scary for me, because TTP is a real phenomenon. Please behave yourself! Also, the database resets itself overnight so don’t expect your changes to stick around. Anyhoo.
First click the “New” button, then enter and run a query like “select * from stuff.” Give the query a name and click “Save” so you can use it again later. The query will only be visible to you unless you check the “Shared” box, in which case it can be run (but not edited) by anyone with access to the connection.
Add a parameter to your query by inserting a ? in the query itself, and providing a name in the parameters box — for example, “select * from stuff where label like ?” and a parameter “search”. Run the query again and you’ll be prompted to enter a search string — try something like “yo%” to see wildcard matching live and in color. Woot!
The parameters list should be comma-separated, and each entry in that list must have a corresponding ? marker in the query itself. SQL Hammer doesn’t do a lot of verification on this, so it’s easy to create syntax errors if you’re not careful. A parameters entry can have a default value by adding a colon to the name followed by the value. For example, try “insert into stuff values (?,?)” with a parameter list like “label:mylabel,num:0”.
More than just SELECT
You may have noticed that the query above was actually an insert statement, not a select. This is fine! Assuming you’re configured for write access to a connection, you’re free to execute DML or even DDL statements. You can share these queries too, which can be a great way to capture data from users when combined with parameter lists.
Auditing
With most direct SQL solutions, figuring out who ran what query, when, with what parameters, can be nearly (or actually) impossible. Not only is this just a practical business problem, in many cases it can be a legal one — especially for folks working in regulated environments like healthcare or banking. SQL Hammer to the rescue! If a connection has its “log_queries” column set to 1, every query statement and parameters is logged to disk, together with the user email that executed it. Preserve this logfile and you’ll have no problem satisfying your auditors.
Of course, these logs may now include highly sensitive information — so you’ll have to put processes in place to protect them from prying eyes or tampering. A pain, but well-worth the benefits.
Installing SQL Hammer
SQL Hammer is 100% open source; the code is on GitHub and building it yourself is pretty straightforward. I’ll talk more about that later, but first let’s walk through a binary installation. I’ll be using Linux, but it’s all pure Java so no reason you can’t use Windows or a Mac if you prefer (do let me know if you run into any problems).
First make sure you’ve got a JRE v11 or above. You can check this by running “java -version” at the command line. Next, download sqlhammer-v1.zip from GitHub and unzip it to a directory on a machine that has network access to the database(s) you care about.
Execute “run.sh” in this directory, and point a browser on the same machine at https://localhost:3001. You’ll have to approve the self-signed certificate, but from there you should be prompted for a GitHub login and be on your way! Logs will be written to nohup.out in the same directory; that’s a good place to look for errors if something doesn’t work.
Very cool — but to run “for real” you’ll want to be sure your configuration is correct and secure, so read on. Don’t skip this!
SSL Certificates
The default config.json uses a self-signed localhost certificate for HTTPS. You’ll need to update the SSLCertificateX values to point at your own certificate and key files, using the same same format as Apache’s SSLCertificateFile and SSLCertificateKeyFile. If you really, really want to run without HTTPS you can just delete these values, but that’s probably a bad idea. Remember to set the “Port” value as desired as well.
OAuth2 Provider
As you’ve seen, the default is set up to authenticate users with GitHub accounts, using a stub OAuth2 application registered to my account (seanno). For obvious reasons, you’ll want to pick your own provider and application! If you want to use a social login like Google, Facebook, Amazon or GitHub you’ll find instructions in my recent blog post.
If you’d rather use your enterprise login (likely), you’ll have to figure out how to configure an OAuth2 / OpenID Connection application. Set the “Provider” in config.json to “other,” then provide values for ClientID, ClientSecret, AuthURL, TokenURL and possibly Scope. Most providers make this pretty easy; e.g., for Azure AD / Entra there are instructions here and a config.json fragment will look something like this:
If you have trouble with this, first take a closer look at my Social Login post, and feel free to ping me if it’s still not working — happy to help if I can.
An important note on this: When SQL Hammer starts up the first time, the first person to log in is given full write access to the Metadata store. This will have happened when you first logged with GitHub above. If your chosen provider is associated with the same email address you use on GitHub, all good. If not, you’ll want to start with a fresh metadata store — just delete the dss.sql file (by default in /tmp) after configuring your provider, then log in to recreate these tables.
Cookie Encryption
SQL Hammer uses the config.json values under “CookieEncrypt” to protect it’s login cookie. Since the default value is public on GitHub, anybody with access to your server could theoretically whip up a fake cookie to get access to your stuff. Not good.
In your installation directory, run “java -cp dss-server-1.0-SNAPSHOT.jar com.shutdownhook.toolbox.Encrypt keygen”. This will output a randomly-generated key; put into the “CookieEncrypt.Key” field and you’re good to go.
Metadata Store Location
The default setup stores the DSS database in /tmp; edit the Sql.ConnectionString value if you want it somewhere else.
(Maybe) add JDBC drivers
By default, SQL Hammer includes JDBC drivers for SQLite, mySQL and PostgreSQL databases. If you use a database like Microsoft SQL Server, Azure SQL or Oracle, you’ll need to download those driver(s) to the same directory where you installed SQL Hammer. Then load the JAR(s) by adding them to the “cp” argument in run.sh, separated with colons. Here’s an example doing this for Azure SQL (mssql-jdbc-12.4.2.jre11.jar):
Finding the right JDBC driver is pretty easy; just search “XYZ jdbc driver download” on Google and you’ll get there in no time.
99% of JDBC drivers now self-register by including a META-INF/services/java.sql.Driver file in their JAR. If for some crazy reason yours does not, you’ll need to add its fully-qualified class name to config.json under Sql.PreloadDrivers, which should be an array of string values.
Managing Connections and Access
I’m particularly fond of this — admin tasks are performed not through a pre-built UX, but by using SQL itself. The first user to log into an installation is set up as the administrator, with access to the “DSS Metadata Store” connection. A few pre-built queries are added as well, but honestly the SQL is pretty simple; three tables drive it all. Just click the “Schema” button to see how they’re put together.
connections contains one row for each configured database connection. “name” is the primary key, just a short unique label. “description” is what shows up in the dropdown, and setting “log_queries” to 1 will cause query text and parameters to be logged for audit purposes. The star is “connection_string,” which contains everything necessary to connect to and authorize a specific database connection. SQL Hammer connection strings typically contain login information and are very sensitive — be careful to restrict access to the metadata store!
You can add connections using the “connections: add new” query or just with a simple insert statement. The harder part is figuring out a connection string that works; a great place to start is this article at Baeldung. A few examples can also go a long way; so here you go:
SQLite: jdbc:sqlite:/PATH/TO/FILE
mySQL: jdbc:mysql://SERVER:PORT/DATABASE?user=USER&password=PASSWORD (port is usually 3306)
PostgreSQL: jdbc:postgresql://SERVER:PORT/DATABASE?user=USER&password=PASSWORD (port is usually 5432)
access holds (not surprisingly) rules about who can access which connections. The “user” field can either be a specific user (i.e., logged-in email address) or a wildcard pattern matched with the like operator. Some useful practical applications of this are “%” for matching any user, and “%@xyz.com” to match all users with email addresses at xyz.com.
In order to execute or save arbitrary queries, a user must match an access row for the relevant connection in which the “can_create” column has the value 1. Without this flag, users can only run existing queries associated with the connection that are marked “shared” (and can’t see the underlying SQL statements).
The built-in queries “connections: grant access” and “connections: remove access” can be used to manipulate the table; they’re just parameterized versions of insert and delete.
You may find it useful to create multiple “connection” rows that reference the same database, associating different queries with each and granting access to different users. For example, you may have some users that are interested in queries related to financial data, while others are focused on user behavior. By segmenting these query sets by connection, you can reduce confusion and better conform to the principle of minimum access. Since folks only see the connections they have access to, navigation is no problem.
queries holds the actual statements for saved queries, including the “is_shared” flag that marks whether users other than the creator can execute them. Mostly this table is managed through the user interface, but there’s no reason you can’t manipulate it directly as well.
Building from source
The SQL Hammer frontend is an SPA built with React; the backend is a set of Java handlers that run in the context of my custom classes on top of the built-in HttpServer. All of this is packaged into a single uber-JAR that runs as a standalone process starting with com.shutdownhook.dss.server.App.
Building the package requires a git client, Java JDK v11+, maven, node and npm, most of which you probably having hanging around anyways:
git clone https://github.com/seanno/shutdownhook.git
cd shutdownhook/dss
./fullbuild.sh
The fullbuild.sh script first builds the React bundle in the client directory (I had to increase node memory with set NODE_OPTIONS=--max-old-space-size=4096) and copies the resulting files into a zip resource under server/src/main/resources. It then builds and locally installs the utility and server classes under ../toolbox, then the server components, and then finally assembles the uber-JAR which lands in server/target/dss-server-1.0-SNAPSHOT.jar. Use this JAR in place of the one in the release directory to run your own build.
If you want to actively play with the user interface, it’s possible to run the React SPA separately from the server. This is particularly nice because it gives you hot-reload. The details are a bit grotty to include here; drop me a note and I’ll get you started. If there’s any kind of broad interest I’ll write it up; just too lazy to do it now!
Quirks and Futures
This is most definitely a “v1” release. It works and works pretty well, at least for my purposes. But the UX is definitely awkward in places — the interplay between “Run” in the editing pane and “Refresh” in the run pane trips me up regularly. I’d like to have more ready-access to the schema information while running queries. The log file isn’t as configurable as it ought to be. “Setup” is a joke. And on and on.
But you have to start somewhere — and I’m hoping that the app will find its way to a few like-minded folks that have shared my pain and acknowledge the need for something like SQL Hammer. Direct SQL is not just inevitable, it’s super-powerful. It can even be an asset to agility and compliance when managed responsibly. I’d love to hear what you think!
“Code Monkey think maybe manager want to write god damned login page himself.” — Jonathan Coulton
Truer words may never have been spoken. Set up a database, build a signup page, enforce some stupid password rules, salt and hash it, now create a login page, oops when does login expire, oops need a forgot password page. Or, integrate with an “identity provider” that requires you to use some crazy third party library with who-knows-what dependencies awash with unhelpful and vaguely-defined concepts like “claims” and “entities” and “level of assurance.” Dude, life is too short for this crap — I just want to know who’s logged into my app. And maybe (maaaaaaybe) sort them into a few buckets like “admins” or “read-only.”
Side note: You know who had this figured out? Windows NT and IIS in 1998. Check one box and your site is secured with the same credentials you use for everything else on the domain. Bliss.
Happily, excepting a few projects in Azure meant for my family, since retiring from corporate life I haven’t had much cause to worry about this stuff. But it came up this week during a conversation about “under-the-desk” servers. Every single company I’ve ever known has a few of these … servers that run little slapped-together homegrown enterprise tools that somehow become mission-critical. These days they aren’t really under somebody’s desk, they’re up in a virtual machine somewhere, but no difference. Vortex, Pokey, Nitro and Flora are just a few under-the-desk machines I’ve supported over the years.
It occurred to me that there was one of those tools that I’ve written again and again, and might be fun to put together as a small open source project. But before I tell you about that, I’m going to have to up my Java WebServer game a bit with … yes, wait for it … login. Sigh.
Social Login to the Rescue
I’m not doing it from scratch though, that’s for damn sure. It turns out that despite its (jargon-heavy history) OAuth2 has become a pretty ubiquitous standard for integrating with third-party services. It’s actually the same technology we explored in Part 3 of my SMART on FHIR tutorial. And while typically the standard is used to support data integration (e.g., by brokering access to personal health data in the FHIR case), it can serve as a pretty nifty basis for “social login” as well. This is what’s going on behind all of the “Login with Facebook/Google/etc.” buttons you see around the web. Seems like it just might do the trick for us.
Which service(s) you rely on depends on your use case, but an OAuth2-based implementation gives you a ton of options: Google, Facebook, Github, Microsoft / Office365, Twitter, Apple, we could go on for a long time here. There are minor differences in implementation, but not enough to cause much trouble. We’ll take a look at a few to tease out that diversity.
The bulk of the code here is just over 300 lines in OAuth2Login.java. Another 60 or so lines integrates it into WebServer.java, and that’s the lot. Not that much at the end of the day, but the jargon-to-code ratio is annoyingly high. I’ve tried to simplify things by limiting the exploration to a web-based flow without some more esoteric features; once the basics make sense, adding these back in is pretty easy.
To try the code yourself, first you’ll need to register a provider application. Let’s use GitHub, because they make it relatively simple:
Log into your GitHub account.
Under your profile icon, choose Settings / Developer Settings / OAuth Apps.
Copy your Client ID and Secret and save them for later.
To run the code, you’ll need access to a machine with a recent JDK, git and maven:
git clone https://github.com/seanno/shutdownhook.git
cd shutdownhook/toolbox
mvn clean package install
cd ../sdweb
mvn clean package
vi config-ex.json # edit this file to include your GitHub Client ID and Secret
java -cp target/sdweb-1.0-SNAPSHOT-jar-with-dependencies.jar com.shutdownhook.sdweb.App config-ex.json
Finally, point your browser to https://localhost:3000/echo?msg=w00t. You’ll need to acknowledge the scary self-signed certificate, and then you should be redirected to GitHub where you’ll need to log in and approve access. When you’re redirected back from GitHub, you should see your GitHub login and email address. Success!
OK, but what actually happened?
Let’s see what’s going on under the covers here. We’ve got a web site, and want to delegate login duties to GitHub. We’ll need to understand (and implement) three things:
1. App registration & scopes
GitHub needs to know about our web site ahead of time. Each service does this differently, but for all of them we provide a “redirect URL” to our site, and receive an app (client) identifier and secret in return. After our user successfully logs in, their browser lands back on our configured “redirect” URL. This is an important piece of the security provided by OAuth2 — GitHub will only send credentials back to that HTTPS URL on our preconfigured domain. Our site certificate helps ensure that the URL is actually “us.”
Back in our app, we need a way to know that our user is logged in, usually a cookie of some sort. When that’s missing, we start the login process by redirecting the browser to GitHub’s “authorization” URL with a few query string parameters:
The Client ID we got when we registered our site.
Our redirect URL. Most services allow you to register multiple allowable redirect URLs; this parameter lets you specify which one should be used for this request.
Our desired scopes. This needs to be either the same as, or a subset of, the scopes that were registered with your app.
A random state parameter that we’ll remember as part of the user’s browser session. This acts as a cross-site request forgery token for the exchange.
A few other random constant bits.
When the browser hits this page, GitHub presents the user with their login page (if needed), then asks them for permission to share the requested data (scopes) with your application. If all goes well, they redirect the browser back to your site via the redirect URL.
If something bad happened (like the user declined to authorize your app), an error parameter (and possibly error_description and error_uri) will give you a sense of what happened.
Your state parameter will be returned to you. If this doesn’t match what you sent to auth, abort!
A single-use code that’s just one step away from a complete login.
Your last job is to swap that code for an access token (and other things). Do this by sending it in a POST to GitHub’s token URL, along with some proof that you are really you (your client_secret) and other noise. The response will include an access_token and you, my friend, are authenticated and authorized. Store this away in your own authorization cookie or other session state and feel free to go about your business, done and dusted.
Oh wait there’s more
For many OAuth2 use cases, you don’t need anything beyond the access_token. It allows you to call APIs on the user’s behalf, so fetching health conditions from FHIR or saving documents in Google Drive is good to go. But in our social login case, we almost certainly need some kind of unique login ID or email address, so that we can recognize the user across visits. We also need this if we’re going to differentiate between types of access — e.g., maybe bob@example.com is granted admin rights on your site.
Depending on which provider you’re using, things here can start to get a little muddy. But most of the time we can use an add-on standard called OpenID Connect. First, add “openid email” to your scope parameter. This tells the provider that you’re doing an OpenID Connect login and would like to receive identifying information about the user, including their email. There are more options available, but that’s good enough for us.
Now when you call the provider’s token endpoint, in addition to the access_token you’ll receive an id_token that has the goods. The id_token is in JWT format — three Base64Url-encoded strings separated by dots. Since we’ve received our id_token from a trusted source, all we need to do is decode the middle section, which is its own JSON object that amongst other things includes:
A provider-unique token in the field sub, and
Their email in the field email.
Woohoo, we’re done! Except wait, not all OAuth2 providers support OpenID Connect. Like GitHub. Argh.
This is actually is a good example of the edge cases developers are always dealing with in the real world. Even when you do all of this correctly, a GitHub user can block their email address from public visibility. In that case it’s not included in the /user endpoint — but you can still find it using /user/emails (after all, they said you could have it when they agreed to your scope!). Always something.
Who can keep track of all these URLs?
There are tons of OAuth2 providers out there; I’ve collected deets on a few to get you started. If you use my code, all you’ll need is the Client ID and Secret; but the links are useful in case you want to roll your own. Good luck!
This stuff can change quickly, so please let me know if you find a mistake or would like me to add a new provider!
We ignored a lot!
Our implementation here is honestly pretty simple. It gets the job done — and that’s awesome — but there’s a ton more hiding underneath if you want to go there. Just for example:
PKCE
We’ve implemented the “confidential client” version of OAuth2. This version relies on the ability to keep the client secret safe, which as a server-side app we’re able to do. But OAuth2 can also be used by “public clients” that can’t keep secrets safe (e.g., because they run entirely in a browser). These apps used to use something called the implicit flow, which counts only on the security of your HTTPS certificate and predefined redirect URLs for security. That ground is a little shaky though, so current implementations have added a feature called “Proof Key for Code Exchange.” This serves as kind of the inverse of the state parameter — proving to the server that the client asking to swap a code is legit.
Refresh Tokens
Our authorization URLs include a parameter access_typewith the value online. This means that we’re just going to use our access_token for the life of the current session (or as long as the server allows us to, whichever is shorter). For Social Login this is more that enough, because we don’t really need the access_token for API access at all, except maybe in the GitHub or Amazon case where we use it once to fetch profile information.
If instead we passed offline for this parameter (and assuming the provider allows it), we would also receive a refresh_token in exchange for our code. We can use this to “refresh” our access_token whenever it expires — enabling scenarios that require long-lived API access without the security risk of forever-tokens. Maybe for something like sending an alert whenever a Google Drive file is updated. Nice!
Device Authorization Flow
There’s even an OAuth2 flow for devices that don’t have a browser or keyboard at all! The device displays a code, and then just polls waiting for an access_token to be available while the user enters the code on their phone or laptop or other device altogether. While they don’t tend to use OAuth2, you’ve almost certainly used a very similar experience authorizing apps like Netflix on a Smart TV.
OK, so now we can log in. Next!
Thanks to my snazzy new OAuth2 implementation, I can easily secure my web apps without ever writing “create table users……” again. And that is, most certainly, a worthwhile outcome. Now I can get back to that under-the-desk-app, which I’ll look forward to sharing in the coming weeks. Woot!
I want to be clear up front that I’m not a “methodology” guy. Whatever the hype, software methodology is inevitably either (a) full employment for consultants; (b) an ego trip for somebody who did something good one time under specific circumstances and loves to brag about it; or (c) both. I’ve built software for decades and the basics haven’t changed, not even once.
Make decisions.
Break big things down into little things.
Write everything down.
Use a bug database and source control.
Integrate often.
With that said, the rest of this might sound a little bit like software methodology. You have been warned!
Crossing the Ocean
I spend a bit of time these days mentoring folks — usually new startup CTOs that are figuring out how to go from nothing to a working v1 product. “Zero to Launch” is a unique, intense time in the life of a company, and getting through it requires unique (sometimes intense) behaviors. In all cases the task at hand is fundamentally underspecified — you’re committing to build something without actually knowing what it is. In bounded time. With limited resources. Who even does that? Startup CTOs, baby.
Like an ocean crossing, getting from zero to launch is a long journey that requires confidence, faith and discipline. There are few natural landmarks along the way, but there are patterns — the journey breaks down into three surprisingly clear and consistent phases:
What are we building anyways?
Holy crap this is way bigger than we thought!
Will this death march ever end?
Hopefully, one reason you have the job is that you know how to code fast and well — CTOs that can’t (or don’t) code drive me up the wall. And you’d better hire great people. But you’re going to need more than just those chops to get to launch. Each phase needs a different set of skills and behaviors; let’s dig in.
What are we building anyways?
You likely have two constituencies telling you what your software needs to do: (1) non-technical co-founders that see a market opportunity; and (2) users or potential users that want you to help them accomplish something. Each of these perspectives is essential, and you’d probably fail without them. But don’t be fooled — they are not going to give you clear requirements. They just aren’t. They think they are, but they’re wrong.
The first mistake you can make here is getting into a chicken-and-egg battle. Your partners ask for a schedule, you say you can’t do that without full requirements, they say they already did that, you point out the gaps, they glaze over, repeat, run out of money, everyone goes home. Don’t do that.
Instead, just understand and accept that it is up to you to decide what the product does. And further, that you’ll be wrong and folks will (often gleefully) point that out, and you’re just going to have to suck it up. This is why you hire program managers, because synthesizing a ton of vague input into clarity is their core competency — but it’s still on you to break ties and make judgment calls with incomplete information.
And I’m not just talking about invisible, technical decisions. I’m talking about stuff like (all real examples):
Does this feature need “undo” capability? If so how deep?
Do we need to build UX for this or can we just have the users upload a spreadsheet?
Can we cut support for Internet Explorer? (ok finally everyone agrees on that one)
What data needs to be present before a job can be submitted?
Does this list require paging? Filtering? Searching?
You get the idea. This can be hard even for the most egocentric among us, because really, what do we know about [insert product category here]? Even in a domain we know well, it’s a little bold. But there are two realities that, in almost every case, make it the best strategy:
Nobody knows these answers! I mean sure, do all the research you can, listen, and don’t be stupid. But at the end of the day, until your product is live in the wild, many of these are going to be guesses. Asking your users or CEO to make the guess is just an indirection that wastes time. Take whatever input you can, make a call, consider how you’ll recover if (when) it turns out you were wrong, and move on.
Normal people just aren’t wired to think about error or edge cases. For better or worse, it’s on you and your team to figure out what can go wrong and how to react. This is usually an issue of data and workflow — how can you repair something that has become corrupt? “Normal” people deal with these problems with ad-hoc manual intervention, which is a recipe for software disaster.
For this to work, you need to be obsessively transparent about what you’re building. Write down everything, and make sure all of your stakeholders have access to the documents. Build wireframes and clickthrough demos. Integrate early and often, and make sure everybody knows where the latest build is running and how they can try it. This isn’t a CYA move; that’s a losing game anyways. It’s about trying to make things real and concrete as early as possible, because people are really good at complaining about things they can actually see, touch and use. You’re going to get a ton of feedback once the product is live — anything you can pull forward before launch is gold. Do this even when it seems embarrassingly early. Seriously.
Transparency also gives people confidence that you’re making progress. As they say, code talks — a live, running, integrated test site is what it is. No magic, no hand-waving. It either works or it doesn’t; it has this feature or it doesn’t; it meets the need or it doesn’t. Seeing the product grow more complete day by day is incredibly motivating. Your job is to will it into existence.This is a key but often unstated startup CTO skill — you need to believe, and help others believe, during this phase.
Holy crap this is way bigger than we thought!
Once you’ve gotten over the first hump and folks have something to look at, things really start to heat up. Missing features become obvious. “Simple” tasks start to look a lot less simple. It can get overwhelming pretty quickly. And that’s just the beginning. Over on the business side of things, your colleagues are talking to potential customers and trying to close sales. Suddenly they desperately need new bells and whistles (sometimes even whole products) that were never on the table before. Everything needs to be customizable and you need to integrate with every other technology in the market. Sales people never say “no” and they carry a big stick: “Customers will never buy if they don’t get [insert one-off feature here].”
Herein we discover another problem with normal people: they have a really hard time distilling N similar instances (i.e., potential customers) into a single coherent set of features. And frankly, they don’t really have much incentive to care. But it’s your job to build one product that works for many customers, not the other way around.
During this phase, your team is going to get really stressed out, as every solved problem just seems to add three new ones on the pile. They’re going to want to cut, cut, cut — setting clear boundaries that give them a chance to succeed. This is an absolutely sane reaction to requirement chaos, but it’s on you to keep your team from becoming a “no” machine.
A useful measure of technical success is how often you are able to (responsibly) say “yes” to your stakeholders. But saying “yes” doesn’t mean you just do whatever random thing you’re told. It means that you’re able to tease out the real ask that’s hiding inside the request, and have created the right conditions to do that. It’s very rare that somebody asks you to do something truly stupid or unnecessary. Normal people just can’t articulate the need in a way that makes software sense. And why should they? That’s your job.
During this phase, you have to be a mediator, investigator, translator and therapist. Try to be present at every feature review, so you can hear what the business folks and users say first-hand. If you can’t be there, schedule a fast follow-up with your team to discuss any new asks while they’re still fresh. Never blind-forward requests to your team. Propose simpler alternatives and ask why they won’t (or will) work. Use a cascading decision tree:
What is the real ask? If you’re getting an indirect request through sales, ask them to replay the original conversation exactly — what words were used? If it’s coming from users, ask them to walk you through how they think the feature should work, click by click. Ask what they do now. What do other similar products do? Try to find other folks making the same ask — how do they word it?
Do we need to do anything? Sometimes new asks are just a misunderstanding about what the product already does. As they say in Hamilton, “most disputes die and no one shoots.”
Do we need to do something right now? Beyond just schedule, there are good reasons to delay features to “vNext” — you’ll know more once you’re live. Do we really need this for launch, or can it wait? One caveat here — be careful of people who want to be agreeable. I remember one company in particular where the users would say “it’s ok, we don’t need that,” but then go on to develop elaborate self-defeating workarounds on their own. It took awhile to get everyone on the same page there!
Can we stage the feature over time? This is often the best place for things to end up. Break the request down into (at least) two parts: something simpler and easier for launch and a vNext plan for the rest. You’ll learn a ton, and very (very) often the first version turns out to be more than good enough. Just don’t blow off the vNext plan — talk it out on the whiteboard so you don’t have to rebuild from scratch or undo a bunch of work.
Is there something else we can swap for? Sometimes yes, sometimes no. And don’t turn stakeholder conversations into horse trading arguments. But costs are costs, and if you can remove or delay something else, it makes launch that much closer. Again, you’re always learning, and there’s no honor in “staying the course” if it turns out to be wrong. Be smart.
This phase is all about managing up, down and sideways. Things will get hot sometimes, and people will be frustrated. Reinforce with your stakeholders that you’re not just saying “no” — you’re trying to figure out how to say “yes.” Remind your team that you understand the quantity-quality-time dilemma and that if there’s a fall to be taken, it’s on you not them. And tell your CEO it’s going to be OK … she’ll need to hear it!
Will this death march ever end?
You might notice that, so far, I haven’t mentioned “metrics” even once. That’s because they’re pretty much useless in the early stages of a product. Sorry. Products start out with one huge issue in the database: “build v1.” That becomes two, then four, and suddenly you’re in an exponential Heather Locklear shampoo commercial. New features come and go every day. Some are visible and quantifiable, but many are not. You are standing in for metrics at first — your gut and your experience. Read up on proton pump inhibitors my friend.
But as you get closer to launch, this balance shifts. Requirement changes slow down, and issues tend to look more like bugs or tasks — which tends to make them similar in scope and therefore more comparable. There’s some real comfort in this — “when the bug count is zero, we’re ready to launch” actually means something when you can measure and start to predict a downward trend.
But things get worse before they get better, and sometimes it feels like that downward shift will never happen. This is when the most grotty bugs show up — tiny miscommunications that blow up during integration, key technology choices that don’t stand up under pressure, missing functionality discovered at the last minute. Difficult repros and marathon debugging sessions suck up endless time and energy.
The worst are the bug pumps, features that just seem to be a bundle of special-cases and regressions. I’ve talked about my personal challenge with these before — because special-cases and regressions are exactly the symptoms of poor architecture. Very quickly, I start to question the fundamentals and begin redesigning in my head. And, sometimes, that’s what it takes. But just as often during this phase, you’re simply discovering that parts of your product really are just complicated. It’s important to give new features a little time to “cook” so they can settle out before starting over. Easy to say, tough to do!
During this home stretch, you need to be a cheerleader, mom and grandpa (please excuse the stereotypes, they’re obviously flawed but useful). A cheerleader because you’re finding every shred of progress and celebrating it. A mom because you’re taking care of your team, whatever they need. Food, tools and resources, executive air cover, companionship, music — whatever. And a Grandpa because you’re a calming presence that understands the long view — this will end; it’s worth it; I’ve been there.
I can’t promise your company will succeed — history says it probably won’t. But I can promise that if you throw yourself into these roles, understand where you are in the process, stay focused, hire well and work your butt off, you’ve got a really good chance of launching something awesome. I’m not a religious guy, but I believe what makes humans special is the things we build and create — and great software counts. Go for it, and let me know if I can help.
The beach outside our Whidbey place is amazing. There’s about twenty yards of firm sand and rocks along the shore, then a broad, flat, soft expanse of sand/mud/clay for just under 100 yards, then maybe 30 yards of firm sandbars. Beyond the sandbars, the channel drops to a depth of about 500 feet or so (the first “steps” along this drop-off are the best places to drop a crab pot).
The tide sweeping in and out over this shallow area changes our back yard dramatically from hour to hour. At the highest high tide there’s no beach at all — in the Spring whales swim just a few yards away, sucking ghost shrimp out of the mud flats. During summer low-low tides, we head out to the sand bars where you can dig for horse clams and pick up crabs hiding in the eel grass (while Copper chases seagulls for miles).
I know it sounds a bit out there, but the rhythm of our days really does sync up with the water — and it’s a wonderful way to live. “What’s the tide doing today?” is the first question everybody seems to ask as they come down for coffee in the morning. And that, my friends, sounds like fodder for another fun project.
What’s the tide doing today?
NOAA publishes tide information that drives a ton of apps — I use Tides Near Me on my phone and the TideGuide skill on Alexa, and both are great. But what I really want is something thatshows me exactly what the tide will look like in my back yard. For some reason I have a really hard time correlating tide numbers to actual conditions, so an image really helps. (As an aside, difficulty associating numbers with reality is a regular thing for me. I find it very curious.) For example, if you were to stand on the deck in the afternoon on September 30, what exactly would you see? Maybe this?
Those images are generated by (a) predicting what the tide and weather will be like at a point in time, and then (b) selecting a past image that best fits these parameters from a historical database generated using an exterior webcam, NOAA data and my Tempest weather station. So the pictures are real, but time-shifted into the future. Spooooky!
Actually, my ultimate goal is to create a driftwood display piece that includes a rotating version of these images together with a nice antique-style analog tide clock. But for today, let’s just focus on predictions and images.
Variations in pull from the Moon’s gravity on the Earth. The side facing the Moon has increased gravity, and the side opposite the moon has slightly less. Both of these cause liquid water on the surface to “bulge” along this axis (more on the closer side, less on the far side).
The same thing happens due to the Sun’s gravity, but less so. Tides are most extreme when the sun and moon “line up” and work together; least so when they are at right angles to each other.
The Earth is spinning, which combines with orbital movement to change which parts of the Earth are being pulled/pushed the most at any given time.
The Earth is tilted, which changes the angles and magnitude of the forces as the seasons change. One consequence of this is that we tend to have daytime lows in the Summer and nighttime lows in the Winter.
Weather (short-term and seasonal) can change the amount of water in a specific location (storm surges being a dramatic example).
Local geography changes the practical impact of tides in specific locations (e.g., levels present differently over a wide flat area like my beach vs. in a narrow fjord).
All of this makes it really tough to accurately predict tide levels at a particular time in a particular place. Behavior at a given location can be described reasonably well by combining thirty-seven distinct sine waves, each defined by a unique “harmonic constituent.” NOAA reverse-engineers these constituents by dropping buoys in the ocean, measuring actual tide levels over a period of months and years, and doing the math. Our closest “harmonic” or “primary” station is across the water in Everett.
“Subordinate” stations (our closest is Sandy Point) have fewer historical measurements — just enough to compute differences from a primary station (Seattle in this case). But here’s the really interesting bit — most of these “stations” don’t actually have physical sensors at all! The Sandy Point buoy was only in place from February to April, 1977. In Everett, it was there for about five months in late 1995. To find an actual buoy you have to zoom all the way out to Port Townsend! This seems a bit like cheating, but I guess it works? Wild.
You can query NOAA for tide predications at any of these stations, but unless there’s a physical buoy all you really get is high and low tide estimates. If you want to predict water level for a time between the extremes, you need to interpolate. Let’s take a look at that.
The Rule of Twelfths
Image credit Wikipedia
It turns out that sailors have been doing this kind of estimation for a long, long time using the “Rule of Twelfths.” The RoT says that if you divide the span between extremes into six parts, 1/12 of the change happens in the first part; 2/12 in the next; then 3/12, 3/12 again, 2/12 and 1/12 to finish it out. Since the period between tides is about six hours, it’s a pretty easy mental calculation that would have been good to know when I was fifteen years old trying to gun my dad’s boat through the channel off of Ocean Point (spoiler alert: too shallow).
Anyways, I use this rule together with data from NOAA and simple interpolation to predict tide levels on my beach for any given timepoint. The code is in NOAA.java and basically works like this:
The resulting list is returned to the caller as a Predictions object.
The Predictions object exposes a few methods, but the most interesting one is estimateTide, which does a binary search to find the predictions before and after the requested timepoint, then uses linear interpolation to return a best-guess water level. The resulting estimations aren’t perfect, but they are really very accurate — more than good enough for our purposes. Woo hoo!
Stepping Back
OK, let’s back up a bit and look at the code more broadly. Tides is a web app that primarily exposes a single endpoint /predict. It’s running on my trusty Rackspace server, and as always the code is on github. To build and run it, you’ll need a JDK v11 or greater, git and mvn. The following will build up the dependencies and a fat jar with everything you need:
git clone https://github.com/seanno/shutdownhook.git
cd shutdownhook/toolbox && mvn clean package install
cd ../weather && mvn clean package install
cd ../tides && mvn clean package
To run the app you’ll need a config file — which may be challenging because it expects configuration information for a Tempest weather station and a webcam for capturing images. But if you have that stuff, go to town! Honestly I think the code would still work pretty well without any of the weather information — if you are interested in running that way let me know and I’d be happy to fix things up so that runs without crashing.
The code breaks down like this:
Camera.java is a very simple wrapper that fetches live images from the webcam.
NOAA.java fetches tide predictions, augments them with the RoT, and does interpolation as discussed previously.
Running the app with the parameter “capture” tells it to call Tides.captureCurrentTide rather than running the web server. This method:
Captures the current “day of year” (basically 1 – 365) and “minute of day” (0 – 1,439). It turns out that these two values are the most critical for finding a good match (after tide height of course) — being near the same time of day at the same time of year really defines the “look” of the ocean and sky, at least here in the Pacific Northwest.
The capture stuff runs twice hourly via cron job on a little mini pc I use for random household stuff; super-handy to have a few of these lying around! Once a day, another cron job pushes new images and a copy of the database to an Azure container — a nice backup story for all those images that also lands them in a cloud location perfect for serving beyond my home network. Stage one, complete.
Picking an Image
The code to pick an image for a set of timepoints is for sure the most interesting part of this project. My rather old-school approach starts in Tides.forecastTides, which takes a series of timepoints and returns predictions for each (as well as data about nearby extremes which I’ll talk about later). The timepoints must be presented in order, and typically are clustered pretty closely — e.g., for the /predict endpoint we generate predictions for +1, +3 and +6 hours from now, plus the next three days at noon.
Armed with this stuff, the real core of the work happens in Tides.forecastTide. The first pass is in TideStore.queryClosest, which uses a series of thresholds to find images within given ranges of tide height, day of year and hour of day. We start with a very tight threshold — tide within .25 feet, day of year within 10 days and hour of day within 20 minutes. If we don’t find any, we fall back to .5/20/20, and so on from there until our last try is pretty wide at 1/120/120. If we can’t find anything at that point we just give up — hard to even squint and see that as a match. The good news is, even after collecting data for just about a month, we already succeed most of the time.
By querying in stages like this, we end up with a candidate pool of images that, from a tide/time perspective, we consider “equivalently good.” Of course we may just find a single image and have to use it, but typically we’ll find a few. In the second pass, we sort the candidates by fit to the predicted weather metrics. Again we use some thresholding here — e.g., pressure values within 2mb of each other are considered equivalent.
At the end of the day, this is futzy, heuristic stuff and it’s hard to know if all the thresholds and choices are correct. I’ve made myself feel better about it for now by building a testing endpoint that takes a full day of actual images and displays them side-by-side with the images we would have predicted without that day’s history. I’ve pasted a few results for August 30 below, but try the link for yourself, it’s fun to scroll through!
Other Ways We Could Do This: Vectors
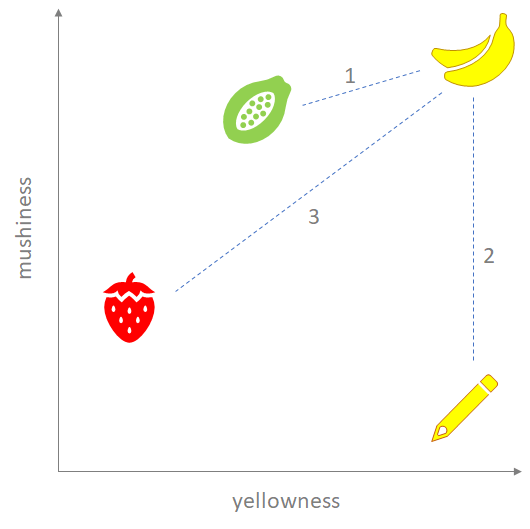
Our approach works pretty well, even with a small (but growing!) historical database. But it’s always useful to consider other ideas. One way would be to replace my hand-tuned approach with vector-based selection. Vector distance is a compelling way to rank items by similarity across an arbitrary number of dimensions; it appeals to me because it’s pretty easy to visualize. Say you want to determine how similar other things are to a banana, using the properties “yellowness” and “mushiness” (aside: bananas are gross). You might place them on a graph like the one here.
Computing the Euclidian distance between the items gives a measure of similarity, and it kind of works! Between a papaya, strawberry and pencil, the papaya is intuitively the most similar. So that’s cool, and while in this example we’re only using two dimensions, the same approach works for “N” — it’s just harder to visualize.
But things are never that simple — if you look a little more deeply, it’s hard to argue that the pencil is closer to a banana than the strawberry. So what’s going on? It turns out that a good vector metric needs to address three common pitfalls:
Are you using the right dimensions? This is obvious — mushiness and yellowness probably aren’t the be-all-end-all attributes for banana similarity.
Are your dimensions properly normalized? In my tide case, UV measurements range from 0 – 10, while humidity can range from 0 – 100. So a distance of “1” is a 10% shift in UV, but only a 1% shift in humidity. If these values aren’t normalized to a comparable scale, humidity will swamp UV — probably not what we want.
How do you deal with outliers? This is our pencil-vs-strawberry issue. A pencil is “so yellow” that even though it doesn’t remotely match the other dimension, it sneaks in there.
These are all easily fixable, but require many of the same judgment calls I was making anyways. And it’s a bit challenging to do an efficient vector sort in a SQL database — a good excuse to play with vector databases, but didn’t seem like a big enough advantage to worry about for this scenario.
Other Ways We Could Do This: AI
My friend Zach suggested this option and it’s super-intriguing. Systems like DALL-E generate images from text descriptions — surprisingly effective even in their most generic form! The image here is a response to the prompt “a photographic image of the ocean at low tide east of Whidbey Island, Washington.” That’s pretty spooky — even includes an island that look a lot like Hat from our place.
With a baseline like this, it should be pretty easy to use the historical database to specialty-train a model that generates “future” tide images out of thin air. This is exciting enough that I’m putting on my list of things to try — but at the same time, there’s something just a bit distasteful about deep-faking it. More on this sometime soon!
A Few Loose Ends
The rest of the code is just delivery, mostly in Server.java, using the WebServer and Template classes that make up many of my projects.
One nice little twist — remember that I pushed the images and database to an Azure container for backup. There’s nothing in those files that needs to be secret, so I configured the container for public web access. Doing this lets me serve the images directly from Azure, rather than duplicating them on my Rackspace server.
I also forgot to mention the Extremes part of tide forecasting. It turns out that it’s not really enough to know where the water is at a point in time. You want to know whether it’s rising or falling, and when it will hit the next low or high. We just carry that along with us so we can display it properly on the web page. It’s always small things like this that make the difference between a really useful dashboard and one that falls short.
I’ll definitely tweak the UX a bit when I figure out how to put it into a fancy display piece. And maybe I’ll set it up so I can rotate predictions on my Roku in between checking the ferry cameras! But that is for another day and another post. I had a great time with this one; hope you’ve enjoyed reading about it as well. Now, off to walk the beach!
Remote monitoring of a community water tank for under $500, that works kilometers away from wifi or cell service, incurs no monthly fees, and uses a battery that lasts up to ten years? The future is here! I’m super-impressed with LoRaWAN, The Things Network and my Milesight Sensor. Read on for all the nerdy goodness.
The Setup
Southern Whidbey Island, geologically speaking, is a big pile of clay covered by a big pile of sand. As I (barely) understand it, when glaciers moved in from the North, they plowed heavy clay sediment in front of them, which got trapped in lake beds formed when north-flowing rivers were blocked by those same glaciers. These big blobs of clay (in particular the Lawton Formation) sprung upwards as the glaciers retreated, the same way a pool float does when you climb off, creating the island. The retreat also left a bunch of looser stuff (sand and gravel) on top of the clay. Since then, tides and waves have been continually carving away the sides of the island, leaving us with beautiful high bluffs and frequent landslides. These UW field trip notes go into more and surely more accurate detail, but I think I’ve got the high points right.
Anyway, I’m lucky enough to live at the bottom of one of those bluffs. How our property came to “be” is a great story but one for another time — ask me sometime when we’re hanging out. For today, what’s important is that groundwater collects along the top of the impermeable clay layer in “aquicludes,” what a great word. And that’s where we collect our drinking water. It’s a pretty cool setup — three four-inch pipes jammed into the hillside draw water that’s been filtered through tons of sand and gravel before hitting the clay. The water is collected in a staging tank, then pumped into two holding tanks. A smaller 500 gallon one sits at house-level, and a bigger 2,000 gallon one is most of the way up the bluff.
It’s a bit janky, but gets the job done. Until it doesn’t. Like last July 2nd, two days before 30+ family and friends were to show up for the holiday weekend. The tanks went completely dry and it took us both of those days to figure out the “root” cause. See, I put quotes around the word “root” because it turns out that there were TWENTY-FIVE FEET OF TREE ROOTS growing through the pipes. Completely blocked. Clearing them out was quite a chore, but we got it done and July 4th was enjoyed by all, complete with flushing toilets and non-metered showers. All of which is just background leading to my topic for today.
LoRa / LoRaWAN
Our July 4th saga prompted me to set up a monitoring solution that would give us some advance warning if the water supply starts getting low. The obvious place to do this is the 2,000 gallon upper holding tank, because it’s the first place that goes dry as water drains down to our homes. The tank shed is too far from my house to pick up wifi, though, and while there is some cell coverage, I wasn’t psyched about paying for a monthly data plan. What to do?
It turns out that there is an amazingly cool technology called LoRa (aptly, for “Long Range”) that is tailor-made for situations just like mine. There’s a lot of terminology here and it can be tough to sort out, but in short:
LoRa is a physical protocol for sending low-bandwidth messages with very little power over very long distances. It’s actually a proprietary technique with the patent owned by Semtech, so they control the chip market. Kind of unsettling for something that is otherwise so open, but they don’t seem to be being particularly evil about it.
LoRaWAN is a networking layer that sits on top of LoRa and the Internet, bridging messages end-to-end between devices in the field and applications (e.g., dashboards or alerting systems) that do something useful with device data.
A bunch of different players coordinate within these two layers to make the magic happen. There’s a great walkthrough of it all on the LoRa Alliance site; I’m going to crib their diagram and try to simplify the story a bit for those of us that aren’t huge radio nerds:
Image adapted from semtech.com; click for original
End Devices sit in the field, broadcasting messages out into the world without a target — just signals saying “HEY EVERYBODY IT’S 100 DEGREES HERE RIGHT NOW” or whatever.
Gateways harvest these messages from the air and forward them over TCP/IP to a pre-configured…
Network Server (LNS) that typically lives on the Internet. Network servers are the traffic cops of this game. They queue messages, send acknowledgements, delegate “join” messages to a Join Server and device messages to an Application Server, etc.
Join Servers hold the inventory of end devices and applications within the larger network, and knows which devices are supposed to be talking to which applications. Join Servers also manage and distribute encryption keys to ensure minimal information disclosure. I won’t dive into the encryption details here, because yawn.
Application Servers receive device data and get them to the right Application.
Applications are logical endpoints for specific end device data. This is a bit tricky because a LoRaWAN application is different from an end-user application. There is often a 1:1 relationship, but the LRW application accepts and normalizes device data, then makes it available to end-user applications.
End-User Applications (not an official LRW term, just one I made up) actually “do stuff” with device data — create dashboards and other user experiences, send alerts, that kind of thing. End-user applications typically receive device data through a message queue or webhook or other similar vehicle.
The most common LoRaWAN use case is “uplink” (devices send info to apps), but there are also plenty of uses for “downlink” where apps send to devices: configuration updates, proactive requests for device information, whatever. A neat fun-fact about downlinks is that the network server is responsible for picking the best gateway to use to reach the targeted device; it does this by keeping track of signal strength and reliability for the uplinks it sees along the way. Pretty smart.
Picking a Network
Despite the nifty encryption model, many enterprises that use LoRaWAN for mission-critical stuff set up their own private network — which really just means running their own Servers (I’m just going to call the combo of Network/Join/Application servers a logical “Server” going forward). AWS and companies like The Things Industries offer hosted solutions, and a quick Google search pops up a ton of open source options for running your own. There are also quite a few “public networks” which, kind of like the public cloud providers, share logically-segmented infrastructure across many customers.
More interesting to me is the pretty amazing community-level innovation happening out there. The Things Stack “Community Edition” was one of the first — anybody can set up devices, gateways and applications here. It so happens that our outpost on Whidbey Island didn’t have great TTN coverage, so I bought my own gateway — but with more than 21,000 connected gateways out there, in most metro locations you won’t even have to do that. The gateway I bought grows the community too, and is now there for anybody else to use. Sweet!
Side note: I actually bought my gateway almost two years ago (part of a different project that never made it over the finish line), so it was there and waiting for me this time. But if I was starting today I might (even as a crypto skeptic, and appreciating its already checkeredpast) take a look at Helium instead. They basically incent folks to run gateways by rewarding them with tokens (“HNT”) which can be exchanged for credits on the network (or for USD or whatever). Last year they expanded this (only in Miami for now) system into cell service. I dunno if these folks will make a go of it, but I do love the idea of a “people’s network” … so hopefully somebody will!
Here’s my gateway running on The Things Network:
Picking a Device
Measuring the amount of liquid in a tank is an interesting problem. We use a standard float switch to toggle the pump that feeds the tank, turning it on whenever the level drops below about 1,800 gallons. This works great for the pump, but not for my new use case — it only knows “above” or “below” its threshold. I want to track specific water volume every few minutes, so we can identify trends and usage patterns over time.
A crude option would be to just use a bunch of these binary sensors, each set at a different height (it’s about six feet tall, so say one every foot or so). But that’s a lot of parts and a lot to go wrong — there are a plenty of better options that deliver better measurements with less complexity:
Capacitive measurement uses two vertical capacitive plates with an open gap between them (typically along the insides of a PVC pipe open at both ends. As liquid rises inside the pipe, capacitance changes and can be correlated to liquid levels.
Ultrasonic measurement is basically like radar — the unit mounts at the top of the tank pointing down at the liquid. A pulse is sent downwards, bounces off the water and is sensed on its return. The amount of time for that round trip can be correlated to height in the tank. The same approach can be used from the bottom of the tank pointing up — apparently if the transducer is attached to the bottom of the tank, the signal won’t reflect until it hits the top of the liquid-air boundary. Amazing!
Hydrostatic pressure sensors are placed on the inside floor of the tank and the relative pressure of water above the sensor correlates with depth.
A number of variations on the above and/or float-based approaches.
After a bunch of research, I settled on a hydrostatic unit — the EM500-SWL built by Milesight. Built for LoRaWAN, fully sealed, 10 year battery life, and a relative steal at less than $350. I was a bit worried that our tank would be too small for accurate measurements, but Asuna at Milesight assured me it’d work fine, and connected me with their US sales partner Choovio to get it ordered. They were both great to work with — five stars!
Setup at the tank was a breeze. Connect the sensor to the transceiver, drop the sensor into the tank, hang the transceiver on the shed wall and hit the power button. Configuration is done with a mobile app that connects to the unit by NFC; kind of magic to just hold them together and see stuff start to pop! By the time I walked down the hill to my house, the gateway was already receiving uplinks. Woo hoo!
Setting up the Application
OK, so at this point the sensor was broadcasting measurements, they were being received by the gateway, and the gateway was pushing them up to the Things Network Server. Pretty close! But before I could actually do anything with the readings, it was back to the Network Server console to set up an Application and “activate” the device. Doing this required three key pieces of information, all collected over that NFC link:
DevEUI: a unique identifier for the specific device
JoinEUI: a unique identifier for the Join Server (the default in my device was, happily, for The Things Network)
AppKey: the key used for end-to-end encryption between the device and application
Applications can also assign “payload formatters” for incoming messages. These are small device-specific scripts that translate binary uplink payloads into something usable. Milesight provides a ready-to-go formatter, and with that hooked up, “water_level” (in centimeters) started appearing in each message. Woot!
Finally, I set up a “WebHook” integration so that every parsed uplink from the device is sent to a site hosted on my trusty old Rackspace server, secured with basic authentication over https. There are a ton of integration choices, but it’s hard to beat a good old URL.
And Actually Tracking the Data
At last, we can do something useful with the data! But as excited as I am about my monitoring app, I’m not going to go too deep into it here. The code is all open sourced on github if you’d like to check it out (or use it for something) — basically just a little web server with a super-simple Sqlite database underneath. Four endpoints:
/witterhook is the webhook endpoint, accepting and storing uplinks.
/witterdata provides the JSON data underlying the chart.
/wittercheck returns a parseable string to drive alerts when the levels go low (3.5 feet) or critical (2 feet).
For the alerting, I’m just using a free account at Site24x7 to ping /wittercheck every half hour and send email alerts if things aren’t as they should be.
So there you go. There are already obvious patterns in the data — the “sawtooth” is so consistent that there must be a steady, small leak somewhere in the system below the upper tank. Our supply is keeping up with it no problem at the moment, but definitely something to find and fix! It’s also clear that overnight sprinklers are by far our biggest water hogs, but I guess that’s not a shocker.
Now I just have to figure out how to auger out the rest of that root mass. Always another project at the homestead!
This is article three of a series of three. The first two are here and here.
Last time here on the big show, we dug into SMART Health Cards — little bundles of health information that can be provably verified and easily shared using files or QR codes. SHCs are great technology and a building block for some fantastic use cases. But we also called out a few limitations, most urgently a ceiling on QR code size that makes it impractical to share anything but pretty basic stuff. Never fear, there’s a related technology that takes care of that, and adds some great additional features at the same time: SMART Health Links. Let’s check them out.
The Big Picture
Just like SMART Health Cards (SHCs) are represented by encoded strings prefixed with shc:/, SMART Health Links (SHLs) are encoded strings prefixed with shlink:/ — but that’s pretty much where the similarity ends. A SHC is health information; a SHL packages health information in a format that can be securely shared. This can be a bit confusing, because often a SHL holds exactly one SHC, so we get sloppy and talk about them interchangeably, but they are very different things.
The encrypted string behind a shlink:/ (the “payload”) is a base64url-encoded JSON object. We’ll dive in way deeper than this, but the view from 10,000 feet is:
The payload contains (a) an HTTPS link to an unencrypted manifest file and (b) a key that will be used later to decrypt stuff.
The manifest contains a list of files that make up the SHL contents. Each file can be a SHC, a FHIR resource, or an access token that can be used to make live FHIR requests. We’ll talk about this last one later, but for now just think of a manifest as a list of files.
Each file can be decrypted using the key from the original SHL payload.
There’s a lot going on here! And this is just the base case; there are a bunch of different options and obligations. But if you remember the basics (shlink:/, payload, manifest, content) you’ll be able to keep your bearings as we get into the details.
Privacy and Security
In that first diagram, nothing limits who can see the manifest and encrypted content — they’re basically open on the web. But all that is basically meaningless without access to the decryption key from the payload, so don’t panic. It just means that, exactly like a SHC, security in the base case is up to the person that’s holding the SHL itself (in the form of a QR Code or whatever). And often that’s perfectly fine.
Except sometimes it’s not, so SHLs support added protection using an optional passcode that gates access to the manifest:
A user receiving a SHL also is given a passcode. The passcode is not found anywhere in the SHL itself (although a “P” flag is added to the payload as a UX hint).
When presenting the SHL, the user also (separately) provides the passcode.
The receiving system sends the passcode along with the manifest request, which succeeds only if the passcode matches correctly.
Simple but effective. It remains to be seen which use cases will rally around a passcode requirement — but it’s a handy arrow to have in the quiver.
The SHL protocol also defines a bunch of additional requirements to help mitigate the risk of all these (albeit encrypted and/or otherwise protected) files floating around:
Manifest URLs are required to include 256 bits of entropy — that is, they can’t be guessable.
Manifests with passcodes are required to maintain and enforce a lifetime cap on the number of times an invalid passcode is provided before the SHL is disabled.
Content URLs are required to expire (at most) one hour after generation.
(Optionally) SHLs can be set to expire, with a hint to this expiration time available in the payload.
These all make sense … but they do make publishing and hosting SHLs kind of complicated. While content files can be served from “simple” services like AWS buckets or Azure containers, manifests really need to be managed dynamically with a stateful store to keep track of things like passcodes and failed attempts. Don’t think this is going to be a one night project!
SMART Health Links in Action
Let’s look at some real code. First we’ll run a quick end-to-end to get the lay of the land. SHLServer is a standalone, Java-based web server that knows how to create SHLs and serve them up. Build and run it yourself like this (you’ll need a system with mvn and a JDK installed):
git clone https://github.com/seanno/shutdownhook.git
cd shutdownhook/toolbox
mvn clean package install
cd ../shl
mvn clean package
cd demo
./run-demo.sh # or use run-demo.cmd on Windows
This will start your server running on https://localhost:7071 … hope it worked! Next open up a new shell in the same directory and run node create-link.js (you’ll want node v18+). You’ll see an annoying cert warning (sorry, the demo is using a self-signed cert) and then a big fat URL. That’s your SHL, woo hoo! Select the whole thing and then paste it into a browser. If you peek into create-link.js you’ll see the parameters we used to create the SHL, including the passcode “fancy-passcode”. Type that into the box that comes up and …. magic! You should see something very much like the image below. The link we created has both a SHC and a raw FHIR bundle; you can flip between them with the dropdown that says “Health Information”.
So what happened here? When we ran create-link.js, it posted a JSON body to the server’s /createLink endpoint. The JSON set a passcode and an expiration time for the link, and most importantly included our SHC and FHIR files as base64url-encoded strings. SHLServer generated an encryption key, encrypted the files, stored a bunch of metadata in a SQLite database, and generated a SHL “payload” — which looks something like this:
(You can make one of these for yourself by running create.js rather than create-link.js.) Finally, that JSON is encoded with base64url, the shlink:/ protocol tag is added to the front, and then a configured “viewer URL” is added to the front of that.
The viewer URL is optional — apps that know what SHLs are will work correctly with just the shlink:/… part, but by adding that prefix anybody can simply click the link to get a default browser experience. In our case we’ve configured it with https://shcwork.z22.web.core.windows.net/shlink.html, which opens up a generic viewer we’re building at TCP. That URL is just my development server, so handy for demo purposes, but please don’t use it for anything in production!
Anyways, whichever viewer receives the SHL, it decodes the payload back to JSON, issues a POST to fetch the manifest URL it finds inside, pulls the file contents out of that response either directly (.embedded) or indirectly (.location), decrypts it using the key from the payload, and renders the final results. You can see all of this at work in the TCP viewer app. Woot!
A Quick Tour of SHLServer
OK, time for some code. SHLServeris actually a pretty complete implementation of the specification, and could probably even perform pretty reasonably at scale. It’s MIT-licensed code, so feel free to take it and use it as-is or as part of your own solutions however you like, no attribution required. But I really wrote it to help folks understand the nuances of the spec, so let’s take a quick tour.
Because the manifest format doesn’t include a way to identify specific files, the admin methods expect the caller to provide a “manifestUniqueName” for each one. This can be used later to delete or update files — as the name implies, they only need to be unique within each SHL instance, not globally.
The last interesting feature of the class is that it can operate in either “trusted” or “untrusted” mode. That is, the caller can either provide the files as cleartext and ask the server to allocate a key and encrypt them, or it can pre-encrypt them prior to upload. Using the second option means that the server never has access to keys or personal information, which has obvious benefits. But it does mean the caller has to know how to encrypt stuff and “fix up” the payloads it gets back from the server.
The bottom layer of code is SHLStore.java, which just ferries data in semi-ORM style between a Sqlite database and file store. Not much exciting there, although I do have a soft spot for Sqlite and the functional interface I built a year or so ago in SqlStore.java. Enough said.
Anatomy of a Payload
OK, let’s look a little more closely at the payload format that is base64url-encoded to make up the shlink:/ itself. As always it’s just a bit of JSON, with the following fields:
urlidentifies the manifest URL which holds the list of SHL files. Because they’re burned into the payload, manifest URLs are expected to be stable, but include some randomness to prevent them from being guessable. Our server implements a “makeId” function for this that we use in a few different places.
keyis the shared symmetric key used to encrypt and decrypt the content files listed in the manifest. The same key is used for every file in the SHL.
labelis a short string that describes the contents of the SHL at a high level. This is just a UX hint as well.
v is a version number, assumed to be “1” if not present.
flagsis a string of optional upper-case characters that define additional behavior:
“P” indicates that access to the SHL requires a passcode. The passcode itself is kept with the SHL hoster, not the SHL itself. It is communicated to the SHL holder and from the holder to a recipient out of band (e.g., verbally). The flag itself is just another UX hint; the SHL hoster is responsible for enforcement.
“L” indicates that this SHL is intended for long-term use, and the contents of the files inside of it may change over time. For example, a SHL that represents a vaccination history might use this flag and update the contents each time a new vaccine is administered. The flag indicates that it’s acceptable to poll for new data periodically; the spec describes use of the Retry-After header to help in this back-and-forth.
One last flag (“U”) supports the narrow but common use case in which a single file (typically a SHC) is being transferred without a passcode, but the data itself is too large for a usable QR code. In this case the url field is interpreted not as a manifest file but as a single encrypted content file. This option simplifies hosting — the encrypted files can be served by any open, static web server with no dynamic manifest code involved. The TCP viewer supports the U flag, but SHLServer doesn’t generate them.
Note that if you’re paying attention, you’ll see that SHLServer returns another field in the payload: _manifestId. This is not part of the spec, but it’s legal because the spec requires consumers to expect and ignore fields they do not understand. Adding it to the payload simply makes it easier for users of the administration API to refer to the new manifest later (e.g., in a call to upsertFile).
Working with the Manifest
After a viewer decodes the payload, the next step is to issue a POST request for the URL found inside. POST is used so that additional data can be sent without leaking information into server logs:
recipientis a string representing the viewer making the call. For example, this might be something like “Overlake Hospital, Bellevue WA, registration desk.” It is required, but need not be machine-understandable. Just something that can be logged to get a sense of where SHLs are being used.
passcode is (if the P flag is present) the passcode as received out-of-band from the SHL holder.
embeddedLengthMaxis an optional value indicating the maximum size a file can be for direct inclusion in the manifest. More on this in a second.
The SHL hoster uses the incoming manifest request URL to find the appropriate manifest (e.g., in our case https://localhost:7071/manifest/XruV__8k1Zn68NK1lsLH05ZmONtaUC85jmAW4zEHoTA), then puts together a JSON object listing the content files that make up the SHL. The object contains a single “files” array, each element of which contains:
contentType, typically one of application/smart-health-card for a SHC or application/fhir+json for a FHIR resource (I promise we’ll cover application/smart-api-access before we’re done).
Directly, using an embedded field within the manifest JSON.
Indirectly, as referenced by a location field within the manifest JSON.
This is where embeddedLinkMax comes into play. It’s kind of a hassle and I’m not sure it’s worth it, but not my call. Basically, if embeddedLengthMax is not present OR if the size of a file is <= its value, the embedded option may be used. Otherwise, a new, short-lived, unprotected URL representing the content should be allocated and placed into location. Location URLs must expire after no more than one hour, and may be disabled after a single fetch. The intended end result is that the manifest and its files are considered a single unit, even if they’re downloaded independently. All good, but it does make for some non-trivial implementation complexity (SHLServer uses a “urls” table to keep track; cloud-native implementations can use pre-signed URLs with expiration timestamps).
* Note I have run into compatibility issues with encryption/decryption. In particular the specification requires direct encryption using A256GCM, which seems simple enough. But A256GCM requires a 12-byte initialization vector, and there are libraries (like python-jose at the time of this writing) that mistakenly use 16. Which might seem ok because it “works”, but some compliant libraries (like javascript jose) error out when they see the longer IV and won’t proceed. Ah, compatibility.
SMART API Access
OK I’ve put this off long enough — it’s a super-cool feature, but messes with my narrative a bit, so I’ve saved it for its own section.
In addition to static or periodically-updated data files, SHLs support the ability to share “live” authenticated FHIR connections. For example, say I’m travelling to an out-of-state hospital for a procedure, and my primary care provider wants to monitor my recovery. The hospital could issue me a SHL that permits the bearer to make live queries into my record. There are of course other ways to do this, but the convenience of sharing access using a simple link or QR code might be super-handy.
A SHL supports this by including an encrypted file with the content type application/smart-api-access. The file itself is a SMART Access Token Response with an additional aud element that identifies the FHIR endpoint (and possibly some hints about useful / authorized queries). No muss, no fuss.
The spec talks about some other types of “dynamic” exchange using SHLs as well. They’re all credible and potentially useful, but frankly a bit speculative. IMNSHO, let’s lock down the more simple file-sharing scenarios before we get too far out over our skis here.
And that’s it!
OK, that’s a wrap on our little journey through the emerging world of SMART Health Cards and Links. I hope it’s been useful — please take the code, make it your own, and let me know if (when) you find bugs or have ideas to make it better. Maybe this time we’ll actually make a dent in the health information exchange clown show!
Last Tuesday I got up in the morning, showered and ate some breakfast, took the dog out, did the crossword, got a new pair of eyes, took a nap, watched the Mariners game and went to bed. In case you missed that, I got a new pair of eyes. OK, new lenses to be precise, but still. The technology is amazing and of course I went down a bit of a rabbit hole learning about how it works. It’s hard to believe that we really get to live in this world — just so cool.
Normal Vision
At lot of folks know the basics of how vision work, but let’s start there anyways. Light comes in through an opening in the front of our eye called the pupil (the black part). In front of the pupil is the cornea; just behind it is the lens. Both of these are clear and serve to refract (bend) the incoming light so that it lands perfectly aligned on the retina, a grid of cells on the back of the eye that sense light impulses and send them up the optic nerve to the visual cortex, which assembles the signals into a coherent concept of what we’re looking at.
This works great to see things at a distance — like across the room or street or whatever — when the incoming light rays are almost parallel to each other. But we often need to see things that are much closer, like the words in a book. In this case the incoming light rays diverge and enter the eyes at steeper angles, causing the focal point to fall far behind the retina and blur. Evolution compensates for this by allowing us to dynamically change the shape of the lens to bring things into focus. The ciliary muscle squeezes the lens, making it fatter. This fatter lens bends the outer rays more sharply, pulling the focal point back onto the retina so we can read. Just amazing.
Fun fact, this is why squinting actually can help you see better — it’s a crude way of changing the shape of your eye structure, which can impact where the focal point falls. But squinting can only do so much, quickly tires out your facial muscles, and looks pretty goofy — so not a great long-term solution.
Nearsightedness
I started wearing glasses full-time for myopia (nearsightedness) when I was about twelve — I could see things close up, but not at distance. This happens because the eyeball itself is elongated, or because the cornea or lens is overly-refractive (too strong). Either one causes the focal point to fall in front of the retina, blurring the image received by the brain.
Hyperopia (farsightedness) is the exact opposite — flaws in the eye cause the natural focus point to fall behind the retina. Either “opia” can be fixed relatively easily by placing lenses in front of the eyes in the form of glasses or contacts. The optometrist just keeps trying different lens powers (“Which is better, A or B?”) until they find the one for each eye that lands the image perfectly on the retina at distance. Your ciliary muscle does its job for closeup tasks, and everything is back in business. Woot!
Note I’m basically ignoring astigmatism here, which occurs when flaws in the cornea or lens are asymmetric — e.g., maybe blurring only happens on the horizontal plane. This makes everything way more complicated, and I don’t have much of it myself, so I’m going to pretend it doesn’t exist. Sorry about that.
2015: LASIK
Glasses are fine, and truth be told I probably look better with them on. But they’re also annoying, especially in the rain or under ski goggles or whatever. And fully recognizing the irony of this given my enthusiasm for surgery, contacts just scare the bejeezus out of me — no way. So just about eight years ago I decided to get LASIK surgery to repair my nearsightedness. Dr Sharpe seemed like a good guy and got solid reviews, so into the breech I went.
LASIK (Laser-Assisted In Situ Keratomileusis) replaces the need for external lenses by reshaping the cornea so that it refracts properly. Because everything is always complicated, the cornea is actually made up of five distinct layers. Starting from the top:
The Epithelium is exposed to the environment and passes oxygen/nutrients to the rest of the structure. It constantly regenerates itself and contains a ton of nerves, which is why it hurts so much if you scratch your eye, as I did back in high school with plaster dust. Ouch.
Bowman’s Layer as near as I can tell basically acts as a buffer/sealer between the dynamic epithelium and more static lower layers.
The Stroma is the thickest part of the cornea (which isn’t saying much at about 500 micrometers) and where most refraction occurs.
You’ll have to research Descemet’s membrane the Endothelium yourself because they’re not relevant to LASIK.
The procedure is outpatient and other than a boatload of topical numbing drops, the only anesthesia I had was a medium-heavy dose of valium. A suction/stabilizing device is placed over the eye and the laser cuts a circular “flap” through the top two layers of the cornea. The flap is folded back to expose the stroma, the laser nibbles away at the stroma to reshape it for the correct prescription (flatter for myopia; steeper for hyperopia), and finally the flap is folded back in place.
Apparently the epithelium regenerates so quickly that the flap just heals on its own — I have read about stitches being used, but that didn’t happen in my case. The cut itself is positioned over the iris (the colored part of the eye), so even before it heals there’s no impact to your vision. The weirdest part about all of this is the burnt hair smell that is in fact the laser burning away parts of your eye. Yeesh.
But holy crap, I literally sat up in the chair post-procedure and could see great. Right away. Now of course there was some swelling and pain and stuff over the next few days … but it was one of the most shocking things that has ever happened to me, ever. Just brilliant.
Enter Presbyopia
My vision was basically perfect for about six years after LASIK. I can’t say enough good stuff about that decision, but I’m taking a long time to get to the really good part of this article, so I’ll leave it at that. Absolutely would recommend LASIK to anybody who qualifies.
But of course time marches on. Near vision starts to degrade for almost everyone sometime in their forties or thereabouts, which is why we need reading glasses and shine our phone flashlights on the menu. It’s called presbyopia, and it happens because the lens becomes less elastic and those ciliary muscles just can’t squeeze hard enough to change its shape for near focus. Folks who already have glasses start buying biofocals, and those of us with good distance vision (naturally or thanks to LASIK) start haunting the drugstore aisles for cheap readers.
A little fine print (see my eye joke there?): during my LASIK consult, I chose the “regular” version which corrects both eyes for distance. There is another option called “monovision” in which the dominant eye is corrected for distance, but the second eye is corrected for reading. That is, the second eye is adjusted so that an object in the near field is projected clearly onto the retina with the lens at rest (vs. “squeezed” as we discussed above). Typically, the brain is able to adjust and automatically swap between eyes based on what you’re looking at, which is utterly amazing.
Because the near-vision eye can focus with the lens at rest, monovision can head off presbyopia — you don’t need to change the lens shape to see close-up, you just need to use the eye dedicated to that purpose. This was tempting, but there are a few downsides, particularly (for me) some loss of depth perception since you no longer have effective binocular vision. And since LASIK removes only a tiny amount of corneal tissue, you can actually have it done more than once — I was assured that I could simply “touch up” my eyes in the future to address presbyopia or other changes if needed.
Indeed, I eventually started to need readers, and it was fine. I’m not sure why, but there was actually something kind of nice about the ritual of pulling out the glasses to read or work the crossword or whatever. That is, it was nice until I started needing them for everything. Cooking instructions on the frozen pizza? Glasses. Seat on my boarding pass? Glasses. Which direction does the HDMI cable go in? Glasses. You get the idea. When I started needing them just to snooze the alarms on my phone, I knew it was finally time to go in for the “touch up.” Procrastinated a bit more thanks to COVID and all, but finally pulled the trigger about a month ago.
After walking around the house taking pictures of everywhere I noticed readers lying around (above), I rolled up to the Sharpe Vision office for my consult only to realize that it was no longer their office — apparently in the almost-decade since I got my LASIK they moved a few streets down. A quick lookup on the phone (with readers) and I made it just in time for my appointment at their new place past Burgermaster on 112th …
… only to find that the world had changed once again. Yes, they could touch up my LASIK, and could even offer a new flavor called laser blended vision that’s like monovision but with improved depth perception. But what I really ought to check out is RLE — Refractive Lens Exchange. And since apparently I’m always up for new ways to mess with my eyes, I was totally in. Here’s the deal.
Cataracts
Along with presbyopia, over time most people eventually develop cataracts, a clouding of the lenses that makes them less able to transmit light energy. This is the other reason we’re all using our phone flashlights to read our menus. The good news is that cataracts are easily fixed by replacement of the natural lens with an artificial one.
An aside: cataracts are a major cause of correctable blindness in the developing world. Doctors Without Borders has conducted free “eye camps” in Somalia for many years and has fixed cataracts for hundreds of people who literally go from blind to normal vision in one day. If you’re able to give a bit, you’re not going to find a better organization — they are awesome.
Because we do what we do, there’s been a ton of innovation in replacement lens technology. The path of that innovation is pretty neat, and recently folks have realized that — hey — maybe these lenses are awesome and safe enough that we don’t need to wait until cataracts form to swap them in! The material lasts well beyond the fifty-odd years that middle-aged humans have before them, so why not? Thus was born the “RLE” (Refractive Lens Exchange) industry, and a new practice for the newly re-named “SharpeVision Modern LASIK and LENS.”
2023: Refractive Lens Exchange
RLE at Sharpe with Dr. Barker is pretty fancy. Even before we get to the lens itself, the procedure alone shocks and awes:
The laser cuts small entry slits through the cornea and a round opening in the front of the capsule that holds the lens.
The laser softens and segments the existing lens so that it can be easily broken up and sucked out through a small vacuum tube.
The new lens is passed into the now-empty capsule through a small tube. The lens is flexible and can be folded up so it fits through the small entry hole.
When the lens unfolds, two springlike spiral arms called haptics hold it in place in the center of the capsule.
All of this computer-assisted laser stuff is just incredible. I was awake throughout my procedure and it was pretty crazy to listen to this HAL-like computer voice announcing what percentage of my lens had been sucked out at each step.
Monofocal IOLs (Intraocular Lenses)
OK, finally I get to talk about the intraocular lens itself, which is what sent me down this rabbit hole in the first place. The old-school version of this is the Monofocal IOL, which “simply” acts just like the lens in your glasses or the reshaped cornea in LASIK, using refraction to focus images at distance onto the retina. Monofocals are the workhorse of cataract surgery, but they have some disadvantages. Primarily, since they have only one focal distance and can’t be squeezed / reshaped by the ciliary muscle, readers are basically guaranteed for close-up work. There is a “monovision” option using differently-powered lenses in each eye, but that comes with all the same issues as monovision LASIK.
Accommodating IOLs
Today there are basically two kinds of “premium” IOLs that attempt to provide a glasses-free experience. One is the “accommodating” IOL — most famously the Bauch & Lomb Crystalens. The concept makes a ton of sense — just replicate the action of our natural lens. Remember that an IOL has little springy arms called haptics that hold it in place in the eye (the orange bits in the picture here). The same ciliary muscle that squeezes our natural lens can apply force to these haptics, which are designed to change the lens shape and position in response. The rest of your vision system just does what it’s always done, and the focus point adjusts naturally.
Pretty neat, and I’m always drawn to biomimetic solutions, because evolution tends to, well, work. But while it’s a little hard to find good data, it appears that the Crystalens has seriously dropped in popularity over the last decade or so — only 10% of practitioners were using it in 2021 according to this “Review of Ophthalmology” article that claims to know. From what I can find (e.g., here) it seems that the near vision improvements from these lenses just aren’t that great, and may also decline over time. Perhaps our intrepid ciliary muscle just loses some oomph as we get older … who knows.
So at least for now, accommodating IOLs don’t seem to be the favorite child. Even the original inventor of the Crystalens has moved on to new technologies. But don’t blink (another eye joke), because there are true believers still working the problem with a bunch of new stuff in the pipeline.
Multifocal IOLs
OK, we’ve finally arrived at my lens, the Clareon PanOptix Trifocal IOL, presently the most popular of the other class of premium IOLs: multifocal. Multifocal lenses have no moving parts but instead divide up the incoming light rays into multiple focal points — two for bifocals, three for trifocals. The “distance” focus typically uses refraction — the same mechanism we’ve seen again and again on this journey. But multifocal lenses are shaped so that light entering from near or intermediate distances is diffracted to provide focus in those ranges.
Diffraction occurs when light hits a discontinuity in material. The actual math is super complicated and a bit beyond me, but at the highest level, a light wave passing through different materials (the lens itself vs the aqueous material surrounding it) creates interference patterns that ultimately bend the light in a predictable way. A multifocal lens has a bunch of concentric circles of varying heights that produce this effect — you can see them if you click to zoom into the picture of the PanOptix on the right.
The end result is that the lens creates clear images on the retina at three different distances:
Plano or “infinity” for driving and watching whales in Puget Sound (refracted).
About 24 inches for “intermediate” tasks like computer (and lathe!) use.
About 16 inches for “near” tasks like reading.
Multifocal Issues and Mitigations
If you’re paying attention, you’re probably asking the same question I did when I first learned about these things. Aren’t you now getting THREE images projected onto the retina at the same time? Well, kind of yes. But two things help you out. First, your brain is just really smart and figures it out in the same way that it does with monovision — paying attention to the stuff you are showing interest in by the direction of your gaze and other clues. More importantly, at any given time there’s usually only one of these three distances that actually has something to look at. For example, if I’m reading I’m not getting much of an image from anything behind the book. Between the two of these, your brain very quickly just makes it work.
It is amusing to experience these artifacts in real life. The most obvious one is the “halos” that appear around point light sources such as headlights or streetlights. I wish I could capture it with a camera, but you actually see the diffraction patterns — the light looks exactly like the rings on the lens itself! It’s a bit annoying — if I were a long haul trucker I might think twice about getting a multifocal — but for me it’s no big deal.
A second issue makes sense in theory, but (least so far) I’m not experiencing it in practice. With a natural lens, pretty much all of the light that comes into your eye is captured by the retina. Of course the iris opens and closes to admit an optimal amount of light, but very little of that is lost passing through the lens. With a multifocal the energy is divvied up between the focal points, plus there is some additional loss inherent in the diffractive process itself.
The PanOptix has a neat feature that tries to minimize this by “collecting” light energy at a (mostly unused I guess?) focal distance of 120cm and diffracting it in reverse so that energy helps power distance vision. The end result is that the PanOptix uses about 44% of incoming light for distance, 22% each for near and intermediate, and loses about 12% to the process. Not bad! And at least so far I can’t detect any loss of contrast or issues in lower-light situations. The effect is surely there, I’m just not aware of it.
The Hits Keep Coming
So far I’m super-satisfied with my new lenses — distance vision feels about the same as it was before, but I can read and use the phone/computer comfortably without my trusty readers. Every day my brain gets more used to the various artifacts that do exist, and my vision should stay pretty stable much until I die. Woo hoo!
At the same time, it’s clear that all three of the broadly-used lens types out there (monofocal / accommodating / multifocal) have pros and cons — none work as well as the natural lenses of a young adult. So researchers keep pushing the envelope. The latest concept I’ve read about is Extended Depth of Focus (really well-explained here). The concept behind EDOF lenses is to extend the range of distances that can provide an acceptably (if not perfectly) focused image on the retina, rather than pinning focus to specific intervals.
There are a few mechanisms being tried to product EDOF; the easiest for me to understand is the pinhole effect, which has been used in photography for years. By shrinking the hole through which light enters, you basically filter out the steeper rays that would spread out over the retina, leaving only the ones that are already mostly parallel anyways (regardless of how far they are in front of the eye). Of course this also filters out a bunch of light energy, so it’s harder to see in low-light conditions. So far these lenses have mostly been used monovision-style — one eye gets the pinhole lens and the other gets a classic monofocal.
It’ll be interesting to see how this new approach plays out. And I could easily keep digging deeper into this stuff forever — but I think we’ve covered more than enough for one article. In case it isn’t clear, I’m fascinated with attempts to repair, build on and improve the capabilities that have been so hard won by evolution over millennia. Getting new lenses and learning about the technology has been super-fun — thanks for coming along for the ride!
I’ll grant that I have a relatively nerdy social circle — but it’s still sort of shocking just how many people I know are actually doing useful and interesting things with ChatGPT. Just a sampling:
A friend in the shipping business, building a customer service bot that can coordinate in real-time between drivers and customers to fine-tune deliveries.
One in the biotech software business, exploring new ways to market and explain complex feature concepts.
Just to iterate what I’ve said before, I believe this thing is really real, and it behooves everyone to spend some time with it to build an intuition for what it is (and isn’t) good at. Like any technology, it’s important to have at least a basic understanding of how it works — otherwise folks that do will use it to take advantage of you. The fact that this technology appears to be sentient (hot take from Sean, see how I just dropped that in there?) doesn’t change the reality that people will use it to create phishing scams. Two of my past posts may help:
Anyways, all of this peer pressure got me thinking that I’d better do something important with ChatGPT too. And what could possibly be more important than creating more amusing content on Twitter? I know, right? Brilliant! So that’s what I did. And I figured I might as well write about how I did it because that might help some other folks stand on these impressive shoulders.
You’re definitely going to want to go visit @AINewsHaiku on Twitter (don’t forget to follow!). Three times a day, roughly just before breakfast, lunch and dinner, it randomly selects a top news story from United Press International, asks ChatGPT to write a “funny haiku” about it, and posts to Twitter. That’s it. Funny(-ish) haikus, three times a day.
The rest of this post is about how it works — so feel free to bail now if you’re not into the nerd stuff. Just don’t forget to (1) follow @AINewsHaiku, (2) tell all your friends to follow it too, and (3) retweet the really good ones. Be the trendsetter on this one. No pressure though.
The Code
I’ve reluctantly started to actually enjoy using Node for little projects like this. It’s super-easy to get going without a thousand complicated build/run steps or an IDE, and with a little discipline Javascript can be reasonably clean code. Have to be really careful about dependencies though — npm makes it really easy to pick up a billion packages, which can get problematic pretty quick. And “everything is async” is just stupid because literally nobody thinks about problems that way. But whatever, it’s fine.
There is not a lot of code, but it’s all on github. Clone the repo, create a “.env” file, and run “node .” to try it yourself. The .env file should look like this (details on the values later):
OPENAI_API_TOKEN=[OpenAI Secret Key]
TWITTER_API_APP_KEY=[Twitter Consumer API Key]
TWITTER_API_APP_SECRET=[Twitter Consumer API Secret]
TWITTER_API_ACCESS_TOKEN_KEY=[Twitter Authentication Access Token]
TWITTER_API_ACCESS_TOKEN_SECRET=[Twitter Authentication Access Secret]
index.js starts the party by calling into rss.js which loads the UPI “Top News” RSS feed and extracts titles and links (yes RSS still exists). xml2js is a nice little XML parser, a thankless job in these days of JSON everywhere. You’ll also note that I’m importing “node-fetch” for the fetch API; it’s built-in in Node v18 but the machine where I’m running the cron jobs is locked to Node v16 so there you go.
Talking to Chat-GPT
After picking a random title/link combo, next up is openai.js which generates the haiku.. The OpenAI developer program isn’t free but it is really really cheap for this kind of hobby use; you can get set up at https://platform.openai.com. My three haikus a day using GPT-3.5 run somewhere on the order of $.10 per month. Of course, if you’re asking the system to write screenplays or talk for hours you could probably get into trouble. Live on the edge, and make sure to add your secret key into the .env file.
In its simplest form, using the chat API is just like talking to the models via the user interface. My prompt is “Write a funny haiku summarizing this topic: [HEADLINE]” which I send with a request that looks like this:
“model” is pretty obvious; I’m using v3.5 because it’s cheap and works great.
“temperature” is interesting — a floating point value between 0 and 2 that dials up and down the “randomness” of responses. In response to a given prompt, a temp of 0 will return pretty much the same completion every time, while 2 will be super-chaotic. 0.5 is a nice conservative number that leaves some room for creativity; I might try dialing it up a bit more as I see how it goes. There is also a parameter “top_p” which is similar-but-different, typical of many of the probabilistic dials that are part of these models.
I’ve sent a single element in the “messages” parameter, but this can become quite elaborate as a way to help explain to the model what you’re trying to do. The guide for prompt design is really fascinating and probably the best thing to read to start building that intuition for the system; highly recommended.
There are a bunch of other parameters you can use that help manage your costs, or to generate multiple completions for the same prompt, that kind of thing.
The JSON you get back contains a bunch of metadata about the interaction including the costs incurred (expressed as “tokens,” a vague concept corresponding to common character sequences in words; you can play with their tokenizer here). The completion text itself is in the “choices” array, which will be length == 1 unless you’ve asked for multiple completions.
Over time it’s going to be interesting to see just how challenging the economics of these things become. Training big models is really, really computationally-expensive. At least until we have some significant quantitative and/or qualitative change in the way its done, only big companies are really going to be in the game. So while I’m sure we’ll see pretty fierce competition between the usual suspects, there’s a big risk that the most revolutionary technology of the century is going to be owned by a very small number of players.
For now, just have fun and learn as much as you can — it’ll pay off no matter what our weirdo economic system ends up doing.
And… Tweet!
Honestly I thought this was going to be the easiest part of this little dalliance, but the chaos that is Twitter clearly extends to its API. It’s bad in pretty much every way: 2+ versions of the API that overlap a lot but not entirely; four different authentication methods that apply seemingly randomly to the various endpoints; constantly changing program/pricing structure with all kinds of bad information still in the documentation. Worst of all, the API requires signed requests which pretty much makes calling their REST endpoints without a library enormously painful. Wow.
Having tried a few libraries and trial-and-errored my way through a few approaches, the actual code in twitter.js isn’t bad at all — but the journey to get there was just stupid. To try and save you some time:
You’ll get a default “Project” and “App” … scroll to the bottom of the app “Settings” and choose “Edit” under “User Authentication Settings.” Make sure you have read/write permissions selected (you won’t at first). A bunch of fields on this page are required even if you’re not going to use them — just do your best until they let you hit “Save.”
Now under “Keys & Tokens” choose “Regenerate” for “Consumer Keys / API Key and Secret” and “Authentication Tokens / Access Token and Secret” … save these values and add them to the appropriate spots in your .env file.
This will set you up to call the v2 method to post a tweet using the OAuth v1.0a authentication model. There are surely many other ways you can get things working, but that was mine. I also chose to use the twitter-api-v2 library to manage the noise — it does a fine job trying to hide the dog’s breakfast that it wraps. At least for now. Until Elon gets into a slap-fight with Tim Berners-Lee and decides to ban the use of HTTPS.
You’re Welcome!
The point of all this (beyond the excellent haiku content which you should definitely follow) was just to get some hands-on experience with the API for ChatGPT. Mission accomplished, and I’m really quite impressed with how effective it is, especially given the speed at which they’re moving. I just have to figure out how to reliably tell the model to limit content to 250 characters, because until I do that I’m not going to be able to release @AINewsLimerick or @AINewsSonnet. The world is waiting!