Being overquoted doesn’t make it any less true — I also love it when a plan comes together. Sure, victory over entropy is always temporary, but it’s still just really satisfying to bring diverse ingredients together into a whole that solves a problem or creates something new in the world.
As an aside, this is the reason I have such little patience for people who turn their noses up at “boring” enterprise problems and only want to work on whatever shiny new thing the media is excited about. Every problem is fun when you treat it an opportunity to smack down the second law of thermodynamics.
Anyways, these days many of my “opportunities” come in the woodshop; I just finished one that has brought together a ton of different techniques / steps into a result I’m pretty proud of. Just a quick post — let’s see how this pebble + driftwood + epoxy + Glowforge + LED chess board came together!
1-2. Pebbles and Driftwood Grid
A walk on the beach at Whidbey inspired this project. We don’t have a bunch of shells or glass, but we do have a ton of cool rocks — on this day the contrast between bright white quartz and dark black basalt caught my attention and basically screamed out “chess board!” So I planted my behind down in a gravel patch and started collecting pebbles in a bucket.
The idea was to create a grid using interlocking driftwood strips, then fill the strips with pebbles and lock it all in place with epoxy resin. I had a bunch of offcuts left over after milling/gluing driftwood fir blanks for a neighbor (they became really cool mancala boards!) that were perfect. Setting up table saw jigs for repeated cuts like this is great therapy (and this painters tape hack does a great job of keeping strips from getting sucked down under the blade).
3. Epoxy Fill
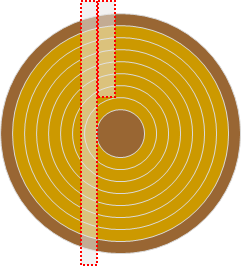
I love working with epoxy resin, but I hate polishing it. In order to make the board glass-clear top and bottom without that chore, I started with a sheet of clear acrylic and super-glued the grid on top of that. After filling the squares with pebbles I filled them to the top with EcoPoxy Flowcast. This is a nice resin for “deep” pours because it off-gasses less than other products, and doesn’t get quite as hot while curing.
However, Flowcast doesn’t “self-level” nearly as well as more traditional epoxy — the surface ends up just a bit “bumpy” which messes up the gloss. So once the squares were largely full, I turned to TotalBoat TableTop to finish it up. I used blue tape along the bottom edges of the acrylic to protect that surface from underdrips. Which worked, although removing it cleanly was a bit of a chore.
4-5. The Base and Lights
The point of using clear epoxy here was to allow light to pass through the board; just sitting on the table would ruin the effect. After trying a few different ideas, I landed on a simple Glowforge box (thanks again boxes.py) made of white oak painted with black acrylic. The board itself sits on a few braces on the inside so it sticks out about 3/8” or so above the top edge. Easy peasy!
I had some LED strip lighting left over from another project — this stuff is amazing, just snip it to the length you need, mix in 12 volts of power, and you’re off to the races. It even has adhesive backing, so I was able to stick it along the inside of the box pointing inwards. A little hole in the side for a power switch and a bit of soldering to attach a battery pack finished the job.
Almost! It turned out that with the black interior of the box, the light didn’t distribute very well — it was super-bright at the edges but not towards the middle. Not to worry — Lara found some neat adhesive mirror vinyl sheeting that bounces the light around beautifully. NOW it’s finished!
… Almost! I mean, it’s all working and awesome and that’s cool. But I realized that, especially because the board fits pretty snugly into the box, it’d be more convenient to use a power supply vs. a battery that will need to be replaced and likely get corroded after sitting too long. Amazon sells everything, so a barrel socket and power supply are jetting their way to me as I write. No project is ever really done.
And of course, a chess board without pieces isn’t much of a set. Maybe something with my new 3D printer will be the answer here. That plan will also come together — eventually!
Baseball, specifically Red SoxBaseball, was a Big Deal for kids growing up in the 1970s in suburban Boston. We all collected and traded cards, prayed to be put on the Red Sox for little league, kept score watching on channel 38, played home run derby on the neighborhood tennis court, and established infinitely complex rules to mange “ghost runners” for wiffleball games with only four players. I can neither confirm nor deny reports of ritual burnings of Yankee cards.
Anyways, there was a dice-based baseball game we used to play when we couldn’t be outside. Not the exquisitely-complicated version created by some kid in Quebec in 1979 (I was 10 and that one was a little mind-numbing), but a really simple version that just associates rolls with outcomes. I’d totally forgotten about this until it popped up on my Pinterest feed a couple of months ago. Seemed like a fun and nostalgic Glowforge project, so I started playing with designs in Inkscape. It took awhile, but I’m quite pleased with the end result, which included not just standard cutting and etching but some cool magnets and an online component as well.
Note: You may notice that the engravings are all Mariners images, not the Red Sox. My kids grew up Mariners fans, and over the last 30 years that’s made me one too. Julio!!!
The game consists of a playing field inside a finger-joint box, magnetic bases and tokens, dice (purchased!) and a mobile scoreboard app. Most of the pieces are quarter-inch two-sided white oak veneer MDF from Craft Closet (a great source BTW, they even recommend GF settings for their materials). A QR code on the pitchers mound opens the scoreboard app on a phone, which sits in landscape mode in center field. Each roll of the dice corresponds to one at-bat, according to rules etched into the bottom of the lid.
Tokens are used to represent the batter and baserunners. Outs and runs are recorded via touches on the mobile app, and honestly that’s about it. The game is simple, 100% luck-based, yet kind of entertaining. And a ton of fun to put together; I love projects that combine multiple techniques.
The Field & Tokens
The field is 10×10 inches and comprised of a few different insets — cut separately but all together in this SVG file. Creating the infield shape took forever, intersecting and unioning arcs and lines and circles in Inkscape. I am (at best) an Inkscape hack, but am continually amazed at what a stellar job it does with really complex (for me) stuff. Of course each inset needed to deal with kerf width, which I described here and won’t belabor again.
I pre-stained a piece for the outfield grass using “Dragon’s Belly Green” Unicorn Spit, and used the natural white oak for the infield. The bases and pitchers mound are 1/8” Glowforge Draftboard, which took white acrylic paint well, and since it was half the depth of the oak, left a hidden space underneath for the magnets. For those I used some amazingly strong small rare earth magnets I found on Amazon — the same ones I used for the lid of the chess board I made last year.
Unfortunately the magnets didn’t quite fit into the holes underneath first, second and third bases. I was able to snip off enough using a wire cutter, but the material is really brittle and I wrecked quite a few before I was finished. Luckily they’re cheap and, since they were hidden under the board, looks didn’t matter. A few dabs of two-part epoxy held them in place great. The pitchers mound didn’t have magnets underneath, so I padded the extra space with a bit of cork sheet I had lying around.
The tokens are simple circles cut from more white oak for the home team (34, 24, 11 and 51) and mahogany for the visitors (33, 15, 10 and 20). I’ll leave it as an exercise for you to figure out which numbers correspond to which of our favorite Mariners and Red Sox players. 😉 I used the drill press to very very carefully create a recess for magnets in the bottom of each one — careful to get the polarity right so that the tokens stick to the bases rather than jumping away from them!
The Box
The field is glued into a lidded box, which is handy for storage and keeps the dice from bouncing off the table during play. Having never built a laser-cut box before, I tried the “boxes.py” SVG generator and really can’t say enough good things about it. Choose your style, set your measurements and you’re ready to go. And because its output is a clean SVG file, it was super-easy to add engravings for the top and the dice combos.
Once again our old friend kerf is super-important to ensure a good fit, and it was a little tough to get right with thicker pieces. But my second try was a success and didn’t require a lick of glue to stay solid (the first attempt is now holding my supply of Unicorn Spit). The inset lid even snugs perfectly into place. My box was pretty simple, but there are tons of options to choose from. What a stellar resource.
Three coats of a clear satin spray polyurethane to protect the surfaces and the physical game was good go to. Now, on to the virtual!
The App
Some versions of the game use a cribbage-like setup with pegs to keep track of runs and outs. I played with that, and with manually-operated counter wheels, but really didn’t like either one. Instead I decided to build a mobile website, optimized for a landscape-mode phone, that could sit right in the box in center field. I added a little brace behind second base that should fit pretty much any phone. The pitchers mound has a QR code (I have QR Codes on the brain these days) that opens up the scoreboard app, so there’s no stupid URL to remember or lose. Just scan the code and place the phone into its nook. Works great!
The code for the app is up on github; if you have any cause to use it please feel free! It’s a ReactJS site, really nice for simple little apps like this that can be all client-side. I set things up using create-react-app, and don’t get me started on that. I literally just started with React three months ago, and CRA was (and basically still is) the default in every single “getting started” tutorial out there. But Javascript tools have the lifespan of a mayfly, and suddenly it’s deprecated. Something has got to give so that we can get developers off this new-tool treadmill, it’s just inane. Anyways.
There’s not too much to say about the app itself. Diceball.js holds the game state and logic, which is passed down to three controls: Scoreboard.js drives the aggregate and per-inning run display (tracking extra innings if necessary), OutsDisplay.js shows current outs in the inning, and ButtonBar.js handles game updates. Game state is persisted into local storage so you can resume games in progress, and a full undo chain lets you fix touch errors like double-tapping the “out” button by mistake. Because there’s no server-side processing, I was able to host it in my family Azure account simply by copying the files up to a storage account with web access enabled. Nice.
And that’s it! A lot of fun to make and to share. Until next time!
I’ve been working on myself for fifty-four years; software for about forty; kids for almost thirty; and (as Jim says) sawdust for six or so. Whatever the domain, sometimes projects go great and sometimes they, well, don’t. But it’s hard for me to think of anything I’ve tried — even the worst of them — that didn’t have some useful lesson hiding in there. That’s pretty cool.
Case in point, this little pine bowl. It actually looks ok with a little distance and soft focus:
But if you zoom in, it’s a freaking disaster in pretty much every way. First of all, there’s a ton of “tearout,” which happens when the tool catches and rips the wood fibers instead of cutting cleanly. I still have pretty lousy sharpening skills, and between that and a preference for carbide scraping tools it’s something I’m always having to watch for. I ended up with a few really rough spots, especially on the inside of the piece — it’s so tempting to think you can sand these out, but that really only goes so far. Ah well.
Next, I didn’t dry the wood well enough for the orientation and shape I wanted to create. I thought I did, but clearly not. You can see in the picture that I included the pith, and that it runs horizontally through the piece. Which looks cool, but with those straight, thin walls it cracked less than an hour after bringing it in from the garage. The big one shown in the picture and then a hairline exactly on the opposite side. Whooooops!
When I first got my lathe I had no concept of how much wood moves as it dries, and how much time it can take to stabilize. Of course this isn’t the case when you buy kiln-dried stuff at the store, but most of my material comes off of the beach and it’s hard to know how long it’s been cut and/or in the water. The most reliable method is sealing the ends with a wax or glue and waiting a year or two for it to dry naturally (the wax helps the moisture evaporate more evenly), but the oven works “ok” in a pinch.
Anyways, I often reinforce blanks before turning them, using epoxy or CA glue or a wood glue / sawdust paste. And generally that’s actually a positive for the work — like the beautiful clear epoxy voids in this bowl, one of my favorites. But once something has been turned to final shape it’s a lot harder. My next mistake was doing that repair poorly. The plan was to block off the crack using metal tape and hot glue, pour in just enough epoxy to fill the crack, and then sand it flat. Which sort of worked, except (1) the tape leaked, so there’s staining around the repair, and (2) rather than being either clear or opaque, I put in just enough black pigment to make it kind of a muddy grey. Mmmmm.
The hits keep coming! I almost exclusively use oils and waxes to finish, because the whole point of what I make is to show off the great wood that floats up on the beach (if I want a hard coat I will use epoxy coats sometimes). But for this one I wanted to experiment with traditional shellac just to broaden my arsenal a bit. Sanding sealer is a pretty typical undercoat for shellac, and I was still hoping I could hide some of those tears, so I put on a couple of coats. All good, except that when I actually sanded the sealer I left a ton of marks that I didn’t notice before locking them in with the shellac coats. Awesome.
At least that was about it. Oh, except for the drips I left in the shellac, but at least I was able to buff those out with a little work.
Not my finest hour. And yet, I’ll still put this little guy up on the shelf and in the gallery. And be happy when I see it. And even post it here for everyone to see! Next time I’ll sharpen things up better, dry the wood a little more and be more patient with the sanding. All good things.
A few weeks ago we got to spend some time in Ventura. What a beautiful spot, despite the (record, just saying) low temps and rainfall. The beach there is fantastic — uncrowded, great sand, interesting driftwood, rocks and seaglass, surfers and fisherfolk to watch, and tons of friendly dogs for Copper to play with. Nothing can top the Whidbey beach, but there’s sure a lot to love in California.
Now don’t get me wrong; I can nap in the sand with the best of them. But there is no better playground than the shore and between kites, metal detectors, sand castles, rock and shell hunting, driftwood collecting, raft and fort building … well, you get the idea. Down in Ventura I added a new activity to the list — carving whistles from bamboo driftwood. Super fun and super easy. All you need is a penknife and a chunk of bamboo, which seems to be everywhere, even up north. I guess the closed cells just float so well they get around.
Here’s how to do it and impress the heck out of every six year old in the neighborhood. Sorry if the older kids give you the “Dad head shake” — comes with the territory.
1. Find a chunk of bamboo with an intact “cell.” The hollow center is closed off wherever you see a raised band going around the outside. About a 1″ diameter piece works well, but it’s not important to be exact here. The length between the bands is also not that important, as short as 6″ will work. 10″ will start to give you a nice deep tone.
2. Cut the piece on the inside of one band and the outside of the one above it. This leaves you with a tube that is open at one end and closed at the other. If you have a saw handy that makes for quick work, but your penknife will do the job. Just make repeated, deep angled cuts in a ring around the piece and eventually you’ll carve away enough that it snaps easily. Then just clean up the edges with your knife. Being able to do the whole project with one tool is part of the fun!
3. A few inches away from the open end, cut a notch. The cut should be vertical on the side facing the open end and slope up maybe 25-40 degrees toward the back. The notch should go about a third of the way into the tube. Perfection here is less critical than you’d think so don’t worry about it too much.
Starting to look like a whistle! But if you blow into the open end now, you’ll note that — nothing interesting happens. You need to direct the flow of air so that it is concentrated onto the sharp back edge of your notch — this is where the magic happens. So….
4. Find a solid stick with a diameter a bit larger than the inside of your tube. We’re going to make a plug that goes all the way from the open end of the tube to just about the front (vertical) edge of the notch. Make a mark on the stick and start whittling it down to fit. Test a lot, because you don’t want it to get too skinny — it should fit into the tube snugly enough to stay on its own and block most of the airflow. Don’t make it too snug though or you’ll break your bamboo trying to push it in. Don’t cut it to length until you’re happy with the fit — it’s much easier to shape the plug while you still have a “handle” to hold onto.
5. Once you’ve got a good fit, shave just a bit off of one side of the plug to flatten it out, creating a channel that will direct airflow onto the notch. This is the one step that can have a big impact on the sound, so start with a small channel and keep testing it out until you get something you like. Small air leaks around the sides don’t matter as long as the majority of the air hits the notch.
That’s it, you’re done! If you want to adjust the sound, the notch and the channel are the key levers. It’s actually pretty easy to get a really rich tone; WOO HOO!
I’ve tried adding holes along the body to change the pitch (like a recorder) but have had mixed results. It works, but can make the sound a lot less consistent — I’m not quite sure what the trick is here yet. Always more to figure out and explore with this kind of thing.
PS. Bonus Dad skills: acorns and blades of grass make killer noise too, albeit a bit more shrill than the bamboo. You’re welcome!
My nephew (a pretty cool guy BTW) has started playing a lot of chess. I thought it’d be fun to make him a custom board using driftwood from the beach — it’s been too long since he’s been able to visit in person, but at least I can send a bit of Whidbey Island his way. The Glowforge made it easy to finish the job with an etched playing surface and pieces; I love the way it turned out! (I masked out his full name because he’s wisely not hanging out on social media like I am.)
The Driftwood Base
The base is a solid piece cut from a nice beach log — still a big fan of my electric chainsaw for this work! Rather than hoof it all the way back on foot, I rowed my inflatable the quarter mile down and back to the house. You can’t tell from these pics, but it was actually a crazy foggy day with visibility no more than maybe thirty yards. I did not stray far from shore.
First step was to flatten the slab. The router sled I created last year was perfect for the first side — just like with code, it’s awesome when you use something like this a second time! I then ran it through the planer until it was parallel on both sides. Next I dried the slab in the oven for about four hours at two hundred degrees. This worked ok, but there is just so much moisture in the beach wood that quick-drying creates a ton of stress on the fibers. I was able to work around the cracks that opened up, and the warp planed out ok, but I think sometime this month I’m going to cut a few pieces, give the ends a nice coat of Anchorseal, and then just leave them in the garage to dry for a year. That’s a long time and I’m not very patient, but it’ll be worth it to (mostly) eliminate ongoing cracks and warps.
After cutting the base square on the table saw, it was time to move onto the center recess for storing pieces. Originally I planned to just hollow this out, but I’m just not very skilled with detail routing yet. Instead I cut the slab in a tic-tac-toe fashion, planed down the middle piece until it was a good height, and glued it all back together. It’s amazing to me just how strong well-made glue joints can be; the wood around them will often tear before they give way. A tip from this very amateur woodworker: buy a ton of good-quality clamps; it’s just impossible to build well without them.
Last steps on the base were to (a) shave off the uneven edge created by the kerfs during the tic-tac-toe cutting, (b) use a roundover bit to route a nice edge along the top; (c) sand it all to about 240 grit; (d) embed and glue in some magnets in the corners (more on this later); and (e) apply a few coats of Tried and True finish. I used this finish for the first time because it’s popular for wooden toys, and I’m kind of obsessed with it now — a combination of linseed oil and beeswax that goes on easily, buffs well and looks and feels great. Woot!
Glowforging the base
A piece of 1/8″ MDF with a white oak veneer serves as both the playing surface and a lid for the recess inside. Etching 32 squares takes a long time (SVG links are at the end of the article)! The board is secured with some small but relatively mighty disc magnets I got from Amazon. Honestly this could have turned out a bit better, but it worked OK. The magnets are 3/8″ diameter, but I couldn’t squish them into a 3/8” drilled inset — so I went up to a 1/2″ bit and that was fine after sanding down the edges a little. I secured a pair of magnets in each corner using J-B Weld epoxy. As an aside, J-B Weld is the absolute best. Years ago at Adaptive my belt buckle broke in the middle of the day and one of the folks in the lab hooked me up. That metal-to-metal repaired joint is STILL HOLDING under stress (OK eventually I did get a new belt but that one is still my backup). Amazing.
After that was dry, I put a third magnet on each stack, dabbed some epoxy on the top, and carefully placed the board so the magnets were aligned. This was the right approach, but I kind of screwed it up. The board and base are square and non-directional, so ideally you could just drop the board down in any rotation. But because the base isn’t perfectly square (remember when I trimmed off the kerf edge? That means the final piece is about 1/8″ shorter than it is long), the magnets are actually in a rectangle, not a square. Barely a rectangle, but enough that if you rotate the board 90 degrees it doesn’t sit well.
Worse, I reversed the polarity of the magnets in one corner so if you rotated the board, two corners actually repelled each other. Ugh. The rectangle I could live with but not this, so I carefully pried those magnets out and replaced them the right way. End result — a solid “B” job. I ended up burning two little dots, one on the corner of the board and one in the matching corner of the base, to make it easy to align.
Then the pieces
Now, my nephew takes this stuff very seriously, and I think he may choose to play with his own more traditional pieces. But I wanted the set to be complete, and I just wasn’t up to trying to lathe out a full set in two different woods. After thinking about it quite a bit I ended up cutting out a set of discs based on some great creative commons art (hat tip CBurnett and note my derivative SVG files linked below are freely available for use and modification as well).
The black pieces are on an MDF with mahogany veneer; the white ones are on basswood — so there’s clear contrast between the sides. I made an extra set of each in case some got lost, and they can also be used on the reverse side for checkers (although he’s pretty much too cool for that). Unfortunately I neglected to get any pictures of these before sending the final piece off — oops!
And finally, the inset
The final touch was to line the bottom of the storage recess with an engraved cork sheet. The ones I use are 2mm thick and have adhesive on one side — really nice for these insets, bowl and vase bottoms, and so on. For this project the adhesive wasn’t quite enough, so I added some wood glue and used my daughter’s pie weights (blind bake to avoid a soggy bottom!) to hold it all in place until the glue dried.
That’s a wrap
And that’s it! Lara made even cooler stuff for our niece and it all went into a box for their birthdays. I think I like these hybrid projects the best, using the Glowforge to add details and components to a piece made with more natural materials and techniques. SVG links are below; I didn’t include the cork inlay because that was just a personal note … but good settings for the cork sheets are 1000/10% for engraving and 400/100% for an easy cut.
Thanks as always for reading; it’s almost as fun running back through the projects in my mind as it is making them in the first place. Except for all the mistakes… so many mistakes.
A few weeks ago “bentwood rings” started showing up on my Pinterest feed amongst the usual fare of woodturning and off-grid power systems (that recommendation engine knows its business). I’d been thinking vaguely about wooden rings for awhile, so went down the Internet rabbit hole to see what was up. There’s a ton of good stuff on YouTube, but this step-by-step guide was my favorite.
Bonus shot of the silicon ring Lara got me !
Bentwood rings are made by wrapping a very thin bit of wood (think veneer or shavings) around a form, gluing the overlapping layers together with CA (aka “Krazy”) glue. This basically creates plywood, with the grain running in circles around the ring. A bit complicated, but much stronger than a ring cut from solid wood, which inevitably has narrow bits with perpendicular grain that snap easily. Of course, all that glue doesn’t hurt the stability either.
Most online tutorials use purchased wood veneers, and you can get some great looking stuff that way. But one of the main reasons I love to build with wood is that I can know exactly where it comes from — material I’ve harvested myself, from a place that has meaning to me. So I chose the shavings method, starting with a branch from one of the beautiful maple trees in our Bellevue yard.
The end result isn’t an unqualified success — there are clear flaws in the finish and it’s a bit bulkier than I’d have liked. But it was a ton of fun to make, and with some practice I think I’ll be able to get it right. So I’m calling this first attempt “version 0.8” which leaves me room to take another shot. Lots of lessons to talk about!
Sourcing and forming the shavings
The first step was to secure the maple branch (green, about a foot and a half long and one inch in diameter) in my bench vise and use my new spokeshave to first flatten it out and then pull off some long curls. It’s important to keep these as even as possible so that they’ll wrap neatly — shaving is easy and fun, so take a bunch and then pick out the best. They should be thin but not translucent, and wider than the final ring will be, to account for splitting at the edges.
If your spokeshave starts to “bounce” or catch as you cut, try reversing direction — you always want to be cutting “downhill” so that you’re not bumping the blade into end grain. This is a really neat tool and just super-satisfying to use when it’s cutting cleanly.
Use medium-grit sandpaper (like 240) to smooth out any bumps or nicks in the shavings. Then sand a shallow bevel into each end so that they taper off to almost nothing. Both of these are to ensure that the layers wrap together as closely as possible to prevent crappy-looking glue pockets.
You’ll want to wrap the shavings against their natural curl — honestly I’m not sure that this matters, but it makes the smoother side of the cut face out and that’s how “they” say to do it. Your shavings may be flexible enough to just wrap them as-is, but I chose to soak mine for about fifteen seconds in hot water, loosely roll them in a loop against the curl, tape them in that position and leave them overnight. This reversed the curl so that the actual glue-up took slightly less manual dexterity.
Making the blank
Next up was wrapping and gluing the shavings into the ring blank. Find something round that is just slightly smaller than the diameter of the ring you want to make (sanding to fit is easier than trying to build up layers of finish inside) — I used a socket from my toolbox wrapped with Teflon plumbing tape. The Teflon worked OK, but next time I’m going to try plain old Scotch tape which seems like it’ll absorb a bit less of the glue. I’m also going to try a stepped ring mandrel instead of the socket, just to take some guesswork out of the sizing.
I used Starbond thin CA glue for this step, which seems to be pretty standard. First, wrap the shaving once as tightly as possible around the form. Add plenty of glue to about a quarter inch bit of shaving and then press and hold until it sets, about ten seconds or so. Soak the next quarter inch with glue, press that bit down, and keep repeating this until you’ve wrapped around the from three or four times (or a little bigger, whatever you like). Don’t be stingy with the glue, you really want it to get into the wood fibers.
Getting the wrap finished takes a bit of finger gymnastics and despite using vinyl gloves I ended up with glue all over my hands — ah the price of art. Do your best to keep the wrap even and flat so that there are no visible pockets of glue. Secure the wrap with some masking tape, drip in a little more glue from each edge, and let it cure fully — overnight should be more than enough.
Shaping and Sanding
sanded but unfinished
This part was the most fun for me. After twisting the ring off of the form, I used a thin pull saw to cut off the rough edges and my spindle/belt sander to clean up the inside and outside of the ring. I found a dowel to hold the ring securely on the lathe and then shaped the ring to what I thought was a good profile (turns out it was a little too bulky, oh well).
From there it was all about sanding through the grits — 120, 240, 400, 600, 800, 1000. I did the same on the inside of the ring by hand, which wasn’t nearly as mind-numbing as you’d expect. The surface area is small so you only need a couple of minutes with each one; I use “one pop song per grit” as my rule of thumb.
I was really pleased with the ring at this point. A little large, but the grain was quite pretty and the ring felt strong and smooth.
Finishing it Up
The last step was to put a glossy protective finish on the ring. Turns out that the most common finish is … wait for it … even more CA glue. Because I was worried about the ring sticking in this step, I bought a one-inch HDPE rod and shaped it to fit the ring (CA glue doesn’t stick well to HDPE). In the end, though, it was pretty easy to keep the glue from dripping off of the ring, so that probably wasn’t necessary.
The technique here was to get the ring rotating on the lathe at its slowest setting (about 45 rpm), apply a drop of medium-thickness CA glue to the ring, and use a toothpick to spread it over the surface, making sure to reach the edges. Let that drop cure, and repeat until you like the look of the finish. The same approach works for the inside of the ring, but since I didn’t have an easy way to lathe-mount the ring with the inside exposed, I just rotated it in my left hand while applying and spreading glue with the right. It worked just fine.
But here’s where I really messed up. First, and I could really kick myself for this, a tiny bit of black HDPE dust was left on the mounting rod after shaping it, and a couple flakes got stuck in my finish. Tiny flakes, but they look like bits of dirt — infuriating. The bigger issue is that I added too much finish with each step (2-3 drops rather than 1), and didn’t let it cure sufficiently between coats. The end result is quite a bit of clouding and a few bubbles deep in the finish. Bummer.
Forging ahead, I re-sanded the ring through the same grits plus 2000 and 3000 at the end, then buffed it out with a plastic polish and buffing wheel. The surface is beautiful, glassy and strong, but the imperfections underneath are still quite apparent. Ah well, that’s why it’s version 0.8.
Next time will be better! I took some red alder shavings from a fallen tree at the Whidbey beach and will have another go in the next week or two (and will get some better in-progress pictures). There are some great advanced techniques to try as well — adding inlays, combining different types of veneer, and so on. There is always something new to learn and try. Hope you’ll give it a shot, and please let me know if you do.
Have I mentioned how much I love our place on Whidbey Island? The ocean and animals are always present, and the house is built perfectly to take advantage of all that natural beauty. But the kitchen? Eh. I mean, it works fine, it’s just, well, ugly. The folks we bought from never found a clearance sale they didn’t love, from the dirt-brown counters to the yellowy oak cabinets to the weird pink sink. All “fine” materials on their own, but as a whole pretty nuts.
So just as most of America seems to be, we’re getting around to a renovation. Lara is a huge fan of quartz countertops from Cambria, and while I like them too what really sold me is that the company financed a whole freaking movie because, I guess, it was cool? I swear I’m not making this up; watch the trailer!
Legend of Cambria tells the story of the legendary lands that inspired our beautiful countertop designs. Each Cambria® surface is masterfully crafted by American craftsmen and women with an uncompromising commitment to quality, performance, and durability. Discover them for yourself and make your dream kitchen or bath a reality.
We also got a new sink, added a cool tile backsplash and next month those oak cabinets are getting filled and painted along with most of that side of the house. My primary job is swapping out every – single – outlet and switch so they’re all white. Someday I’ll get the circuit breakers properly labelled, but if I’m totally honest, probably not.
Anyways, with all of this fancy new stuff, our go-to approach for storing cutting boards (i.e., “jamming them in the corner”) isn’t going to “cut” it — too hard on the new paint. And sure you can buy something perfectly nice and ready-made for like $10, but I figured it’d be fun to try some new wood adventures. So that’s the leadup to my latest project — a cutting-board rack made from (of course) a random log off the beach.
The loose concept was a U-shaped piece with a high right side that would stand up against the newly-painted wall, about a 5” space for boards to slide in, and a short lip on the left side to stop them from slipping out. The tallest cutting board we have is about 12” high, and the full counter depth is 25” — about 22” long fits well. I wanted to have the tops be opposite live edges from the same log, so it kind of looked like I just folded up a single plank. Some people do really really neat waterfall pieces matching grain and everything — nothing so elaborate from me, just a little touch.
First step was to source the material. Other than being big, the log I picked wasn’t particularly notable — enough time out in the water to acquire some character and staining, but not so long that it had too much damage. Most importantly, there was an end poking out of the pick-up-sticks pile that I could cut safely.
Milling is complicated
There are a number of different ways to mill logs into boards — and it’s one of those topics where the web can confuse as much as educate. Dunn Lumber created a great video describing the different cuts and grains. In short, if you look at the end of a board you’ll generally see one of three patterns in the grain:
“Plain Sawn” boards have shallow angles (typically < 30 degrees) that curve and look like smiles or frowns.
“Quarter Sawn” boards have straighter-looking grain at 30-60 degree angles.
“Rift Sawn” boards have near-vertical grain (60-90 degree).
These different patterns impact the “stability” of the wood (whether it tends to warp while drying) and the look of the faces of the board (this depends a lot on species, but plain sawn boards tend to have broad wavy “cathedral” markings on the faces while quarter and rift sawn boards tend to have regular, straighter bands). The complicated part is that terms used to describe the method of cutting overlap and conflict with those used to describe the end-product. There are some great pictures of cutting methods on this site; but in short:
“Plain sawing” creates all plain sawn boards, with lower stability but the least waste. Most building material is created this way. Sometimes people confuse this term for “flat sawing” which is effectively live sawing but with trimmed edges.
“Rift sawing” (sometimes called “radial”) extracts only rift sawn boards, maximizing stability but wasting the most material. It’s used for things like high-end flooring.
“Quarter sawing” is a compromise that results in a mixture of quarter sawn and rift sawn boards. Most higher-quality boards are cut this way.
“Live sawing” results in boards of all three types and leaves the natural edges on the boards. Live sawing is a more recent trend and super-popular in the artsy world.
Anyways — for my project, I wanted something that would look nice, but also had to consider stability because I was going to dry the wood quickly in the oven — significant warping would be a big hassle. I wasn’t worried about wasting material (this is just a log that washed up on my beach after all), so I cut two boards as shown in the diagram to the right; one full-width that was mostly quarter sawn (while still giving me my matching live edges) and one shorter one (for the bottom) that was rift sawn.
I made the cuts all by hand with the chainsaw, which was a fun challenge. I jammed the blade a few times on the lengthwise (rip) cuts, because the damp wood shredded more in that direction, throwing long fibers into the drive wheel that eventually gummed things up (you can see some of that at the base of the blade in the picture). Apparently you can buy dedicated ripping chains (e.g., this one) and I definitely should get one, but I muscled through it with only a little bit of foul language.
Drying and refining
This particular log has seen some float time — so getting it dry was key. It turns out that three hours in the oven at 200 degrees does a great job (hat tip to https://splitwoodclub.com/how-to-dry-wood-in-an-oven-a-practical-diy-guide, although the quick synopsis is “put it in the oven for a while”). Evaporating old seawater does have a bit of a distinctive smell, but hey beauty is pain. I’m going to be using this technique a lot for smaller pieces going forward.
The wide board just barely fit through my benchtop planer, but eventually I got it down to a nice looking ¾” thickness. I planed the second piece to ½” and then sanded them both up to 120 grit. I was actually pretty impressed with the quality of the wood — just one soft spot I had to stabilize with a little bit of CA glue, and some really nice grain and color. I totally can understand why people like to work with unblemished high-quality wood, but I’ll take the quirky and unique stuff from my backyard every time. A few passes through the table saw and all was ready for assembly.
Joinery, also complicated
OK, time to put this thing together. The rack has two joints, both against the base plate — one for the tall piece that stands up against the wall, and one for the short side that stops boards from sliding off. Just as with milling, wood joinery is way more complicated than it seems on the surface. There are dozens of different ways to connect two pieces of wood, and countless online debates about their relative merits. I am never going to be a finish carpenter, but picking the wrong joint can be pretty catastrophic, so I’ve tried to at least learn the basics.
Most important is to understand what stressors are going to act on the joint. That is — what forces will be trying to make it fail and where are they coming from. The first joint any kid in their garage learns is the “butt joint” (heh)— just putting two pieces of wood next to each other and fastening them with glue. Super-easy, but by far the weakest of all approaches because the holding force is exclusively along one plane — in this example picture, downward force (in green) is no problem (the glue is barely doing any of the work anyways) but any significant force from the side (in red) will quickly break the joint. The taller the vertical piece (and thus the longer the lever), the easier it will snap.
Because of this, most butt joints are reinforced with some secondary fastener that increases holding force and, ideally, does so across multiple planes. In home construction, butt-joined studs are often “toed-in” with nails hammered in at an angle. Doesn’t look great, but studs are hidden anyways. In some cases screws parallel to the joint can work, although they have to be pretty long to do much good. For finish carpentry (furniture, etc.) where the joint will be visible, hidden biscuits or dowels can be used.
The joinery arms race really starts accelerating from there. Laps, dadoes, rabbets, mortice and tenons, dovetails and boxes — many of which are not just stronger than butt joints but actually add to the aesthetics of a piece. Joinery really is an impressive craft and a solid lifetime’s work and I am in awe of the folks that even begin to master it.
Our little stubby joint is easy-peasy. Because it is so short, there won’t be much torque against it, and we have the luxury of a hidden surface on the bottom of the piece, so a simple glued butt joint reinforced with screws from the bottom does the job perfectly well. Countersinking the screws ensures that nothing will scratch the surface the rack sits on. I didn’t even bother to plug the holes, although maybe I should have.
Pocket-hole screws
The tall piece was another matter entirely — it will be subject to a bunch of lateral force, all dependent on a single narrow ¾” joint. Yikes! After considering a bunch of options, I chose to take my first swing at a reinforced technique called a “pocket-hole screw.” These have been around forever, but became really popular with the DIY set in the 1990s when Kreg introduced a jig system that made them braindead easy to create. There are a bunch of options; I chose the middle-of-the-road “K4” version.
A bit like that toed-in nail in a stud, the pocket-hole technique joins two pieces with a fastener inserted at a shallow angle (typically 15 degrees). The fastener is a special self-tapping screw that provides a ton of holding force, embedded into a “pocket” that can be easily hidden beneath a wooden plug. The hole is drilled using a special bit that leaves a flat lip for the screw head to sit on and drives the pilot hole just to the edge of, but not through, the first piece — avoiding splinters that could create gaps between the pieces. Despite all of this detailed engineering, the jig is really easy to use:
Start with the Kreg online Screw Selector to verify jig settings; for simple joints this isn’t really necessary but nice to have a double-check. Remember to use true dimensions for the calculator, not “as-sold” nominal ones.
Set the drill guide depth in the jig and lock in the set screw.
Position and tighten the stop collar on the drill bit using the measuring guide on the jig body.
Clamp the piece to be drilled into the jig.
Drill until the stop collar hits the top of the jig. If you’re not using a vacuum attachment, move the drill in and out so that dust doesn’t jam up the hole.
Position and clamp the joint, then use the long square-drive bit to drive the screw until it is fully seated. Keep the clutch low so you don’t over-tighten and break through the bottom of the second piece.
Put a bit of glue onto a plug and insert it into the pocket. When the glue dries, use a flush-cut saw to trim the plug and sand it even with the surface of the piece.
Tah dah!
There are a lot of “proprietary” pieces in the Kreg jig, and typically I shy away from that kind of thing — but this is one really well-designed. Worth it and highly recommended. The joint in the rack is rock solid and should stand up to a lot of everyday hard use. Love it!
Finishing it up
Since cutting boards are going to slide in and out of this piece every day, it needs something more than my typical oil finish. Lara wanted to keep the natural color of the wood, so I picked a fast-drying semi-gloss spray polyurethane. Four coats seem to be a good thickness, but I may have to insert a bit of acrylic or something on the bottom anyways, we’ll see how it holds up.
I don’t use this kind of surface-coating finish very often — it turned out to be really important to do a final sanding and buff to get a nice feel and shine to the wood. The amount of dust that settles on a drying finish is kind of crazy; maybe I need a clean room!
A few little sticky rubber feet to keep it solid on the counter, and that’s a wrap — a fun project and I learned a lot. Which is good, because when you spend like ten hours building something you can buy online for less than a Jackson, you’d better at least be having fun. W00t!
PS. Completely unrelated bonus image of the beach swings I just finished setting up this afternoon. Who doesn’t love a good swing?
As a present for my wife this year, I made a set of heart-shaped coasters to commemorate key times/places in our past — where we met, were married, adopted pets and had kids. Each coaster has a map, a heart inset at the key location, and a description on the back. It was a fun project using a few techniques I thought others might find useful, so just a quick post to walk through it.
I used 1/4″ MDF with maple veneer but the engraving covers the full front of the coaster so you could really use any light-colored wood with minimal grain pattern (you kind of want a blank canvas). The heart insets are translucent red 1/8” acrylic, actually part of a pack I actually got for Valentine’s last year! I was worried that insetting the half-thickness acrylic into the coaster might be an awkward fit, but it worked great. The backs are 2mm adhesive cork that I use a lot for tabletop projects.
The Hearts
I started with a simple vector heart shape and scaled it to the target size of the coaster (4.5” square works for most mugs and glasses). I then scaled copies to three additional sizes:
One inset 1/8” for the cork backing.
A small one 1/2″ square for cutting the hole for the inlay.
The small one outset .007” for the acrylic, which (when flipped over) made a snug fit into the hole.
I use Inkscape for most of my designs. Inset/outset from the “Path” menu is the freaking best feature ever — the only trick is that the size of each step is a global setting, so be sure to double-check under Edit / Preferences / Steps / “Inset/Outset by” to be sure it’s what you want. Seven thousandths of an inch is about perfect for the kerf I get on most 1/8” and 1/4″ wood and acrylic. I’m sure it varies a little but not enough to worry about. Remember to flip the insert over before pressing it in, which takes care of the every-so-slightly-conical cut you get from the laser.
The Maps
OpenStreetMap is a fantastic resource — community-produced and openly licensed, even for commercial distribution (attribution is required; see their guidelines for details). There are a bunch of ways to use the data; this is the process I finally worked out for my purposes:
Navigate to the area you want to capture and zoom in/out as needed.
Export the map as a PDF:
Click the “share” button on the right side of the screen.
Check the “Set custom dimensions” checkbox and select the desired area. Select more area than you need; it provides some wiggle room and we’ll clip it out later.
Set the format to “PDF”.
Play with the “Scale” setting to get a final image that works for you. I found it easiest to start with 1:5000 and adjust from there.
Click Download.
Open the PDF in Inkscape and make edits (remove landmarks, reposition street names, etc.) if needed.
Paste your shape (in my case the 4.5” heart) and position it over the map.
“Select All” and choose Object / Clip / Set to clip the map to your shape.
Optional: I pasted in another copy of the 4.5” heart with a wide stroke, which made a nice outline.
Under the File menu, choose “Export PNG Image”. Make sure “Drawing” is selected at the top and then export.
Finally, open the new PNG file in Inkscape, add additional elements (i.e., the cut lines for the heart and inlay hole) and save as an SVG ready for the Glowforge.
All that work to massage the map into a bitmap (PNG) is worth it — the Glowforge handles the engraving super well.
Printing and Assembling
Printing requires three Glowforge runs, one for each material. For the wood, I used the “Thick Maple Plywood” settings and they worked great, engraving with Draft Photo / Convert to Dots with default settings except two passes instead of just one. The acrylic worked fine as “Medium Red Acrylic”. For the cork I configured “uncertified” material with a height of 2mm; engrave at speed 80 / power 10% and cut at 400 / 100%.
After pressing in the inlays, I poured on two coats of TableTop Epoxy, sanded off the drips, stuck on the cork backs, and that’s a wrap.
I really love working with the maps — such a neat way to personalize stuff. Hope folks will get some use out of the technique, and if you give it a try, let me know if I can help out. Kachow!